Running Mail Merge Via Action Wizard
AutoMailMerge plug-in for Adobe® Acrobat®
- Introduction
- This tutorial shows how to run mail merge via the Action Wizard using the AutoMailMerge™ plug-in for the Adobe® Acrobat®. The Adobe Acrobat® Professional DC offers a powerful way for automating repetitive tasks. This functionality is called “Action Wizard”. It is also known as “Batch Processing” in previous versions of Adobe Acrobat (prior to version X). It allows to define a series of PDF document processing commands (called "actions") with specific settings and in a specific order. Actions can be applied to one or more files, or to an entire content of the folder. Once an action is created, it can be executed either manually from the toolbar or from a command-line batch file using AutoBatch plug-in. It is possible to pre-configure mail merge operations with the settings and specific PDF form for a single-click execution.
- The tutorial also shows how to put a button on the Quick Tools bar to run a mail merge with pre-defined set of parameters.
- Prerequisites
- You need a copy of the Adobe® Acrobat® along with the AutoMailMerge™ plug-in installed on your computer in order to use this tutorial. You can download trial versions of both the Adobe® Acrobat® and the AutoMailMerge™.
- Step 1 - Open A PDF Form
- Start the Adobe® Acrobat® application and open a PDF form that you wish to use as a template using "File > Open…" menu.
.PNG)
- Step 2 - Open The "Mail Merge" Dialog
- Select Plugins > Mail Merge… to open the Mail Merge dialog.
- If you are using a new Adobe Acrobat interface, then you can locate Mail Merge menu here:
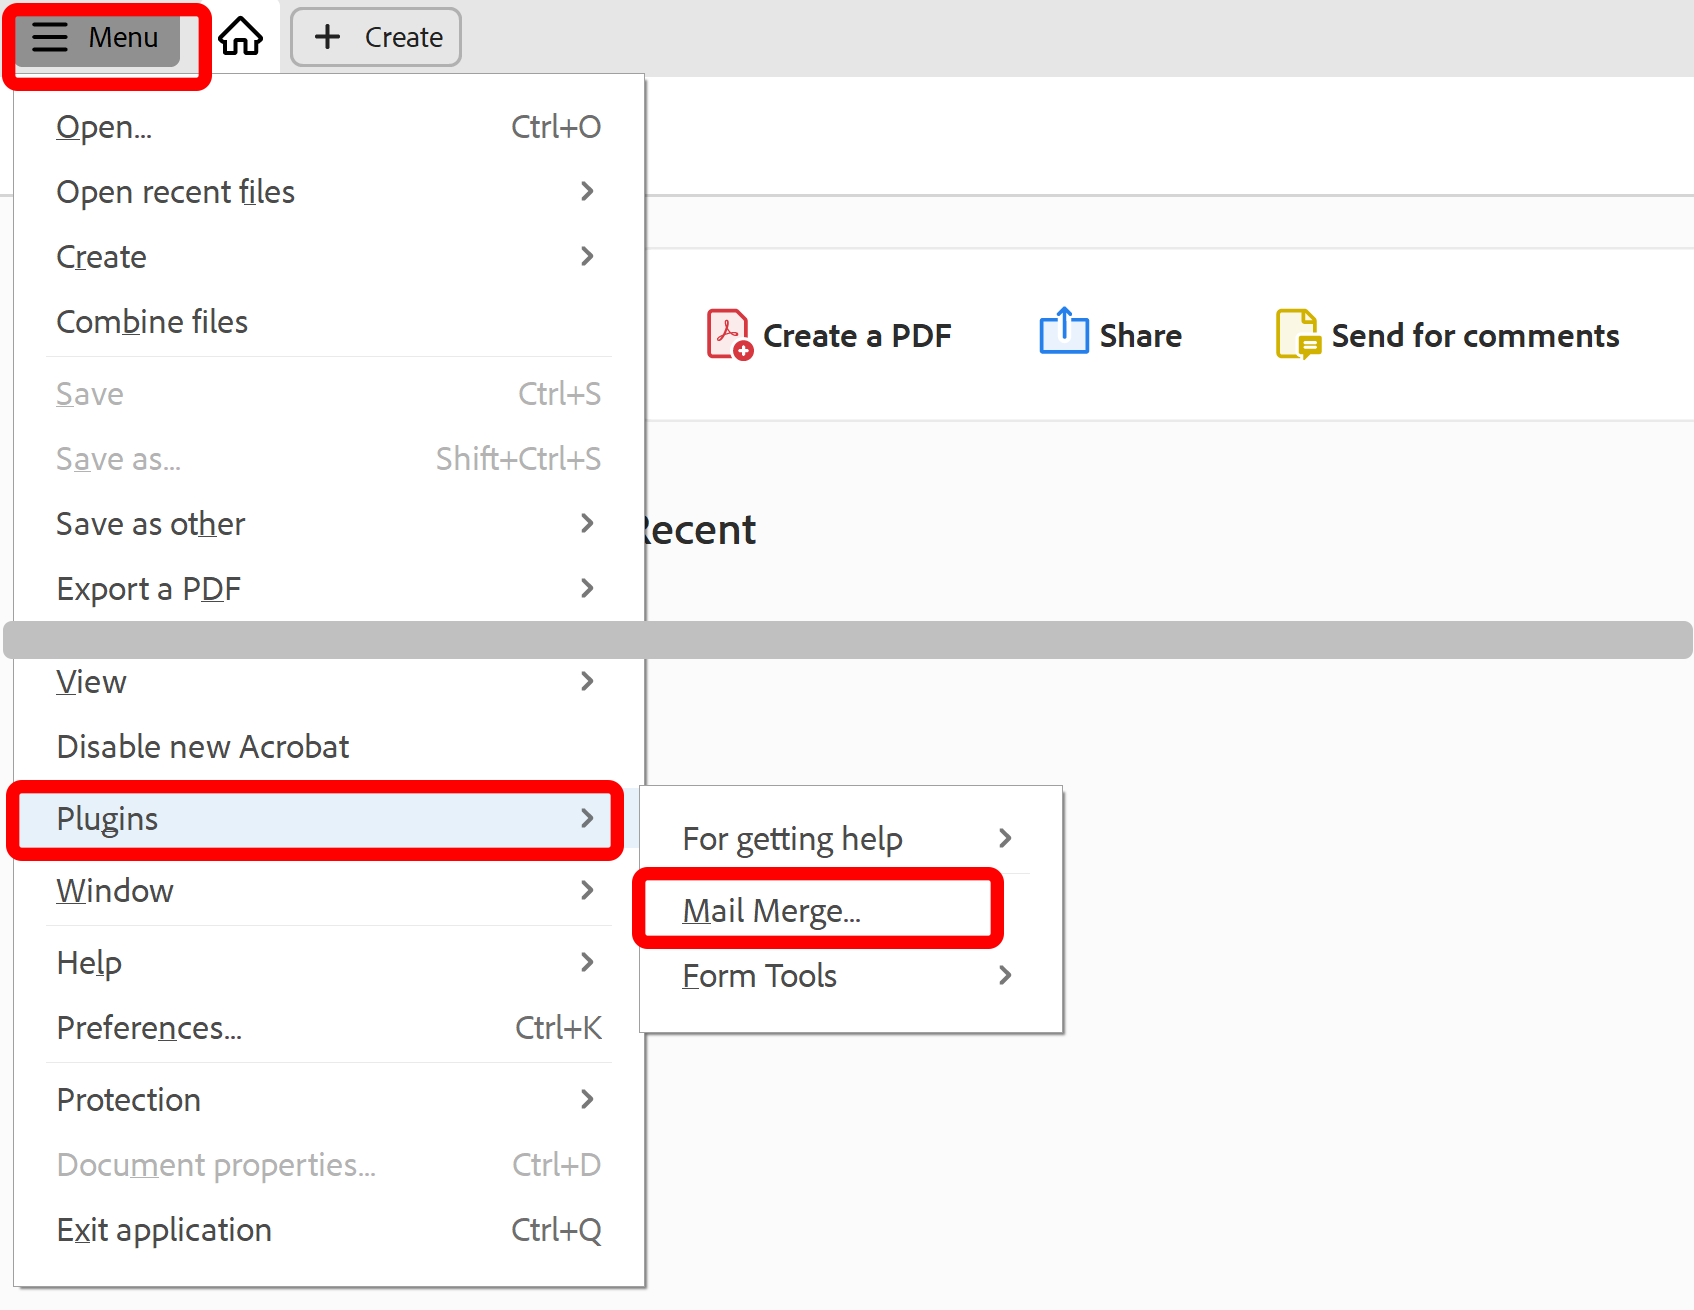
- Please see the following page for a short video tutorial on how to locate Plugins menu in the new Adobe® Acrobat® interface.
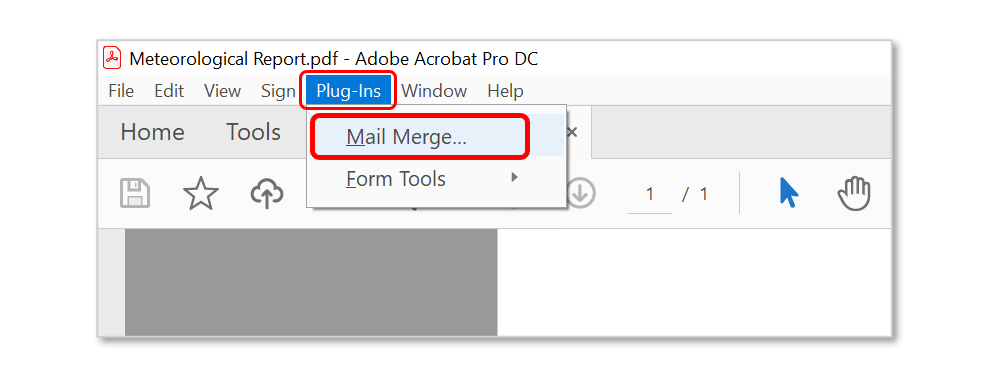
- If you are using a "classic" Adobe Acrobat interface (pre-2022), then you can locate Mail Merge menu here:
- Step 3 - Configure Mail Merge Operation
- Press the "Edit Settings..." button and configure mail merge operation according to the project requirements. See the tutorials that shows how to configure mail merge settings.
.PNG)
- Step 4 - Save Mail Merge Settings
- Press the "Save Settings..." button and save your current mail merge configuration into a settings file (*.mms).
.PNG)
- Specify a folder and file name. Click "Save".
.PNG)
- Step 5 - Close The "Mail Merge" Dialog
- Click "Cancel" to close the "Mail Merge" dialog. Optionally, close PDF form.
.PNG)
- Step 6 - Start The Action Wizard
- Select "Tools" panel located on the main Adobe® Acrobat® toolbar. Double-click on the "Action Wizard" tool icon.
.PNG)
- Step 7 - Create New "Action"
- Click on the "New Action" icon on the "Action Wizard" toolbar to create a new batch processing "action".
.PNG)
- Step 8 - Expand the "More Tools" Category
- Click on the "More Tools" category to see the list of available commands.
.PNG)
- Step 9 - Add The "Mail Merge" Command To The Action Steps
- Double-click on the "Mail Merge" command or press "+->" button to add it to the list of action steps.
.PNG)
- Step 10 - Click "Specify Settings"
- Uncheck the "Prompt User" option (otherwise this command would always prompt for settings when executed). Press the "Specify Settings" button to open the "Mail Merge" settings dialog.
.PNG)
- Step 11 - Load Mail Merge Settings
- Load previously saved mail merge settings via the "Load Settings..." button.
.PNG)
- Select previously saved *.mms file and click "Open".
.PNG)
- Step 12 - Close The "Mail Merge" Dialog
- Click "OK" to save settings and close the "Mail Merge" dialog.
.PNG)
- Step 13 - Save The Action
- Press the "Save" button to proceed.
.PNG)
- Step 14 - Type An Action Name And Description
- Type an action name and description in the "Save Action" dialog. Press the "Save" button to save the action.
.PNG)
- Step 15 - Select Action For Execution
- Now you should see this new action added to the "Action Wizard" toolbar. Click on the action in the "Actions list" to execute it.
.PNG)
- Step 16 - Select Input PDF Form
- Click "Add Files…" and select PDF form to use as a template for the mail merge.
.PNG)
- Step 17 - Start The Action
- Press the "Start" button to execute the action for selected file(s).
.PNG)
- How To Pin Desired Action On The Quick Tools Bar?
- It is always a good idea to add frequently executed action on the Quick Tools Bar for a quick access. Once added to the Quick Tools bar this action will be always just one click away.
- Option 1
- Step 1 - Open The "Customize Quick Tools" Dialog
- Select "View > Show/Hide > Toolbar Items > Customize Quick Tools…" to open the "Customize Quick Tools" Dialog from the main Adobe® Acrobat® menu.
.PNG)
- Step 2 - Expand The "Action Wizard" Category
- Expand the "Action Wizard" category from the "Choose tools to add:" list to see available actions.
.PNG)
- Step 3 - Add Desired Action To The Quick Tools Bar
- Select desired action to be added to the Quick Tools bar from the list. Click the "+" button.
.PNG)
- Step 4 - Save The Changes
- The action icon will appear in the "Tools to show in Toolbar:" field. Click "Save" to save and exit the "Customize Quick Tools" Dialog. Now the action button is added to the Quick Tools bar.
.PNG)
- Option 2
- Open The Action Wizard toolbar while any PDF file is opened. Select desired action from the "Action List" and drag it to the Quick Tools bar.
.PNG)
- Now the action button is fixed on the Quick Tools bar.
.PNG)