Extracting Pages with Text Patterns (Invoices by Multiple States Example)
AutoSplit plug-in for Adobe® Acrobat®
- Introduction
- This tutorial explains how to extract specific pages from a large PDF containing multiple combined documents. These could be a collection of anything from invoices, to mailing labels or receipts. The AutoSplit plug-in can be used to search for specific criteria that always occurs in the same page location. This specific text could be names, ID numbers or components of addresses that always follow the same pattern. Pages that contain the required text or pattern can then be extracted into a separate PDF file. This file can also be named according to the user’s requirements.
- Sample Document Description
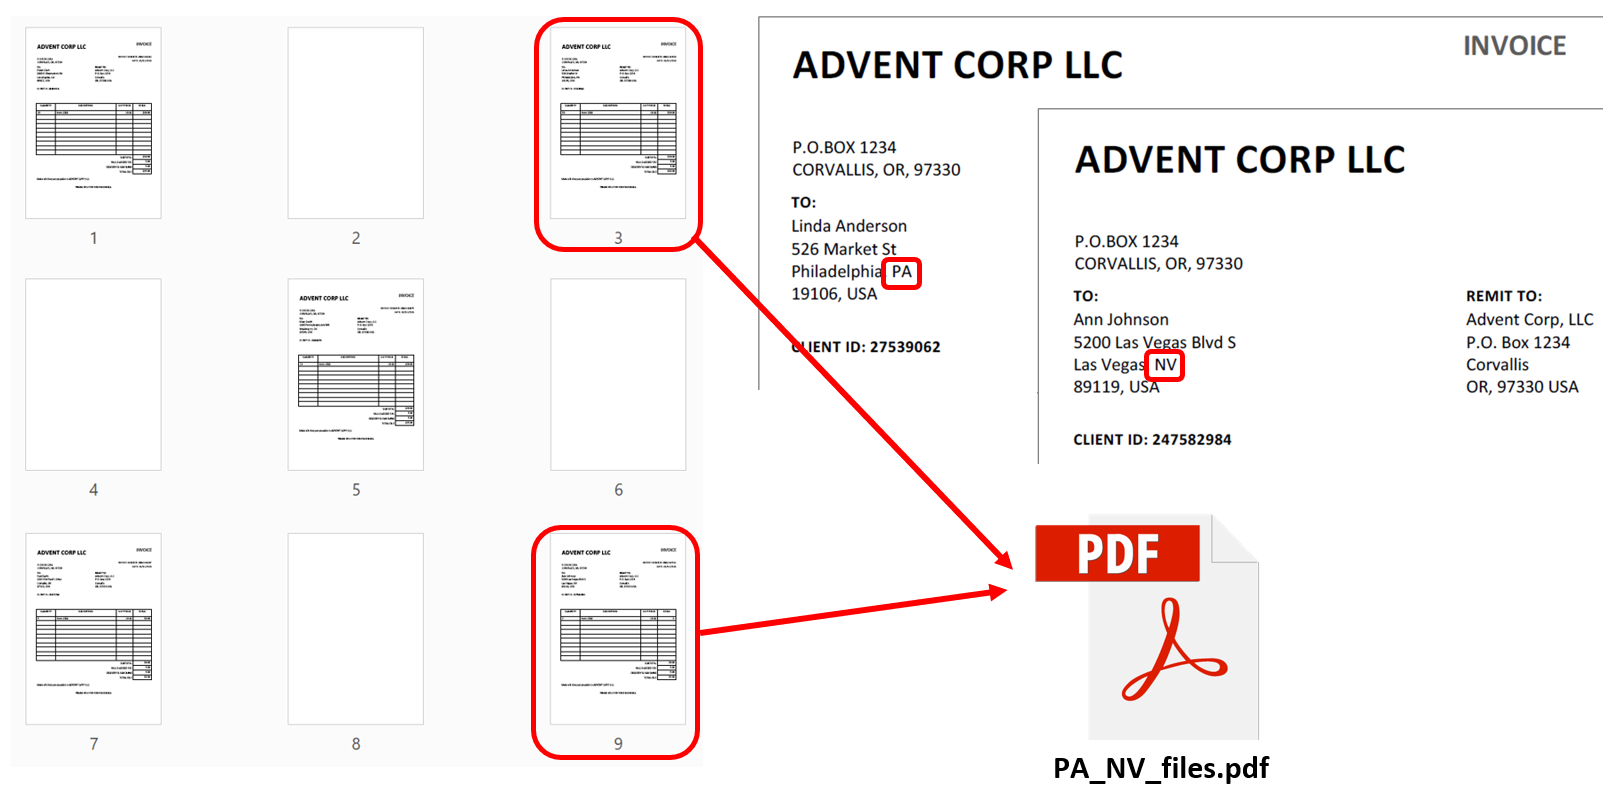
- The sample PDF document used in this tutorial contains multiple invoices. These are addressed to various states, and are also separated by blank pages. The goal is to automatically extract the invoices addressed to specific states into a smaller PDF document. This method only extracts the pages containing the required text - also avoiding blank pages. In this example, we will extract invoices with addresses containing only the CA, DC and NV state abbreviations. This abbreviation is always placed in the same location, as all the invoice addresses feature the same format. We will use the “Manually Defined Page Ranges” method to specify the desired text pattern. The pages to be extracted can be located anywhere in the input document and not necessarily in continuous order.
- Batch Processing Support
- Automate this operation using Guided Actions (aka Action Wizard) tool to process PDF files using the same parameters with only one click.
- Prerequisites
- You need a copy of Adobe Acrobat Standard or Professional along with the AutoSplit™ Pro plug-in installed on your computer in order to use this tutorial. You can download trial versions of both Adobe Acrobat and AutoSplit™ Pro.
- Step 1 - Open the PDF Document
- Start Adobe® Acrobat® and open the necessary PDF document using "File > Open…".
- Step 2 - Open the “Split Document Settings” Menu
- Select “Plug-ins > Split Documents > Split Document…” from the main Acrobat®
menu to open the “Split Document Settings” dialog.
[⚡ How to locate Plugins menu in Adobe® Acrobat® ⚡] - Step 3 - Select Splitting Method
- Check the “Use manually defined page ranges” box to select a splitting method.
- Click the "Add Output Document" button to define a new output document. The "Specify Page Ranges" dialog will appear on the screen. We are going to create a single output document that is going to contain all pages matching the search criteria.

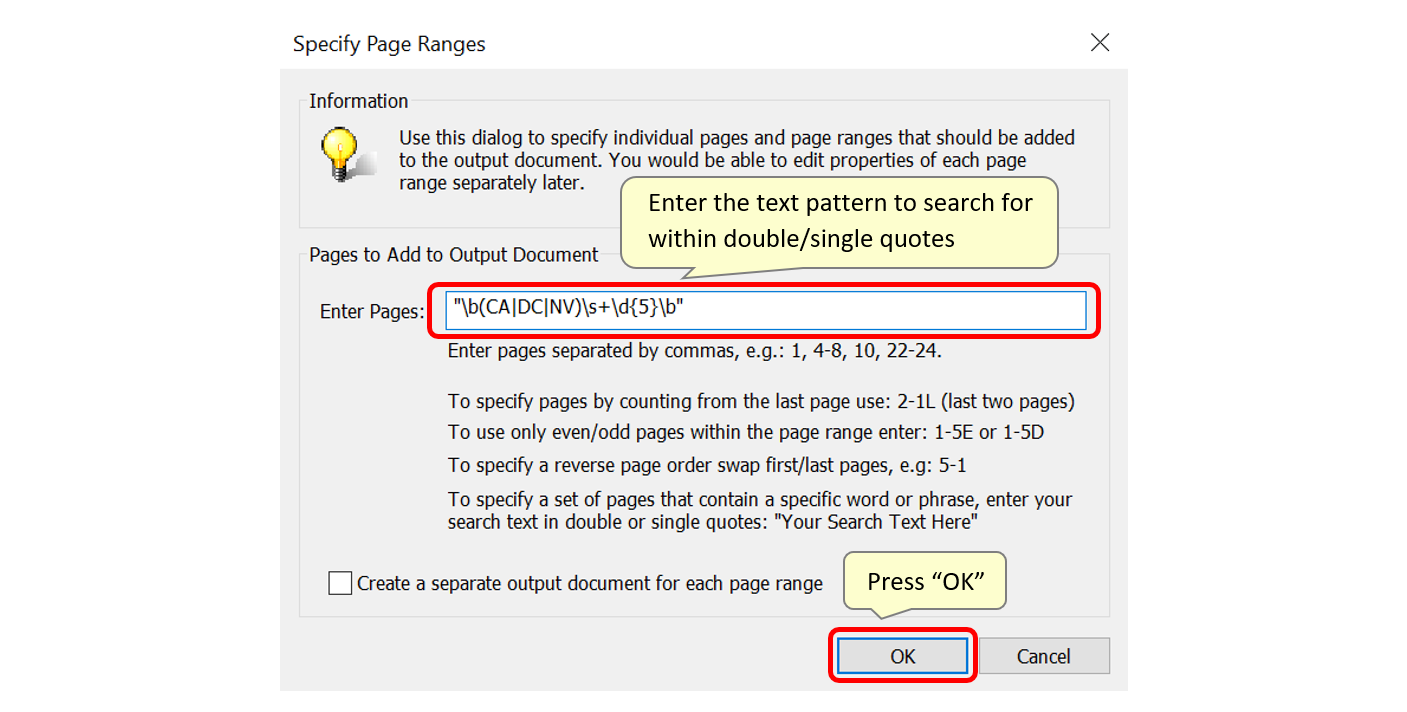
- Step 4 - Enter a Text Pattern
- Enter the search pattern you want to use within double quotes in the “Enter pages” box.
- We are going to search for invoices addressed to specific states in this tutorial (CA, NV & DC) using the \b(CA|DC|NV)\s+\d{5}\b search pattern. Regular expression syntax can used to search for any text pattern such as social security numbers, phone numbers, or account numbers etc. that follow a specific pattern.
- Search Expression Breakdown:
- \b - is a boundary anchor, informing the search that the word starts here and prevents partial matches with words also containing CA/DC/NV. Without this anchor, the pattern would also create matches with similar abbreviations.
- (CA|DC|NV) – identifies matches with CA, DC or NV state abbreviations. It is a logical "OR" operation that will match any of the three abbreviations.
- \s+ – indicates that one or more WHITESPACE symbols (e.g.: a new line, tab or regular space) occurs after the state abbreviation, with the “+” meaning one or more.
- \d{5} – matches with the 5 digit ZIP codes occurring on the next line in these sample invoices. It will also match with codes longer than 5 digits, so is best followed by the additional “\b” at the end to prevent that.
- Click "OK" once done.
- Step 5 - Open the Extract Pages by Text Search Dialog
- The new document entry will be created in the output document list. By default, the output file name is set to "Document 1".
- Click the "Edit Page Range..." button to open the 'Extract Pages by Text Search' dialog.

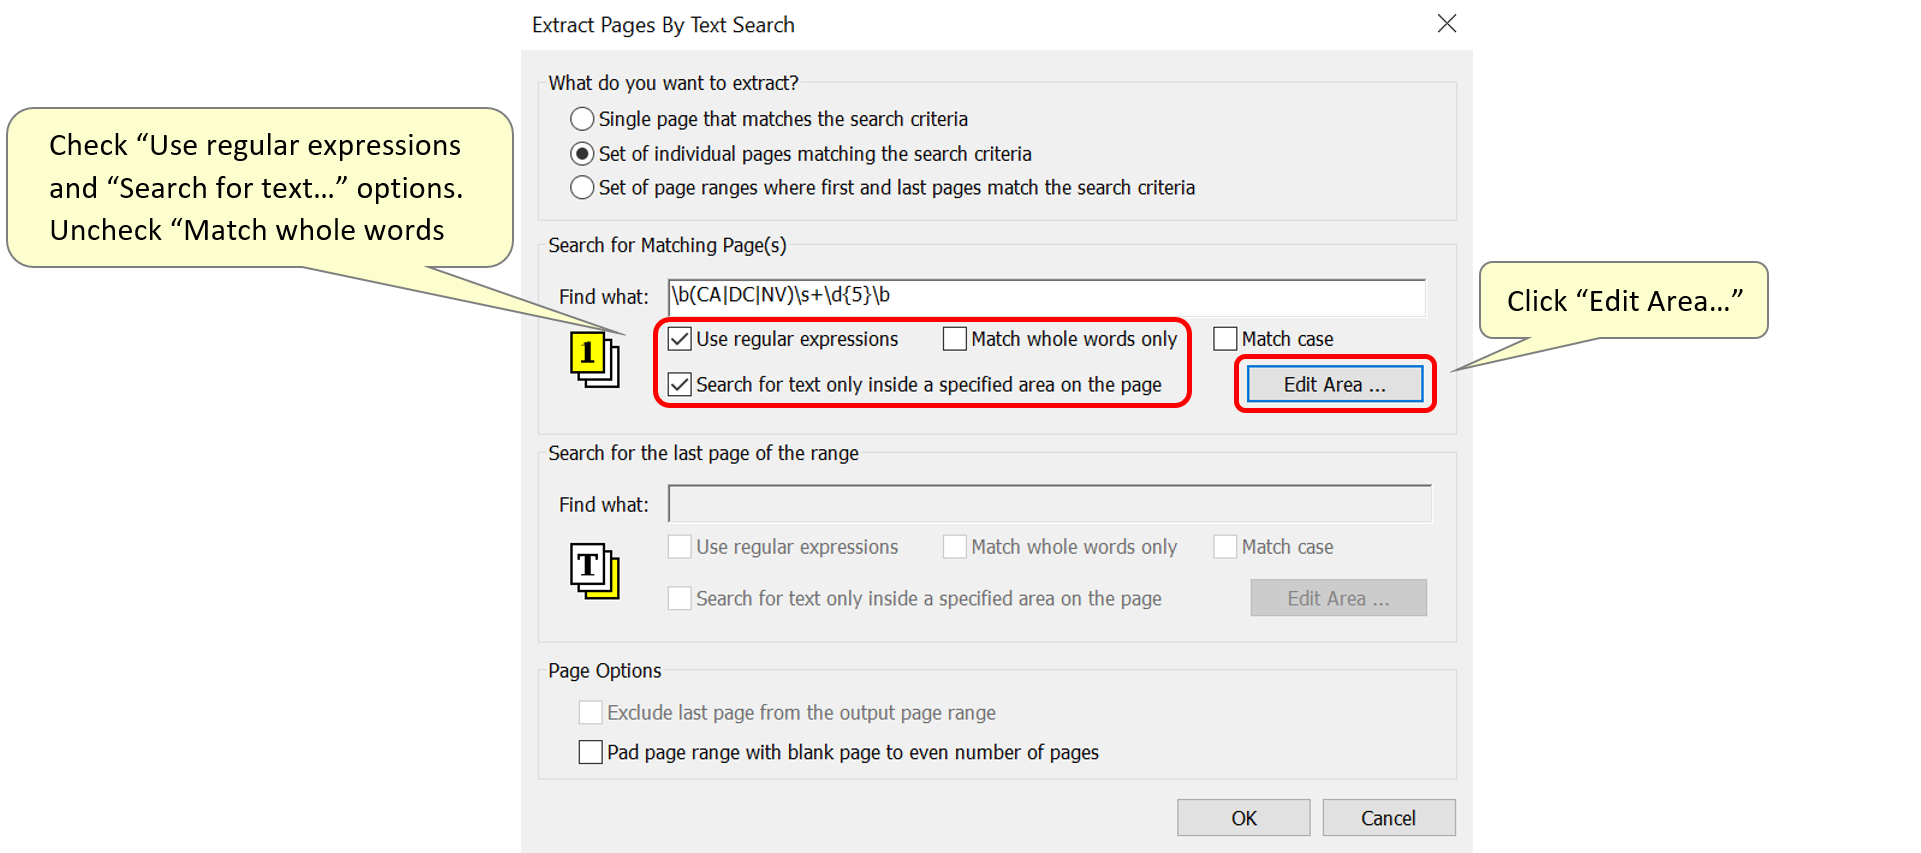
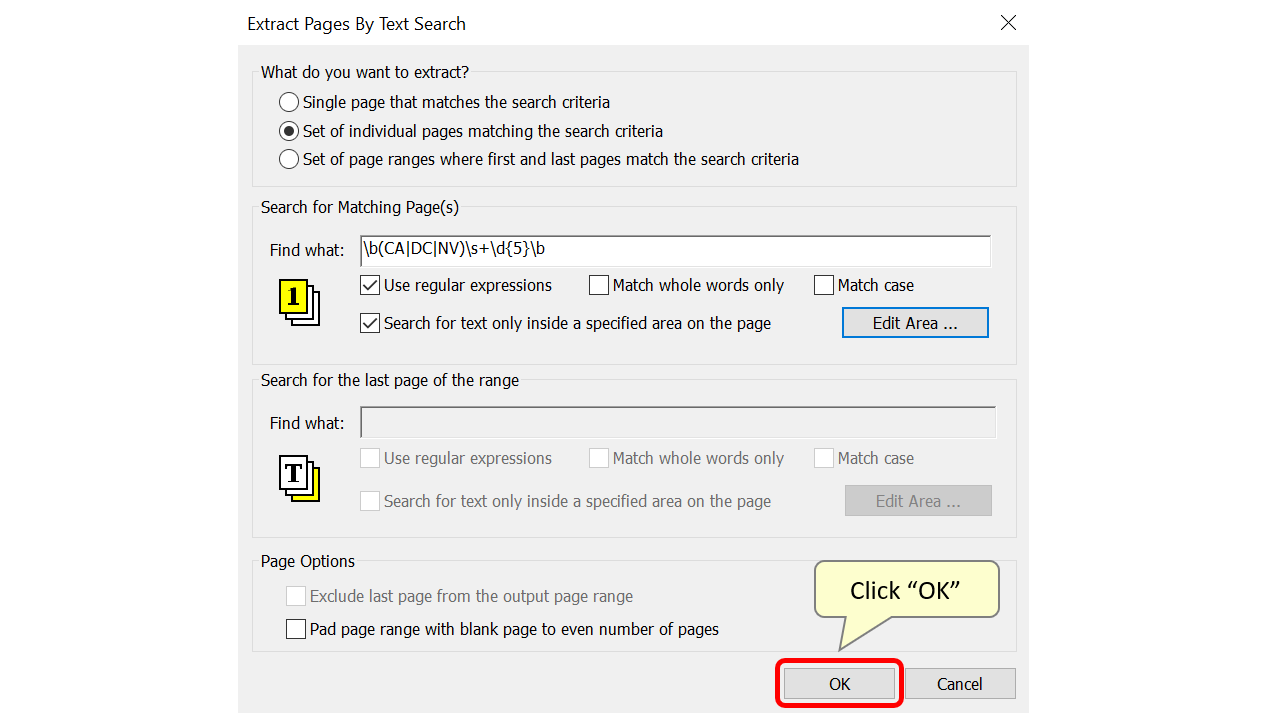
- Step 6 - Specify Text Searching Options
- The previously entered search expression will be shown in the 'Search for Matching Page(s)' section and can be edited here if necessary.
- Check the "Use regular expressions" option as a text pattern is being searched for, and not specific pieces of text.
- Also check the "Search for text only inside a specified area on the page" as this enables the user to specify the area of the page where the required text is always located. At this point, also un-check the "Match whole words only" option if the search expression contains "\b" anchors indicating where matches should occur.
- When the necessary options have been selected, click "Edit Area..." to mark the area on the page where the required text is located.
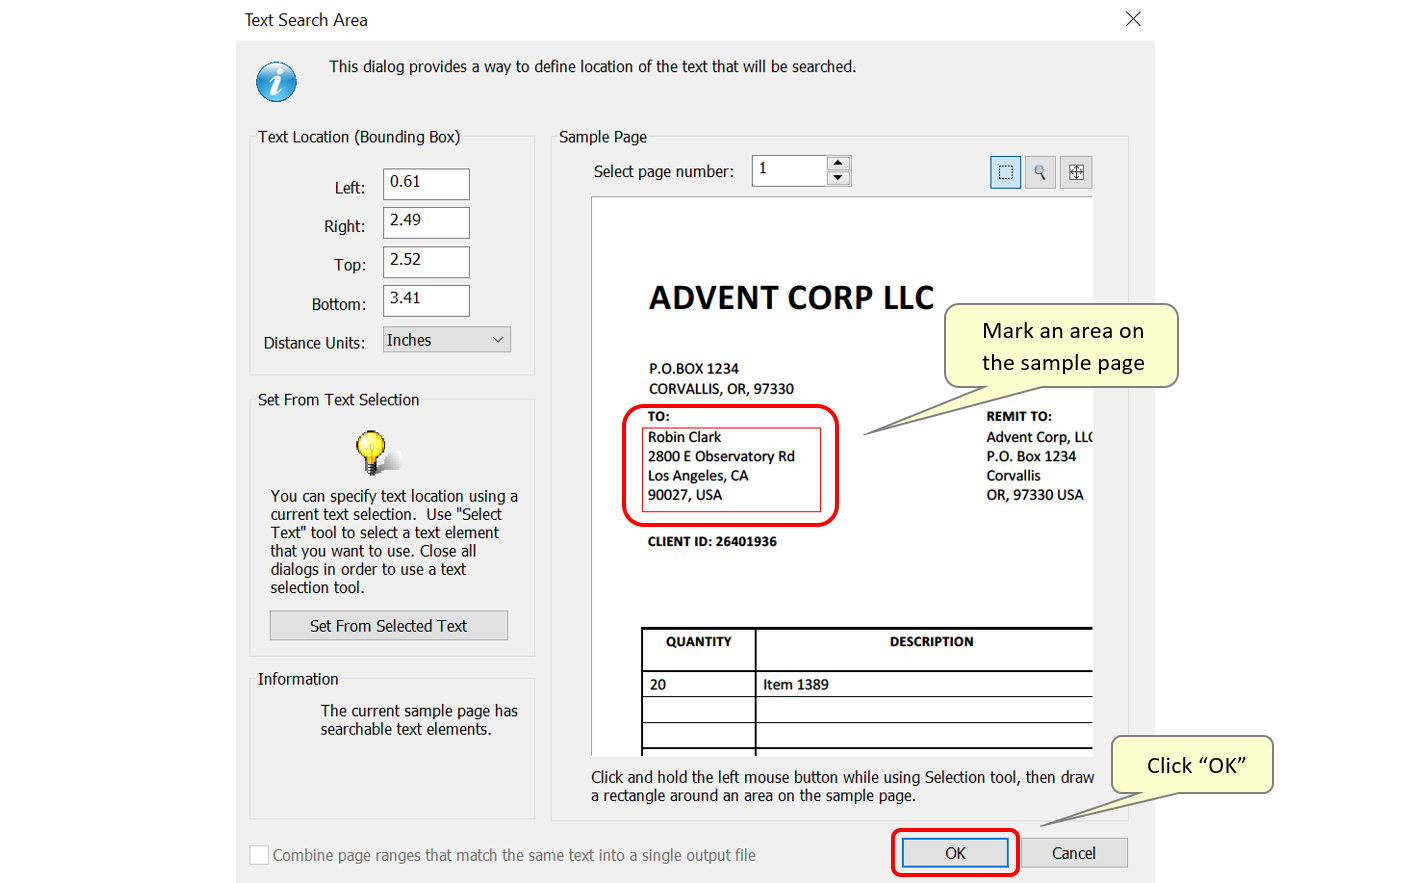
- Step 7 - Specifying a Page Location
- In the 'Text Search Area' dialog, use the tools to mark an area of the page containing the necessary text to search for (e.g.: CA/DC/NV). Alternatively, the user can type in coordinates (left, right, top, bottom) to mark this page area.
- Use the "Zoom" tool to enlarge part of the page for a more precise selection. Using the selection tool, click and hold the left mouse button whilst drawing a rectangle around the required area on the sample page.
- In this example, the plug-in will search through all the text within this specified area in each page of the document, for the necessary state abbreviations. If an error is made, repeat this procedure to overwrite the marked area. The location's coordinates will be listed in the 'Text Location' section.
- Click "OK" once done.
- Click "OK" to close the dialog.
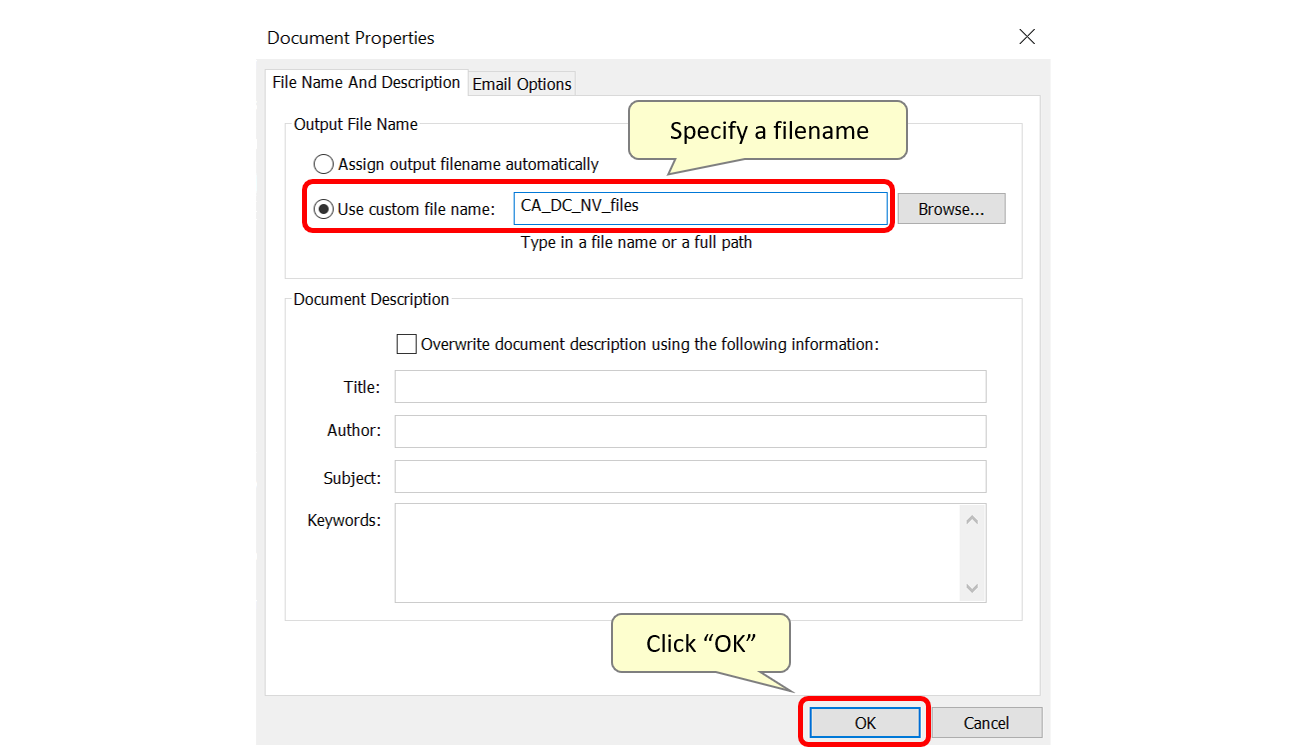
- Step 8 - Edit the Output Filename
- Double-click on the default 'Document 1' filename if you want to enter a custom name for the output document.

- Select the 'Use custom file name' option and specify a new filename in the entry box. Optionally, enter desired metadata properties for the output document such as "Title", "Subject", "Author" or "Keywords" etc. Click "OK" once done.
- Step 9 - Specify an Output Folder
- The new filename will be shown in the output document list. Specify an output folder via the "Browse..." button. All output file(s) will be placed into this folder. In this case, it is only going to be a single file.
- Click "OK” to proceed with the extraction.

- Click “OK” in the dialog box to start the process.

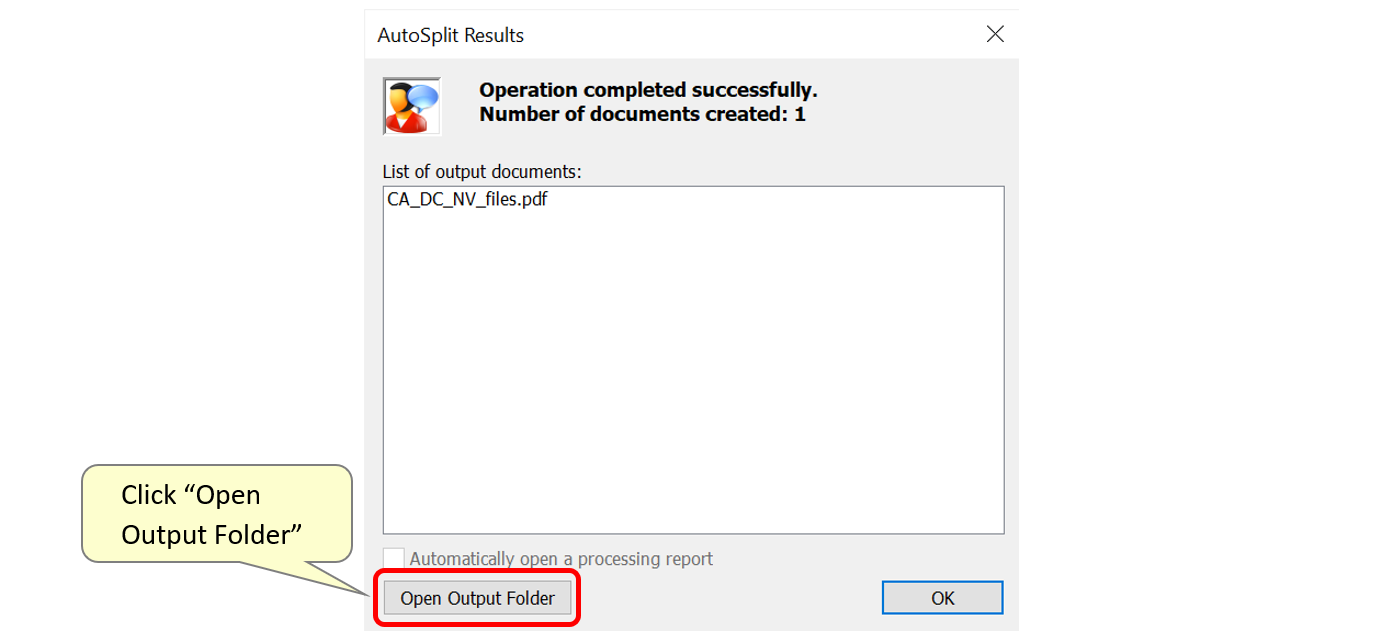
- Step 10 - Inspect the AutoSplit results dialog
- The “AutoSplit Results” dialog appears on the screen once processing is completed, listing files that have been created.
- Click “Open Output Folder” to inspect the results.
- Step 12 - Check the results
- The plug-in has extracted all pages containing the relevant states into an output PDF document.

- You can find more AutoSplit tutorials here.