Splitting Invoices By "Client ID" Example
AutoSplit Pro plug-in for Adobe® Acrobat®
- Introduction
- It is a common task to split a PDF document that contains multiple invoices into individual files while grouping them by some kind of ID number. The following tutorial is going to show how to take a PDF file with multiple invoices (variable number number of pages per invoice) and split it by a "Client ID" (or any other unique identification number). Each output PDF file will contain multiple invoices for each client/account.
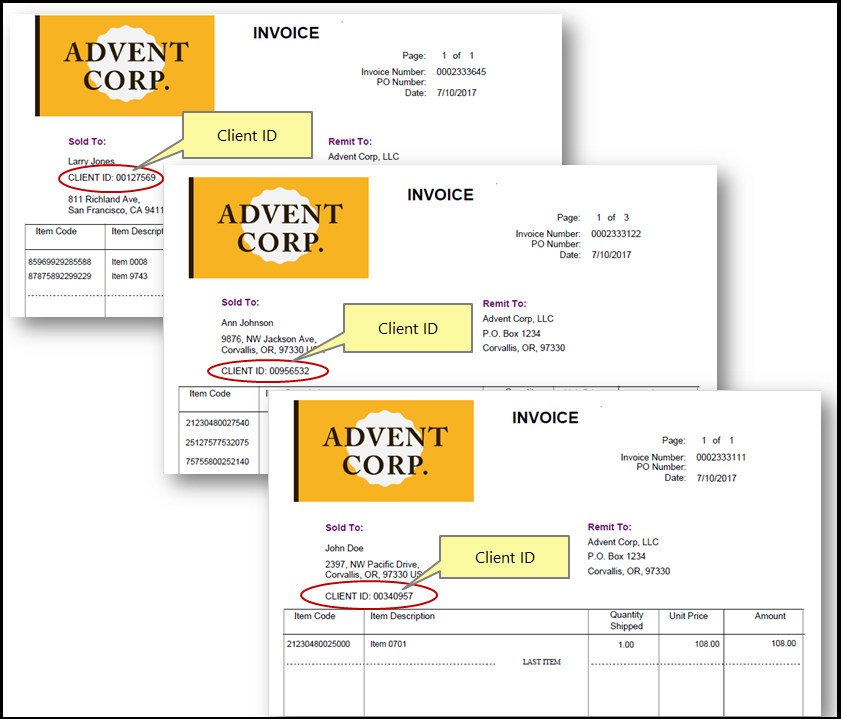
- Input Document Description
- The input PDF document used in this tutorial contains multiple invoices of variable length, one or more invoices per each client. First page of each invoice contains a "Client ID" in the following format "CLIENT ID: XXXXXXXX". Location of the "Client ID" is not fixed and may differ from page to page. The goal is to split input PDF file into documents that contain multiple invoices for every client and name it using a corresponding "Client ID".
- Splitting Approach
- We are going to use a "Split By Text Pattern" method. Since the "Client ID" always occurs on the first page of each invoice, it is natural to use it as a reliable "separator". The AutoSplit will search all pages of the input document for a text pattern that matches the "Client ID" text pattern. The document will be split at pages where text that matches the text pattern is actually changing.
- Batch Processing Support
- This operation is supported by Acrobat's batch processing framework (Action Wizard) and can be used alone or inside another batch sequences allowing you to incorporate a spliting and merging operations into your existing workflow.
- Prerequisites
- You need a copy of Adobe Acrobat Standard or Professional along with AutoSplit Pro plug-in installed on your computer in order to use this tutorial. You can download trial versions of both Adobe Acrobat and AutoSplit Pro.
Step-by-Step Tutorial
- Step 1 - Open a PDF File
- Start Adobe® Acrobat® application and open a PDF file using “File > Open…” menu to open a PDF document that needs to be processed.
- Step 2 - Open “Split Document Settings” Menu
- Select “Plug-ins > Split Documents > Split Document...” from the main Acrobat®
menu to open “Split Document Settings” dialog.
[⚡ How to locate Plugins menu in Adobe® Acrobat® ⚡] - Step 3 - Select Splitting Method
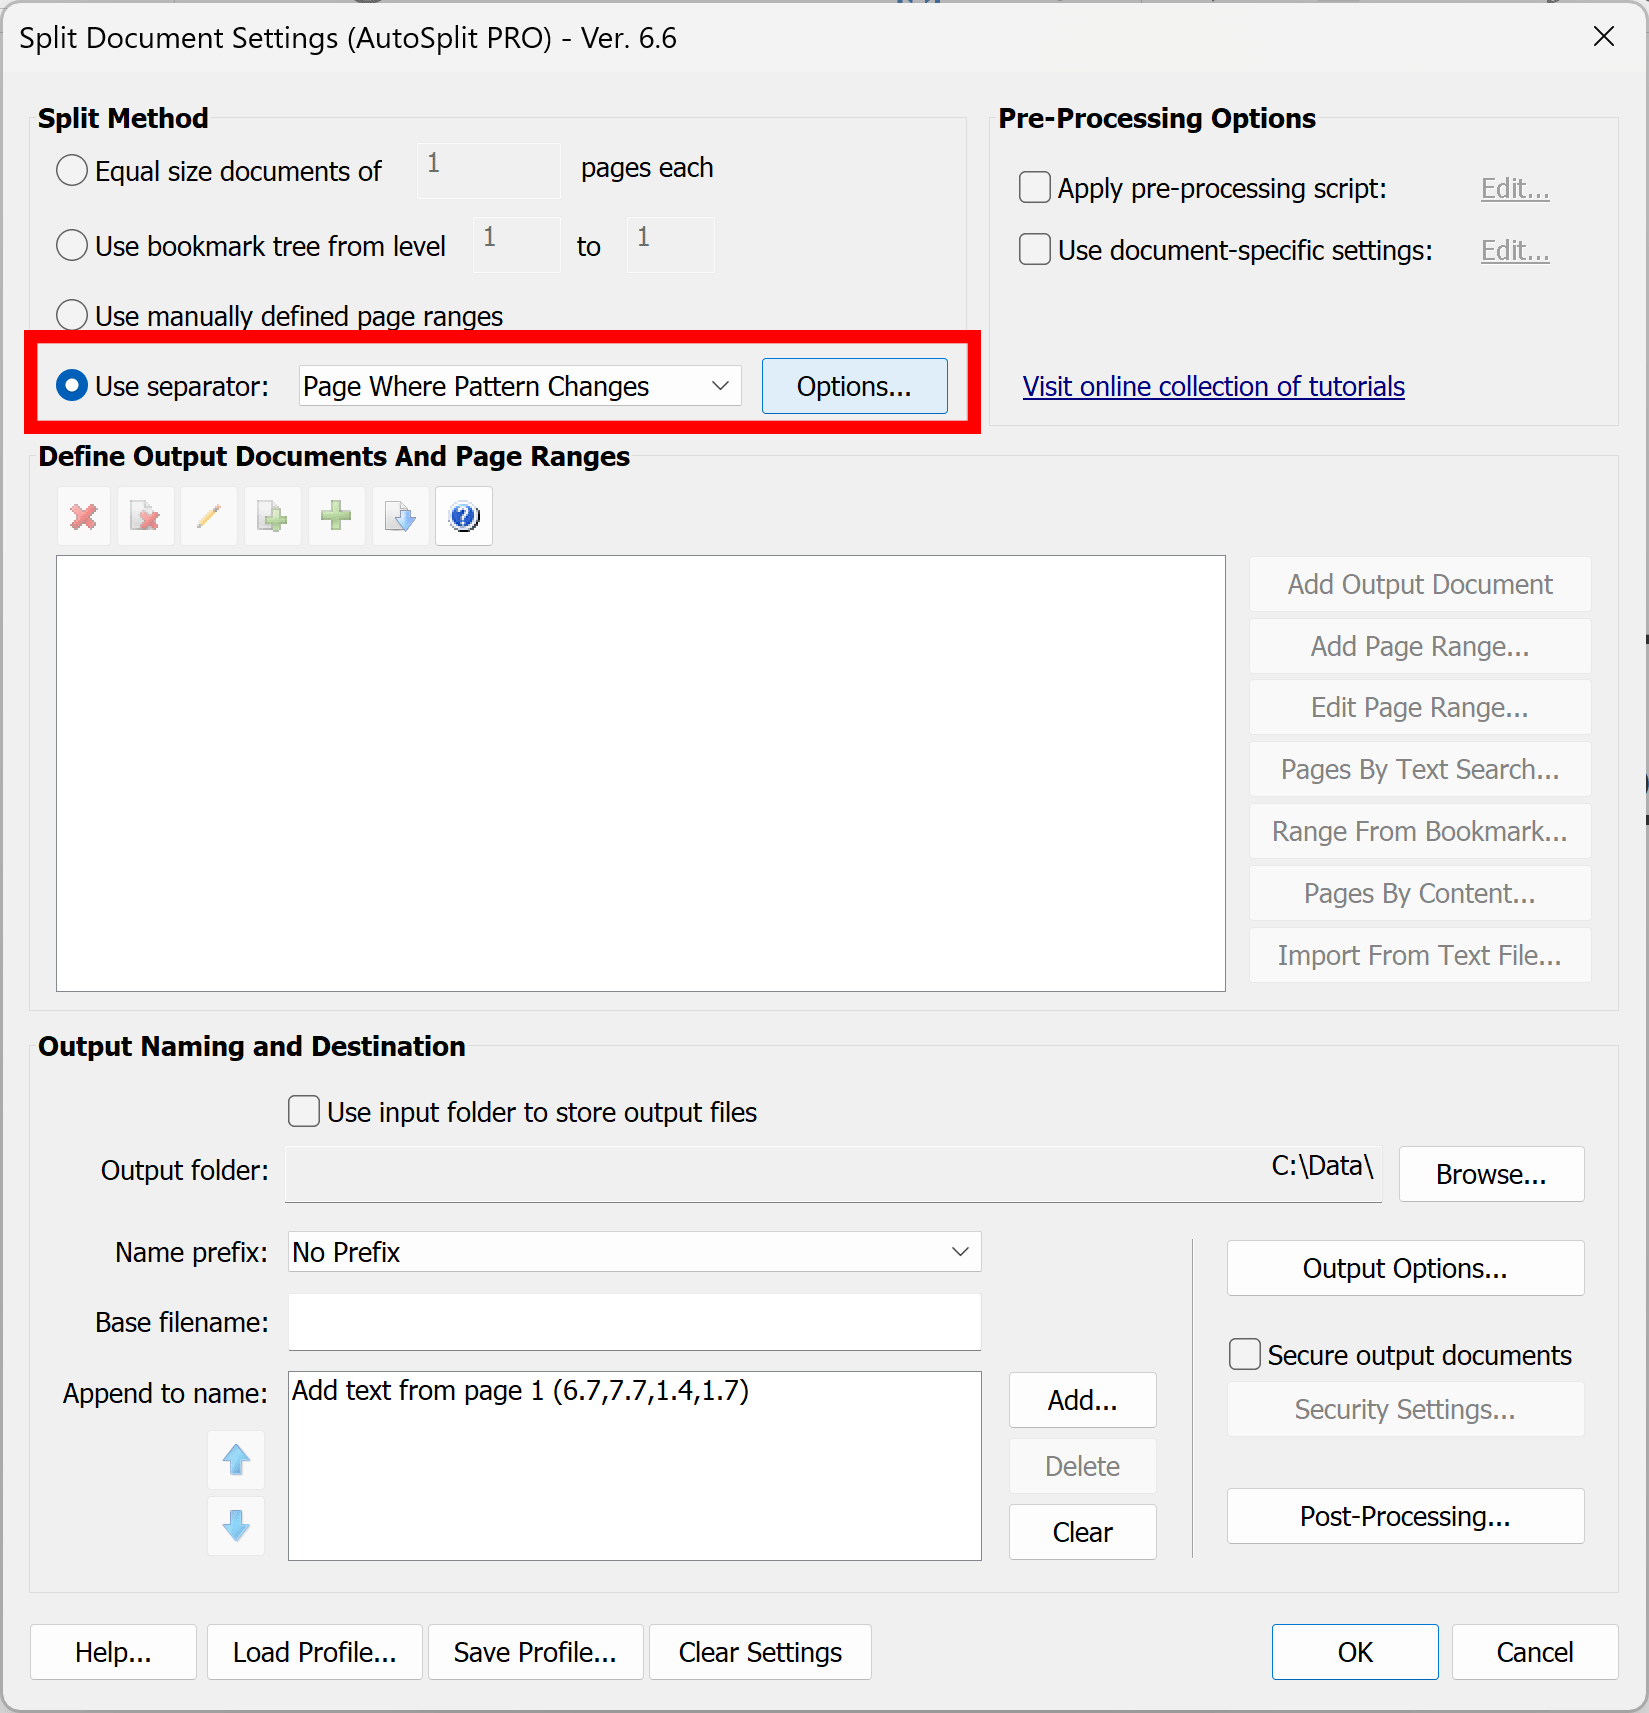
- Check “Use separator” box and select “Page Where Pattern Changes” from the list of available options.
- Next, press “Options…” button.
- Step 4 - Configure Splitting Parameters
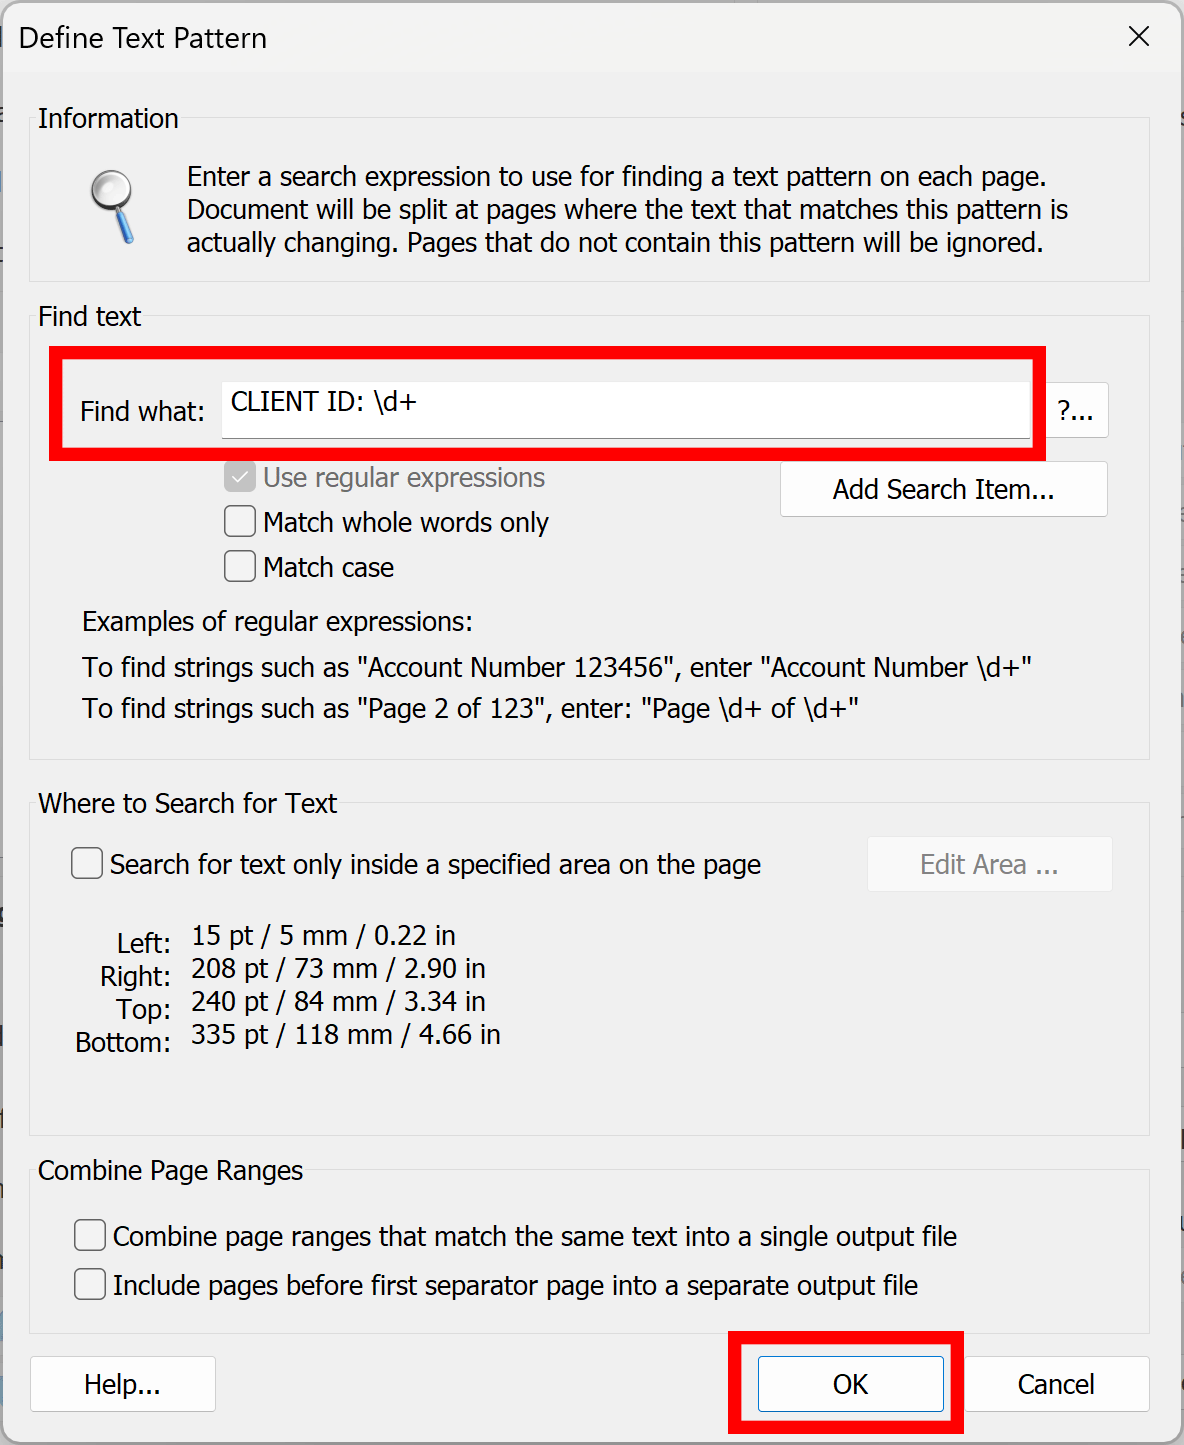
- Enter CLIENT ID: \d+ into “Find what” box. The software will search the document to find pages where client ID text pattern changes. The document will be split at the pages that contain CLIENT ID: followed by one or more digits. For example: CLIENT ID: 129396264 or CLIENT ID: 901248. Only pages that actually contain this pattern are considered as splitting locations. Document is not going to be split at pages that does not contain this pattern.
- Click “OK” once done.
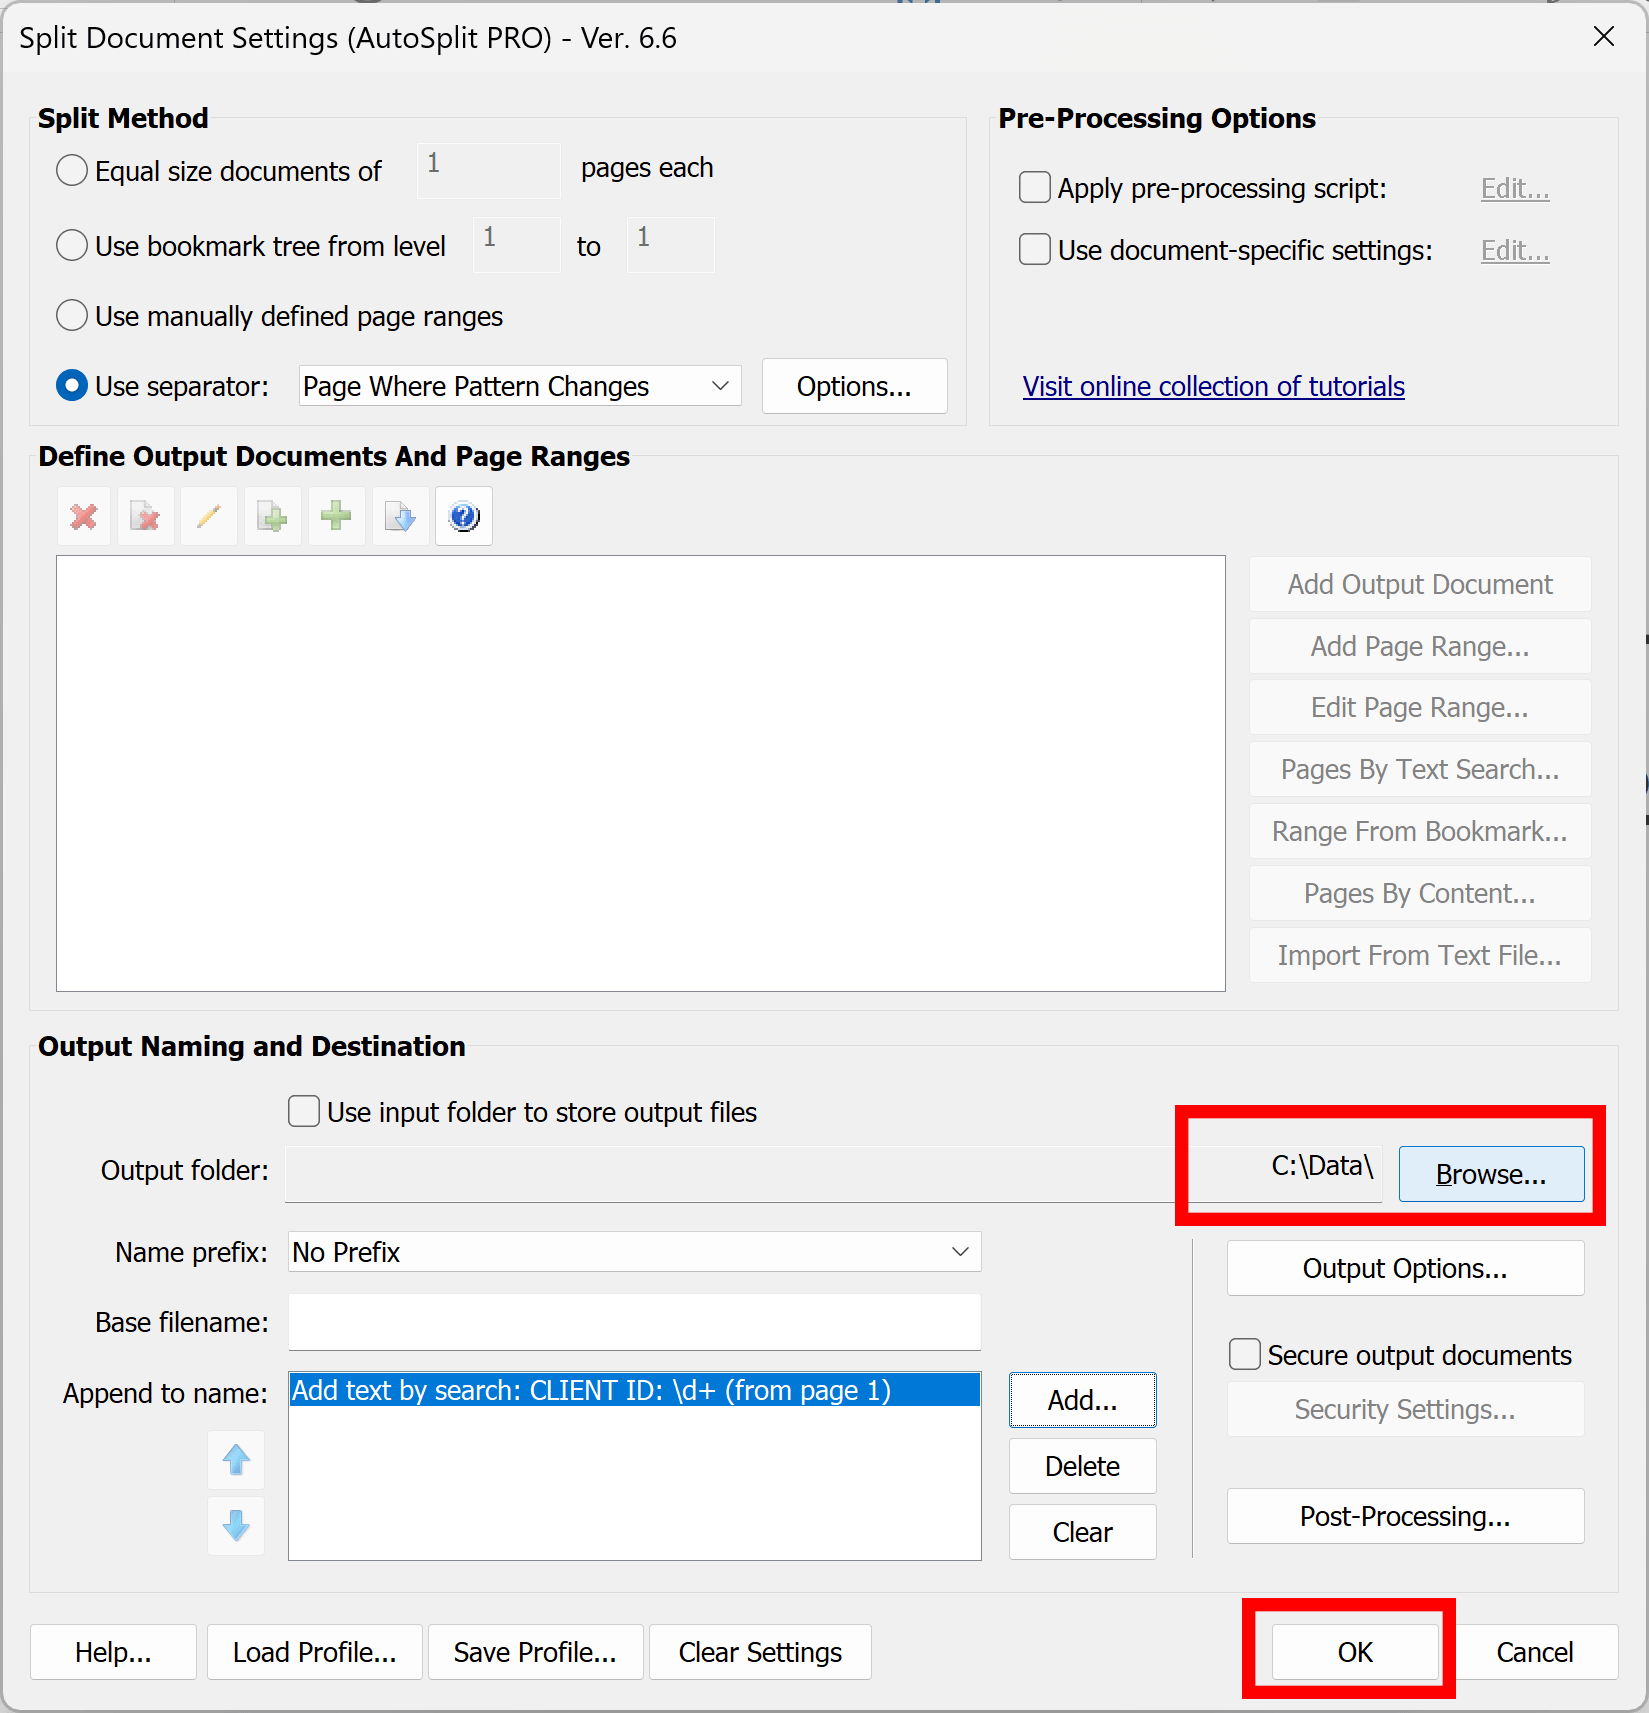
- Step 5 - Specify Output File Naming
- We are going to name each output file using the corresponding Client ID number. Set "Name prefix:" to "No Prefix" option. Make sure "Base filename" box is empty and there are no any entries in "Append to name:" list.
- Press "Add..." button to define how to find Client ID in each output document.

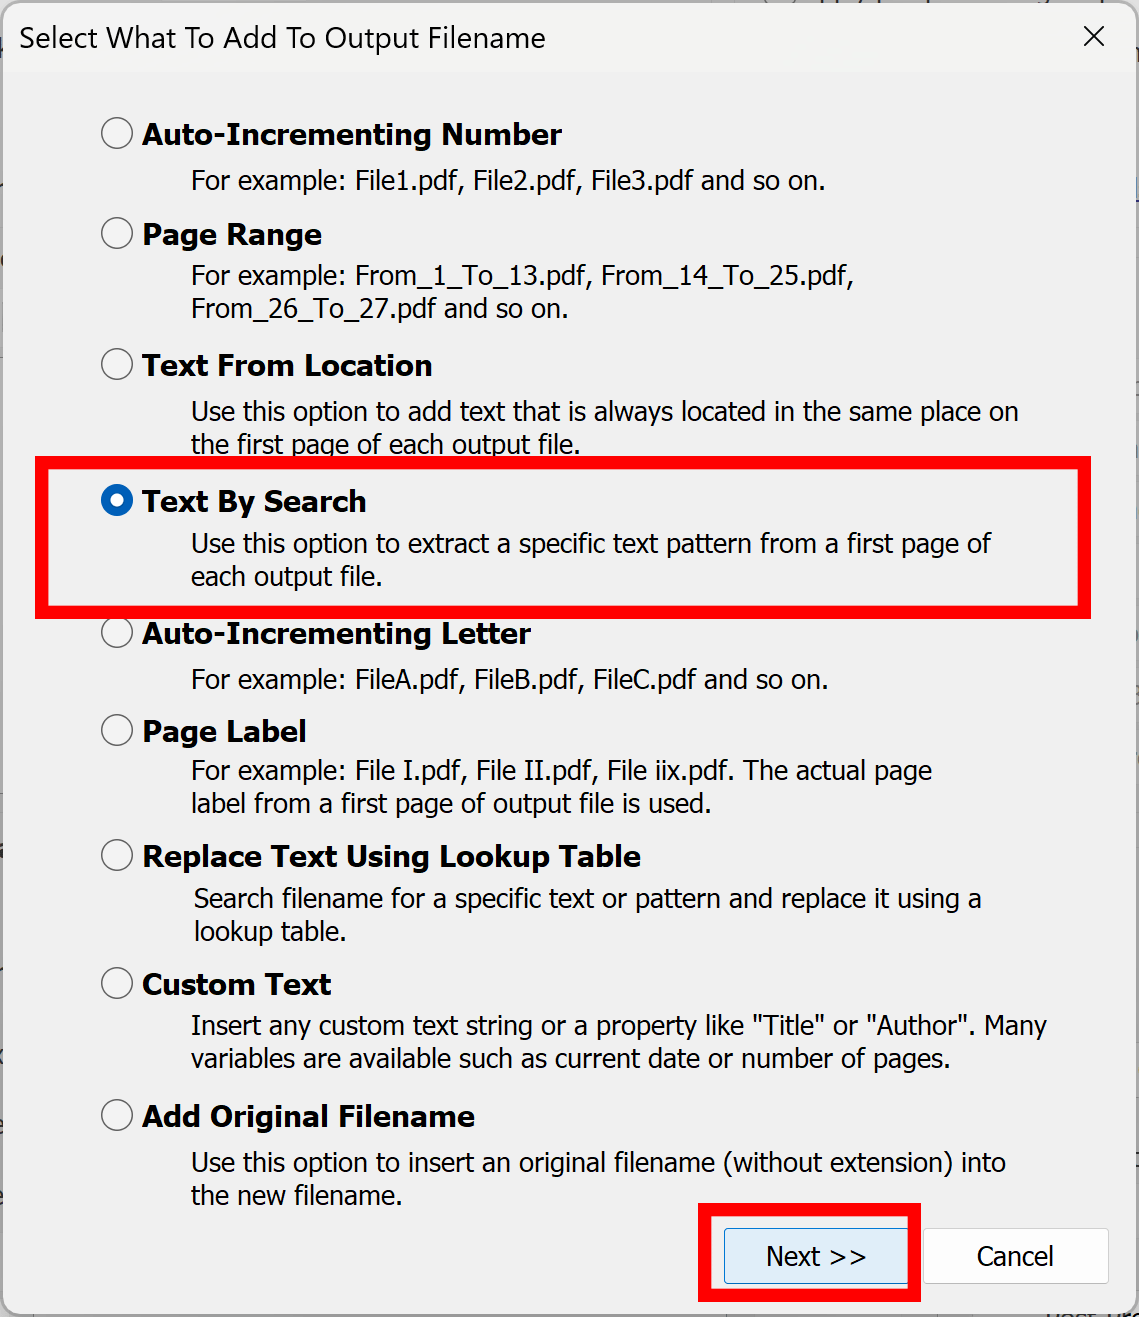
- Step 6 - Select "Text by Search" Option
- Select "Text By Search" option and press "Next" button.
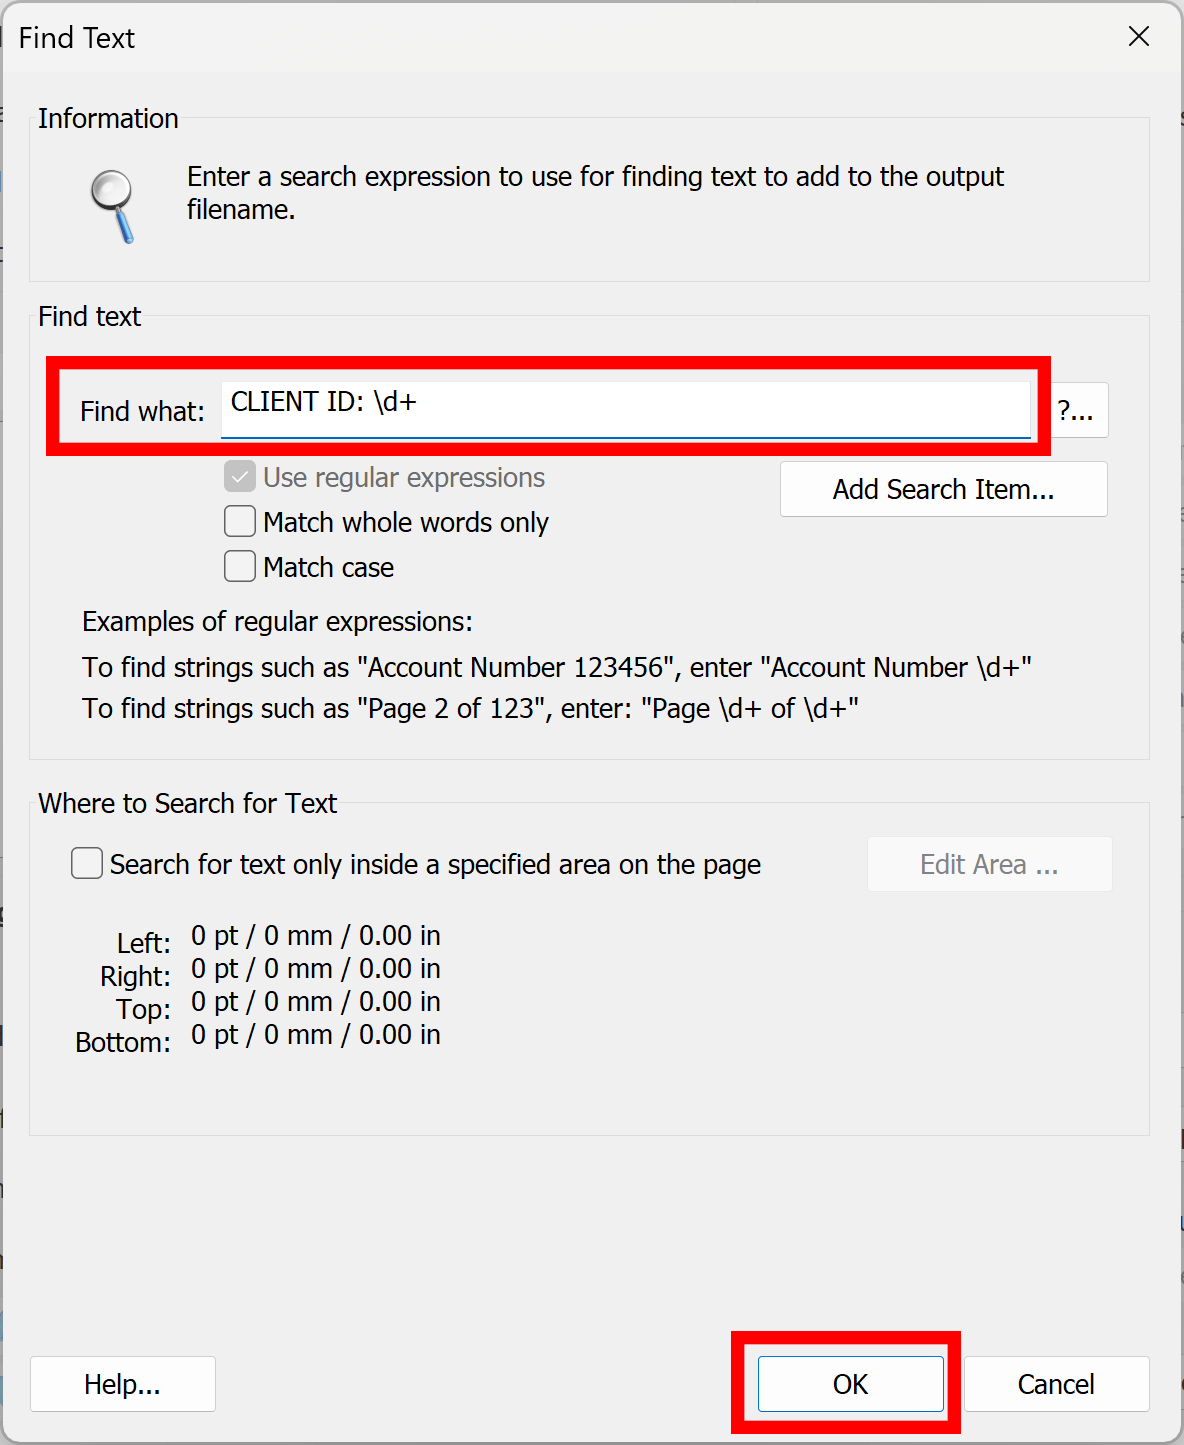
- Step 7 - Enter a Search Expression
- The goal is to name output files with corresponding "Client ID" number.
- Enter a search expression CLIENT ID: \d+ into “Find what” box for finding text to add to the output file name.
- Press “OK” button once done.
- Step 8 - Specify Output Folder
- Press "Browse..." button to select a folder where to save all output files.
- Optionally, press "Save Profile..." button to save splitting configuration into *.APR file for a future reuse. You can later reload these splitting settings by pressing “Load Profile…” button and selecting a previous saved *.APR file.
- Click "OK" button to proceed.
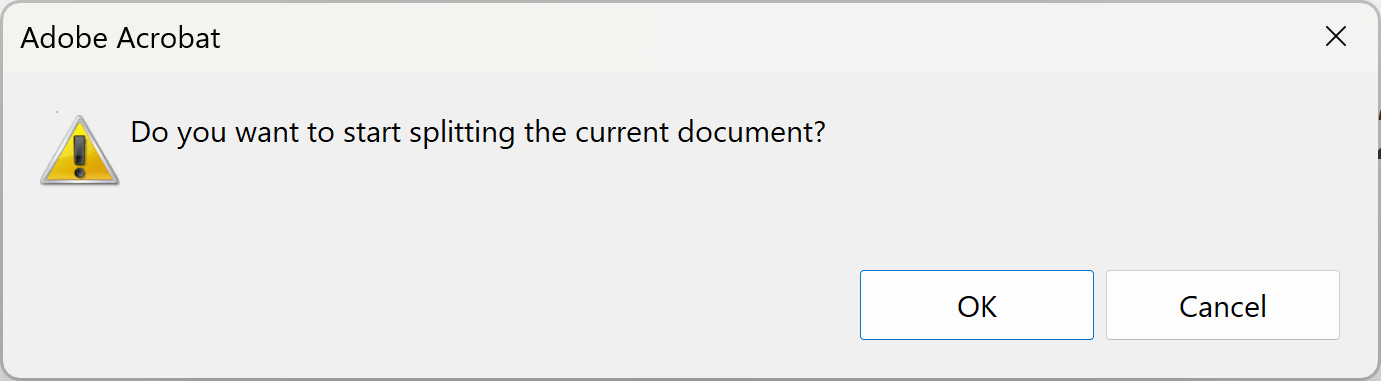
- Step 9 - Start Splitting Process
- Click "OK" in the dialog box to start splitting process.
- Step 11 - Examine the Results
- The “AutoSplit Results” dialog shows a list of files that have been created.
- Click "Open Output Folder" to inspect the results.
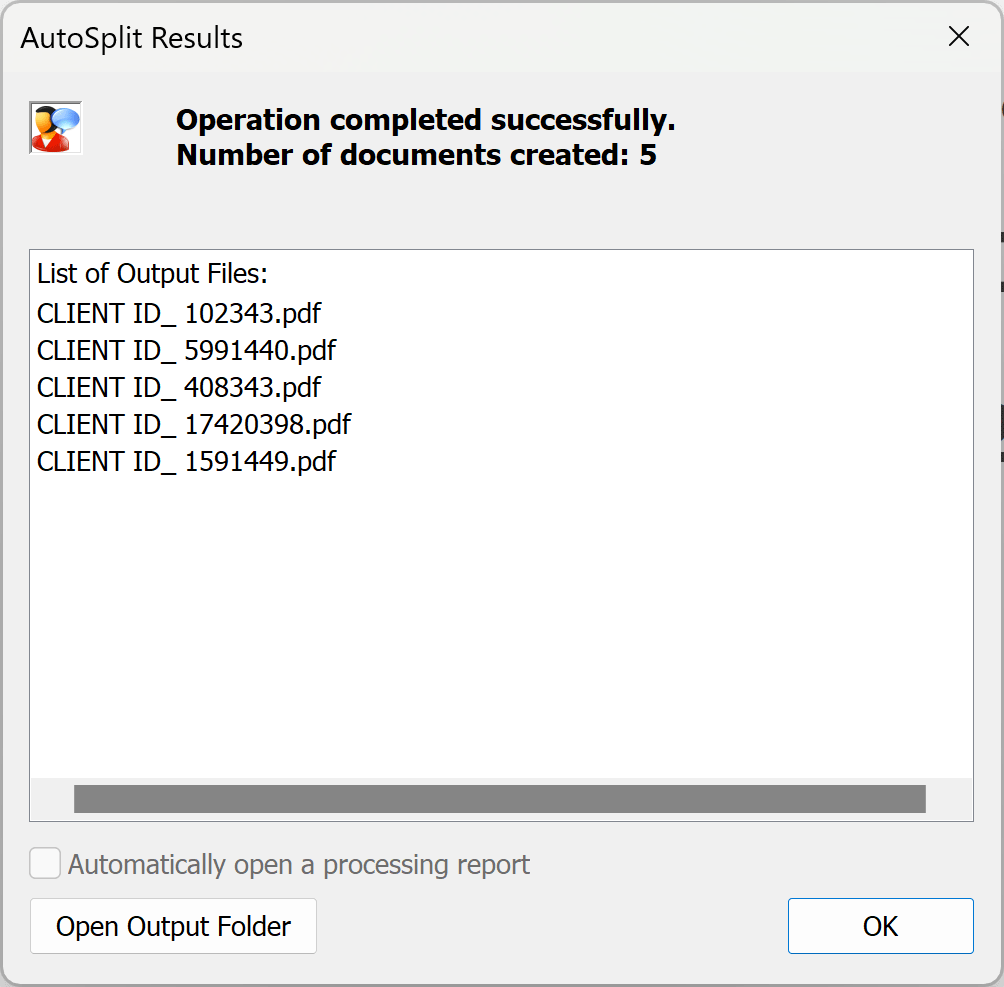
- We have used the AutoSplit™ plug-in to automatically split invoices from a single PDF file and name output files by a "Client ID". Each output file contains all invoices related to a specific "Client ID".
- Click here for a list of all step-by-step tutorials available.