Customize Text Appearance in PDF Forms
Using Rich Text Formatting to Display Text with Different Styles
- Introduction
- This tutorial shows how to use rich-text formatting to populate a single PDF form field using multiple different text styles. This tutorial applies to performing a mail merge process with AutoMailMerge plug-in for Adobe Acrobat.
- Text Field Appearance
- In PDF format, a form field appearance is controlled by the field's properties. Field appearance and field content (text) are two separate entities. The mail merge sets the text content of the field, and it is displayed by the PDF viewer using the field's apperance properties. In general, all text within a single text field is displayed using a single font/style. This is the property of the PDF format, and this is the way PDF forms are designed to work. However, in some applications, it is necessary to display text within a single field using multiple different fonts/styles. Luckily, there is a way to format the content of the text field using special rich-text formatting syntax to allow different text styles within a single PDF form field.
- Important
- This tutorial assumes that reader is familiar with basics of the AutoMailMerge operation. It provides only information that is directly relevant to the topic discussed. If you need tutorials on the basics of the mail merge operation, then please go to the tutorials section.
- Prerequisites
- You need a copy of the Adobe® Acrobat® along with the AutoMailMerge™ plug-in installed on your computer in order to use this tutorial. You can download trial versions of both the Adobe® Acrobat® and the AutoMailMerge™ plug-in.
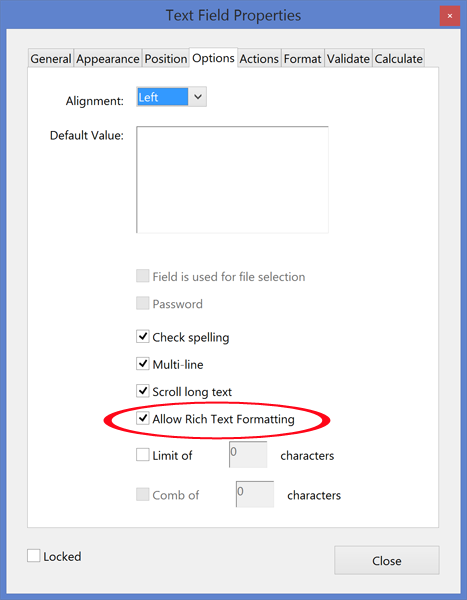
- Enable Rich Text Formatting
- By default, a PDF text field is using a single text style to display it's content. This includes a font style, size and text color. It is necessary to enable rich-text formatting in order to use multiple different text styles within a single text field. Open "Text Field Properties" dialog for the field and select the "Options" tab. Check the "Allow Rich Text Formatting" option and press "Close" button to apply changes. Make sure to use "File > Save" menu to save changes into the file.
- Using Multiple Fonts
- Now the text form field is ready to accept text that is formatted using special XML-based syntax. The mail merge text (in the data source) needs to be edited to provide a desired text styling information. The following example shows how to use two different fonts (Calibri and Segoe UI Black) within a single text field. The actual text (Sample text: Style1 Style2) is shown in bold.
-
<?xml version="1.0"?>
<body xfa:APIVersion="Acroform:2.7.0.0" xfa:spec="2.1" xmlns="http://www.w3.org/1999/xhtml" xmlns:xfa="http://www.xfa.org/schema/xfa-data/1.0/">
<p dir="ltr" style="margin-top:0pt;margin-bottom:8pt;line-height:12.95pt;font-family:Calibri;font-size:11pt">Sample text: Style1
<span style="font-family:'Segoe UI Black'"> Style2</span>
</p>
</body> - After the mail merge is performed, the text field will be displayed using the following styles:

- Using Italic and Bold Text
- The following example shows how to use italic, regular and bold text within the same text field. The text is also using 11pt Calibri font.
-
<?xml version="1.0"?>
<body xfa:APIVersion="Acroform:2.7.0.0" xfa:spec="2.1" xmlns="http://www.w3.org/1999/xhtml" xmlns:xfa="http://www.xfa.org/schema/xfa-data/1.0/">
<p dir="ltr" style="margin-top:0pt;margin-bottom:8pt;line-height:12.95pt;font-family:Calibri;font-size:11pt;font-style:italic">Italic
<span style="font-style:normal"> and </span>
<span style="font-weight:bold;font-style:normal">Bold</span>
</p>
</body> - After the mail merge is performed, the text field will be displayed using the following styles:

- Using Colors
- This example shows how to display a part of the text using a specific color. The colors are defined using HEX values in same way as in HTML format. Use any online color picker for getting color HEX values.
-
<?xml version="1.0"?>
<body xfa:APIVersion="Acroform:2.7.0.0" xfa:spec="2.1" xmlns="http://www.w3.org/1999/xhtml" xmlns:xfa="http://www.xfa.org/schema/xfa-data/1.0/">
<p dir="ltr" style="margin-top:0pt;margin-bottom:8pt;line-height:12.95pt;font-family:Calibri;font-size:11pt;color:#00b050">Green
<span style="color:#ff0000"> Red </span>
<span style="color:#000000">and </span>
<span style="color:#5b9bd5">Blue</span>
</p>
</body> - After the mail merge is performed, the text field will be displayed using the following styles:

- Underline Text
- This example shows how to underline text in the field. It can be done using <u> HTML tag. Encloded any underlined text inside <u>...</u> tags. For example, <u>Important Notice</u>.
-
<?xml version="1.0"?>
<body xfa:APIVersion="Acroform:2.7.0.0" xfa:spec="2.1" xmlns="http://www.w3.org/1999/xhtml" xmlns:xfa="http://www.xfa.org/schema/xfa-data/1.0/">
<p dir="ltr" style="margin-top:0pt;margin-bottom:8pt;line-height:12.95pt;font-family:Calibri;font-size:11pt">Sample of <u>Underlined</u> Text</p>
</body> - After the mail merge is performed, the text field will be displayed using the following styles:

- Sample Excel Spreadsheet
- Here is a link to a sample Excel spreadsheet with all 3 examples used above. Use it as a starting point for testing and evaluation. If you need tutorials on the basics of the mail merge operation, then please go to the tutorials section.