Creating PDF Bookmarks from Comments and Highlights
AutoBookmark plug-in for Adobe® Acrobat®
Introduction
This tutorial shows how to automatically bookmark notes, comments, text highlights, underlines and strikeouts in a PDF document using the AutoBookmark™ plug-in for the Adobe® Acrobat®.
You should use the method of creating PDF bookmarks from highlights and text comments when manually reviewing a document, especially in cases where the text you want to bookmark does not provide clear structural cues such as font size, style, or color. This approach is particularly useful in unformatted or scanned documents, where automatic bookmark generation based on headings or styles is not possible. By leveraging your own highlights and annotations, you can build a personalized and meaningful navigation system that reflects your review process and ensures important sections remain easy to locate later.
PDF Annotation Types
The following annotation types can be selectively bookmark:
- Highlight
- Underline
- Crossout
- Sticky note
- Text comment
- File annotation
- Popup note
- Rectangle
- Other types (such as links or various drawing annotations)
The plug-in uses text behind each annotation or the text content of the comment for a bookmark title. The bookmarks will point to the locations of corresponding annotations. Bookmark color can be optionally inherited from the originating annotation.
.PNG)
This operation is also available in the Guided Actions (aka Action Wizard) (Acrobat's batch processing tool) and can be used for automating of document processing workflows.
Sample Results
Prerequisites
- Adobe® Acrobat® Standard, Pro or Classic
- Microsoft Windows 11, 10, 8, Windows Server 2012-2022
- AutoBookmark™ Standard or Professional plug-in for Adobe® Acrobat®
Tutorial
Step 1 - Open a PDF Document
Start the Adobe® Acrobat® application and open a PDF document to be processed using "File > Open..." menu.
Step 2 - Open the "Bookmark Comments and Highlights" Dialog
Select Plug-Ins > Bookmarks > Create From Comments and Highlights... from the main menu to open the "Bookmark Comments and Highlights" dialog.
[⚡ How to locate Plugins menu in Adobe® Acrobat® ⚡]
Step 3 - Select Annotation Types to Bookmark
Select one or more annotation types to bookmark.
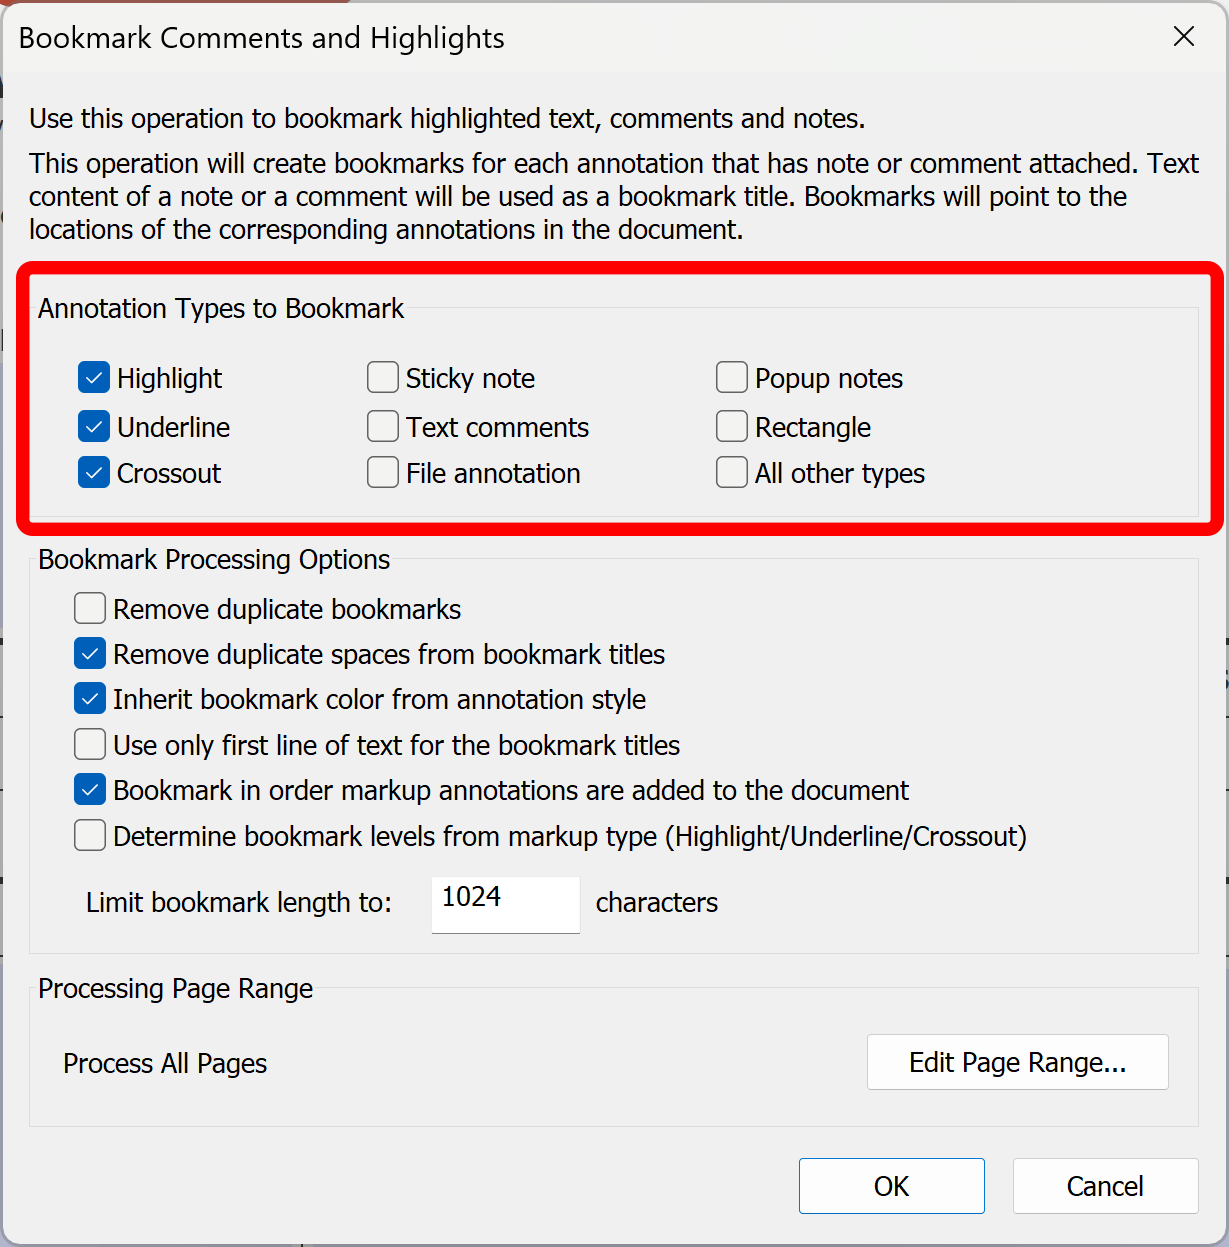
Check the "Highlight" option to bookmark highlighted text:
.PNG)
Check the "Underline" option to bookmark underlined text:
.PNG)
Check the "Crossout" option to bookmark crossout text:
.PNG)
Check the "Sticky note" option to bookmark sticky notes annotations and use the comment text for the bookmark title:
.PNG)
Check the "Text comments" option to bookmark comments:
.PNG)
Check the "File annotation" option to bookmark file annotations:
.PNG)
Check the "Popup notes" option to bookmark popup notes annotations:
.PNG)
Check the "Rectangle" option to bookmark annotations in rectangles:
.PNG)
Check the "All other types" option to bookmark other annotation types (for example, links):
.PNG)
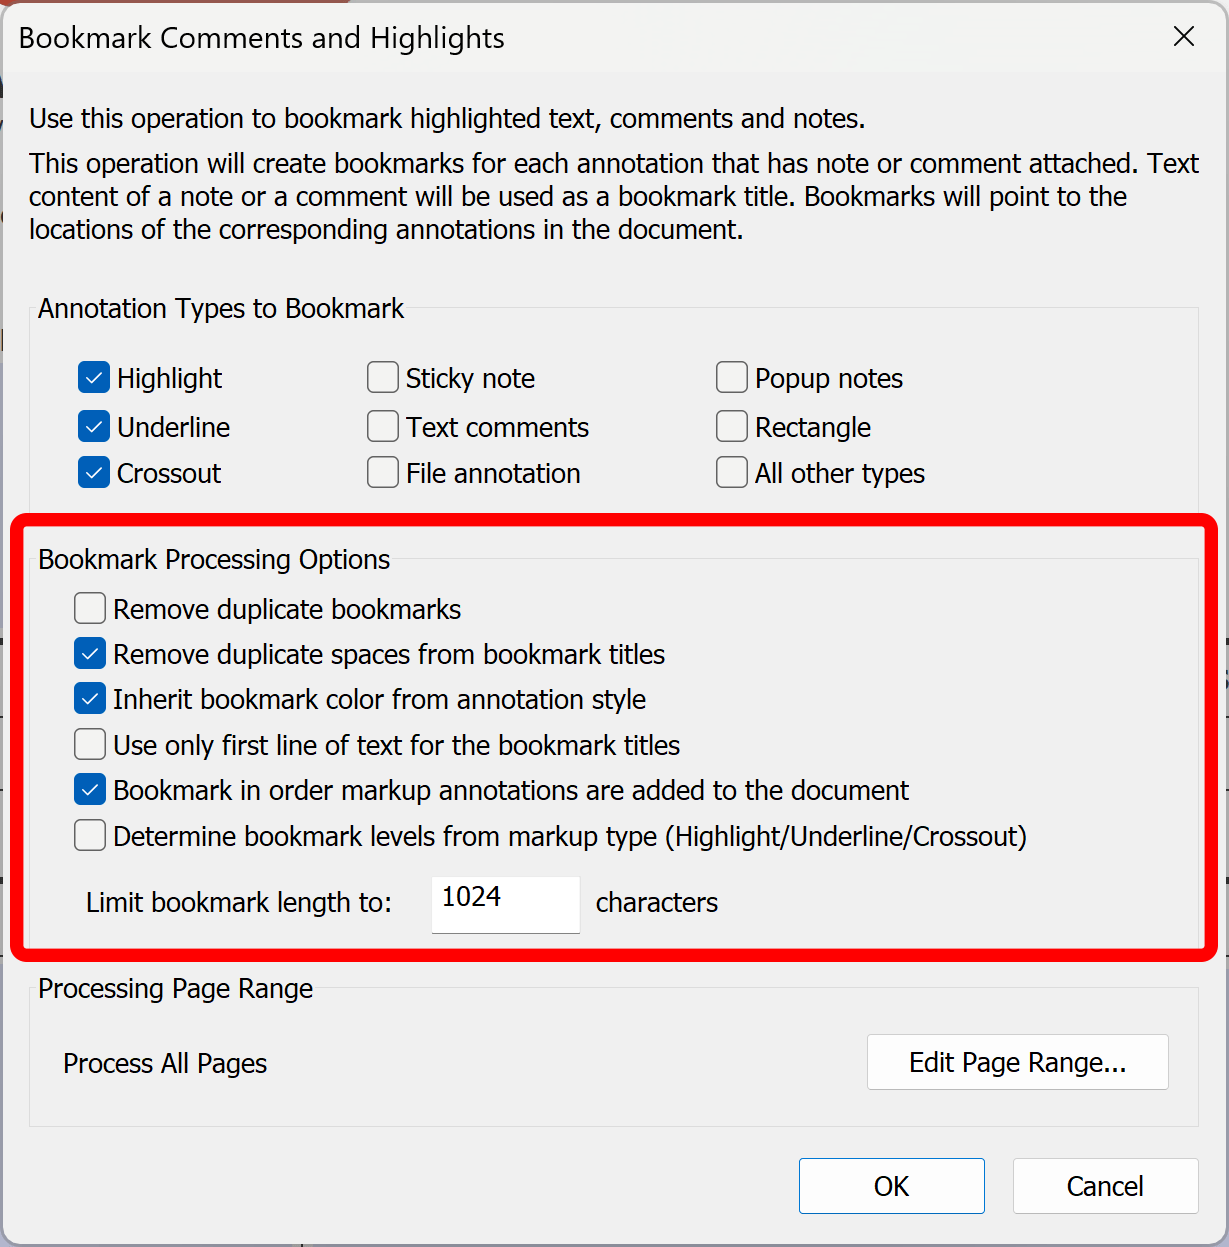
Step 4 - Specify Bookmark Processing Options
Check the Inherit bookmark color from annotation style option to use annotation style color for the bookmark title.
Check the Determine bookmark levels from markup type (Highlight/Underline/Crossout) option to create multiple-level bookmarks. All highlights will be used to create top-level bookmarks, underlines will be used for a second level and crossouts will be used to create third-level bookmarks. It is a simple way to build a multilevel bookmark structure while annotating the document.
Specify the number of characters to limit bookmark title length. When bookmarks have long titles, they wrap across multiple lines in the sidebar. This makes the outline harder to scan quickly. Long entries take up more vertical space, so fewer bookmarks fit onscreen at once. Users end up scrolling the bookmarks panel instead of instantly seeing all sections.
Step 5 - Start the Bookmark Generation
Optionally, specify processing page range by clicking the "Edit Page Range..." button.
Click OK to start the bookmark generation.
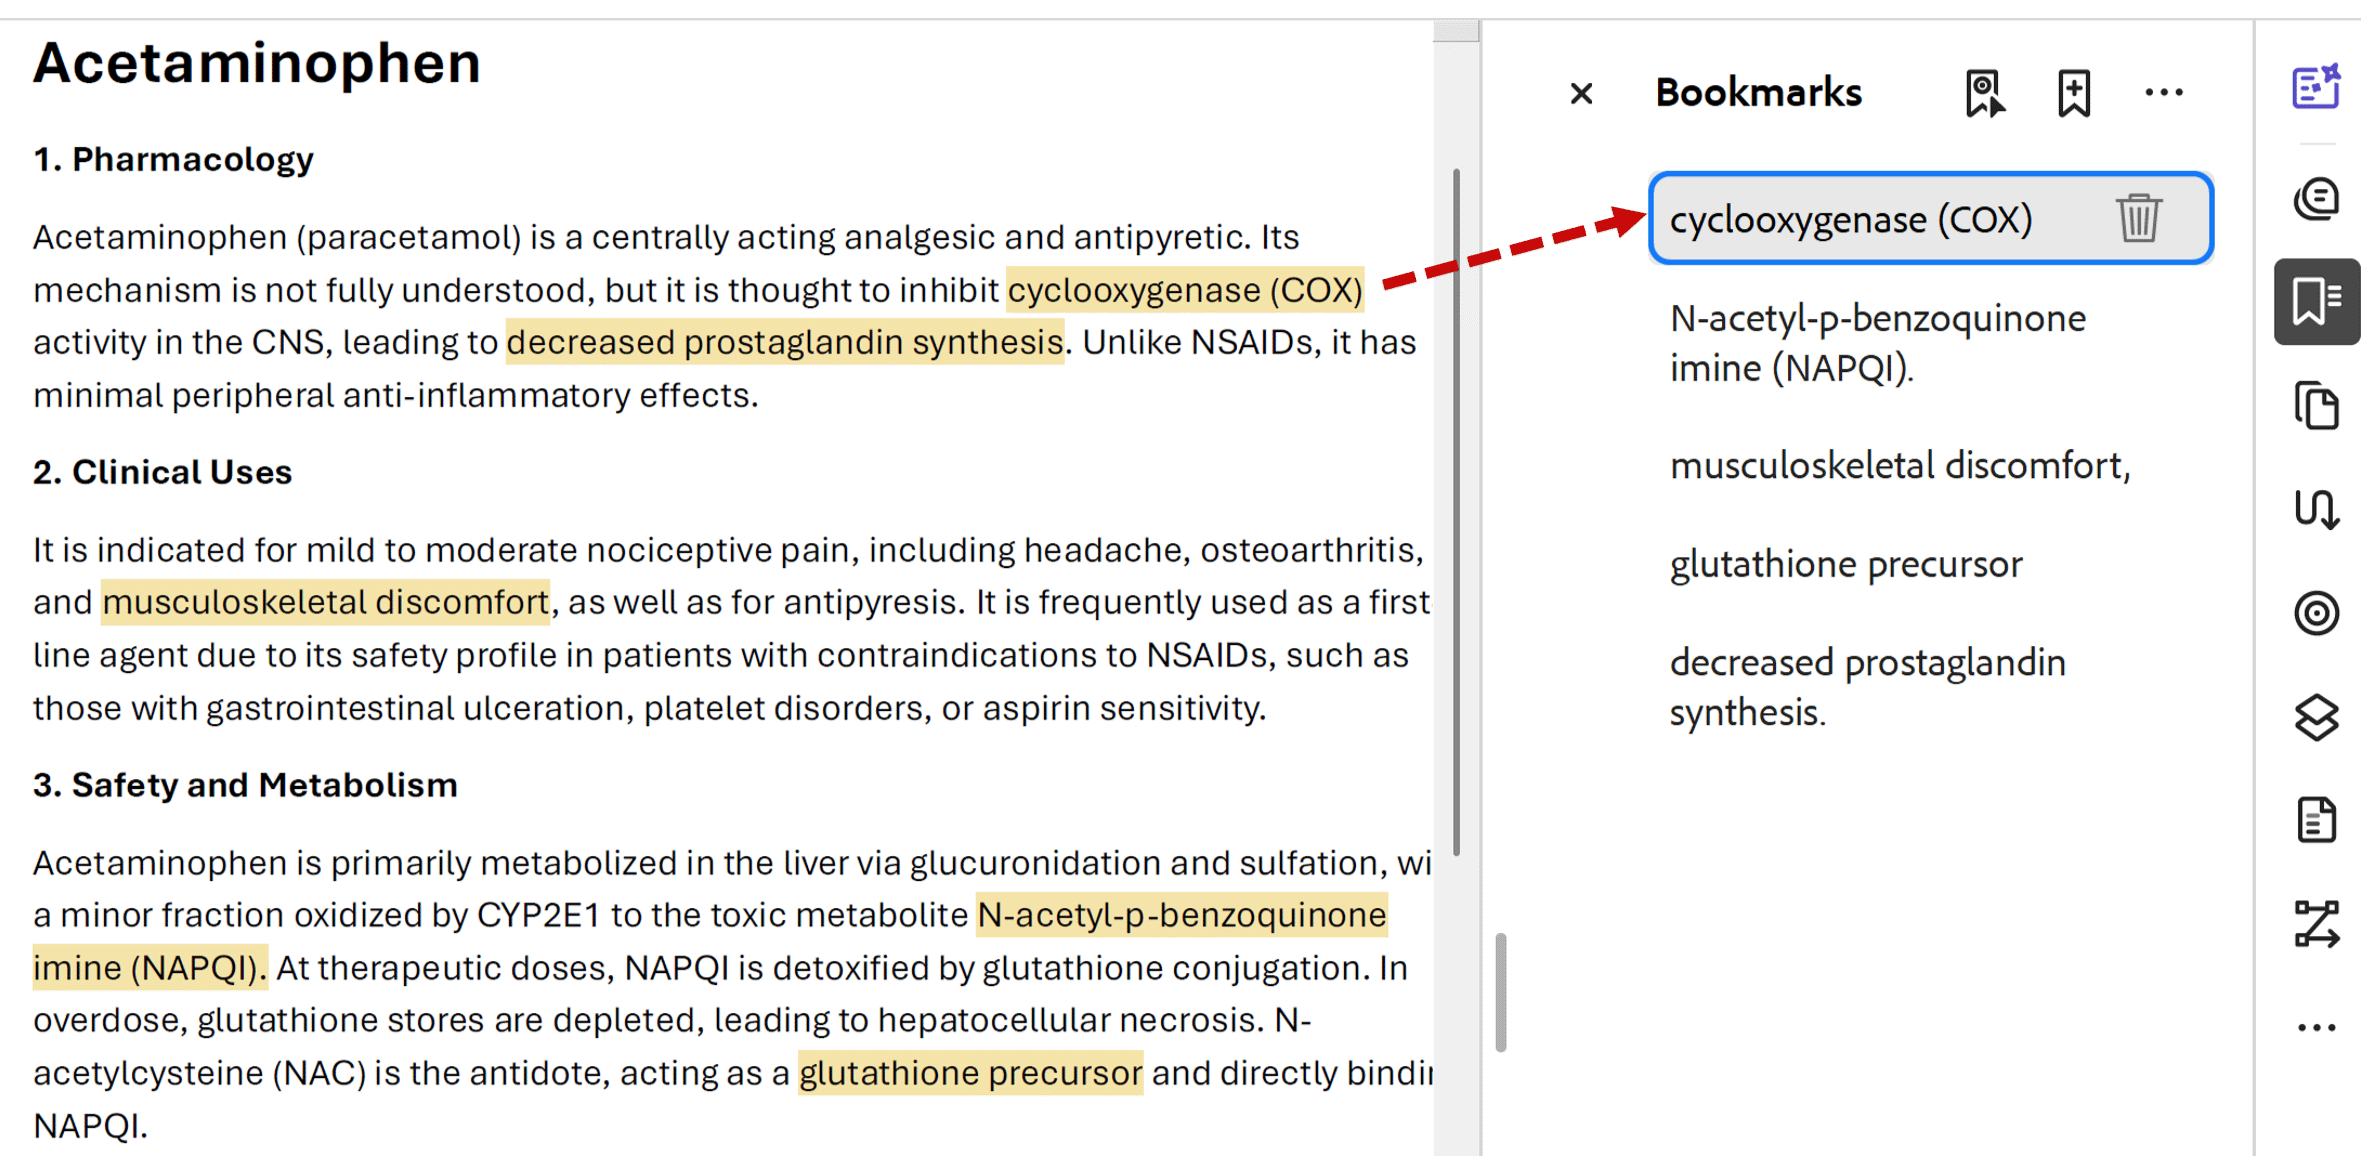
Sample Results: Bookmarks from Text Highlights
The following screenshow shows bookmarks created from text hightlights.
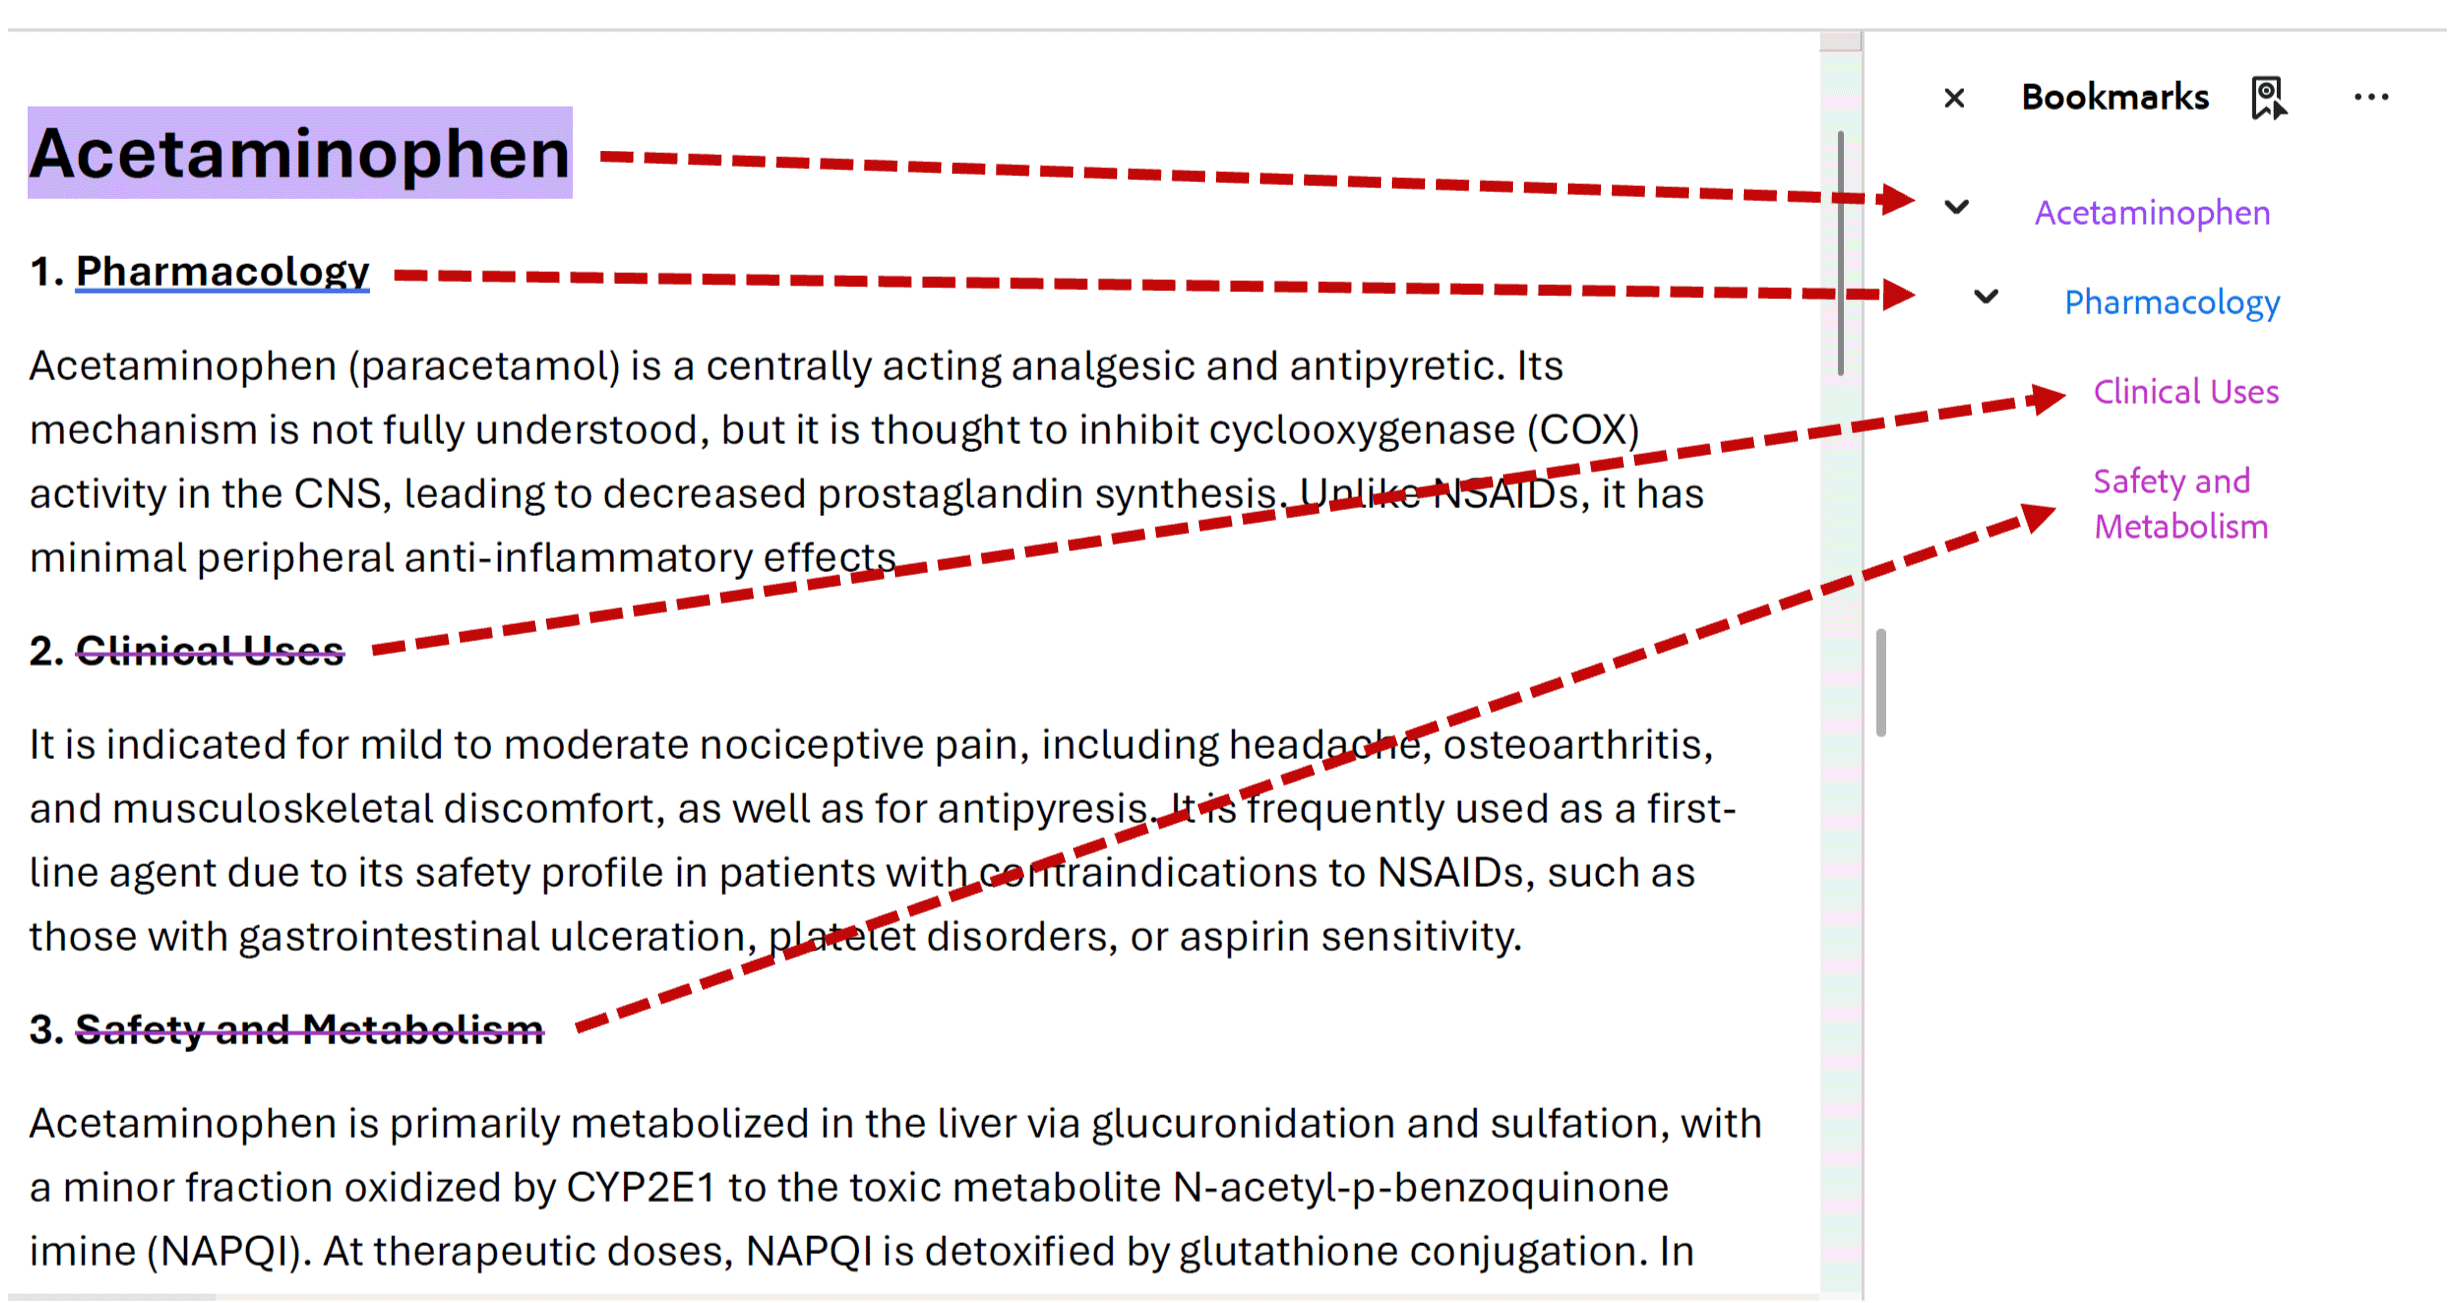
Sample Results: Multi-level Bookmarking with Colors
The following screenshow shows 3-level (Highlight/Underline/Crossout) bookmarks using annotation color for the bookmark titles.
Sample Results: Bookmarks from Popup Notes
The following screenshow shows bookmarks created from popup notes.

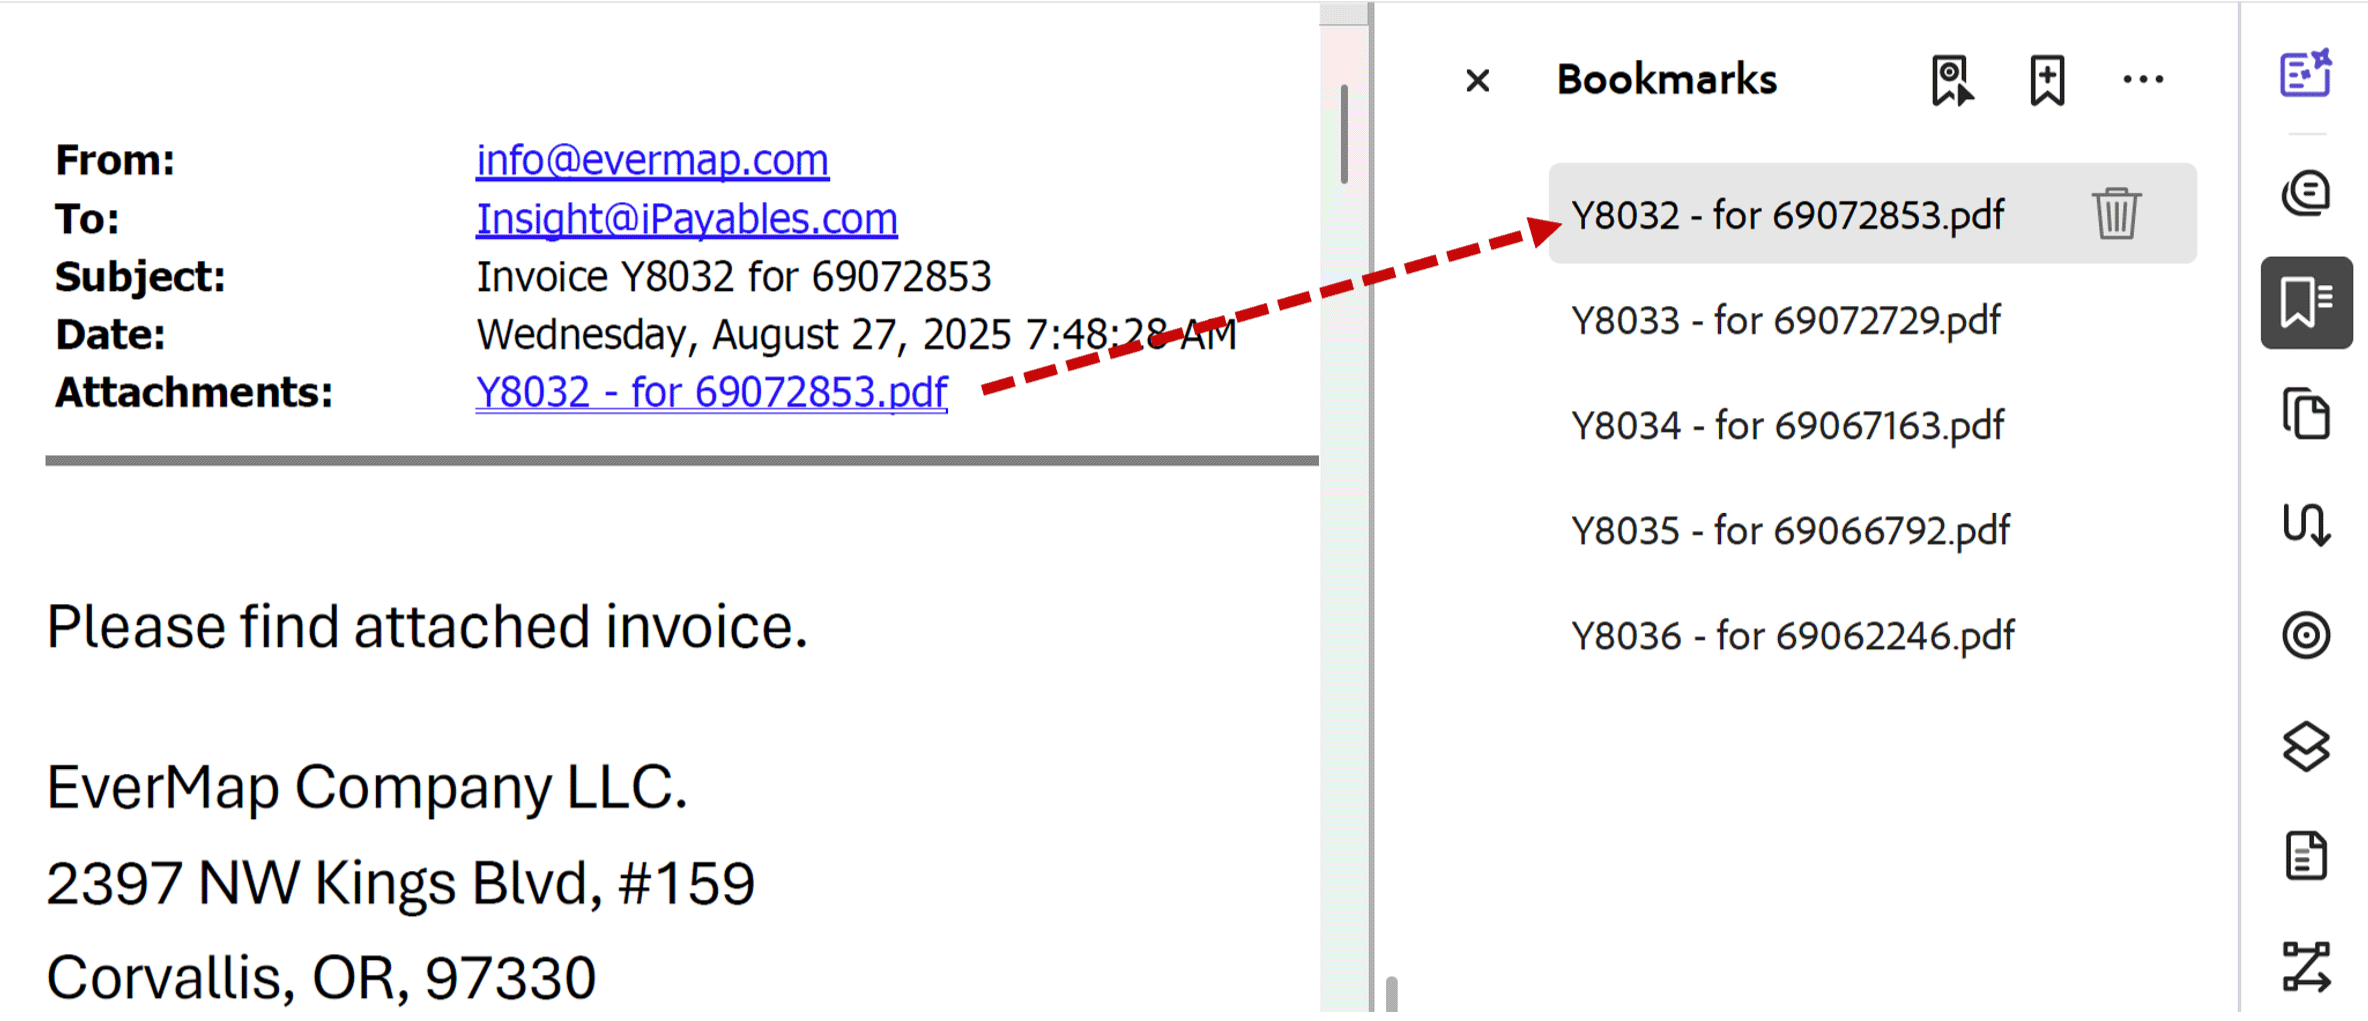
Sample Results: Bookmarks from Email File Attachments
The following screenshow shows bookmarks automatically created from file attachments (file annotations) in PDF file exported from MS Outlook. This is a quick way to bookmark all attachments in multi-email PDF file without performing any manual work.
Click here for a list of all step-by-step tutorials available.