Using Visual Field Mapping in PDF Mail Merge
AutoMailMerge plug-in for Adobe® Acrobat®
- Introduction
- This tutorial explains how to use visual field mapping tool in the AutoMailMerge™ plug-in for the Adobe® Acrobat®. This tool establishes correspondence between data fields and PDF form fields for use in the mail merge process. This method is more efficient than a regular mapping method (mapping by field names) when PDF field names are long, complex or do not reflect the actual "meaning" of the field. The visual mapping tool allows to add field mapping just by double-clicking on the PDF form field and selecting an associated data field. There is no need to know the field name (for a form field) in order to establish a data mapping.
- Please note that using this tool is optional. You can establish correspondence between form fields and data fields using regular method as described in the following tutorial.
- Input Document Description
- The following tutorial is going to demonstrate how to produce personalized W-2 PDFs by using a mail merge operation with the help of AutoMailMerge plug-in.

- The CSV (comma-separated values) data file is used for the data source. This kind of files can be created by Excel and any other spreadsheet application. It is also possible to use Excel spreadsheet directly. The input file contains personal data for 5 employees: first name, last name, employee`s SSN, employee`s address and ZIP code.
.PNG)
- The goal is to establish correspondence between data fields and PDF form fields using a visual field mapping tool. This process is typically referred as "field mapping". The mappings are used for automatic filling of PDF form fields with data from the spreadsheet.
- Prerequisites
- You need a copy of the Adobe® Acrobat® Standard or Pro along with the AutoMailMerge™ plug-in installed on your computer in order to use this tutorial. You can download trial versions of both the Adobe® Acrobat® and the AutoMailMerge™.
Stage 1 - Visual Field Mapping
- Step 1 - Open a PDF File
- Start the Adobe® Acrobat® application and open a PDF form using “File > Open…” menu.
- Step 2 - Open the "Mail Merge Field Mappings" Dialog
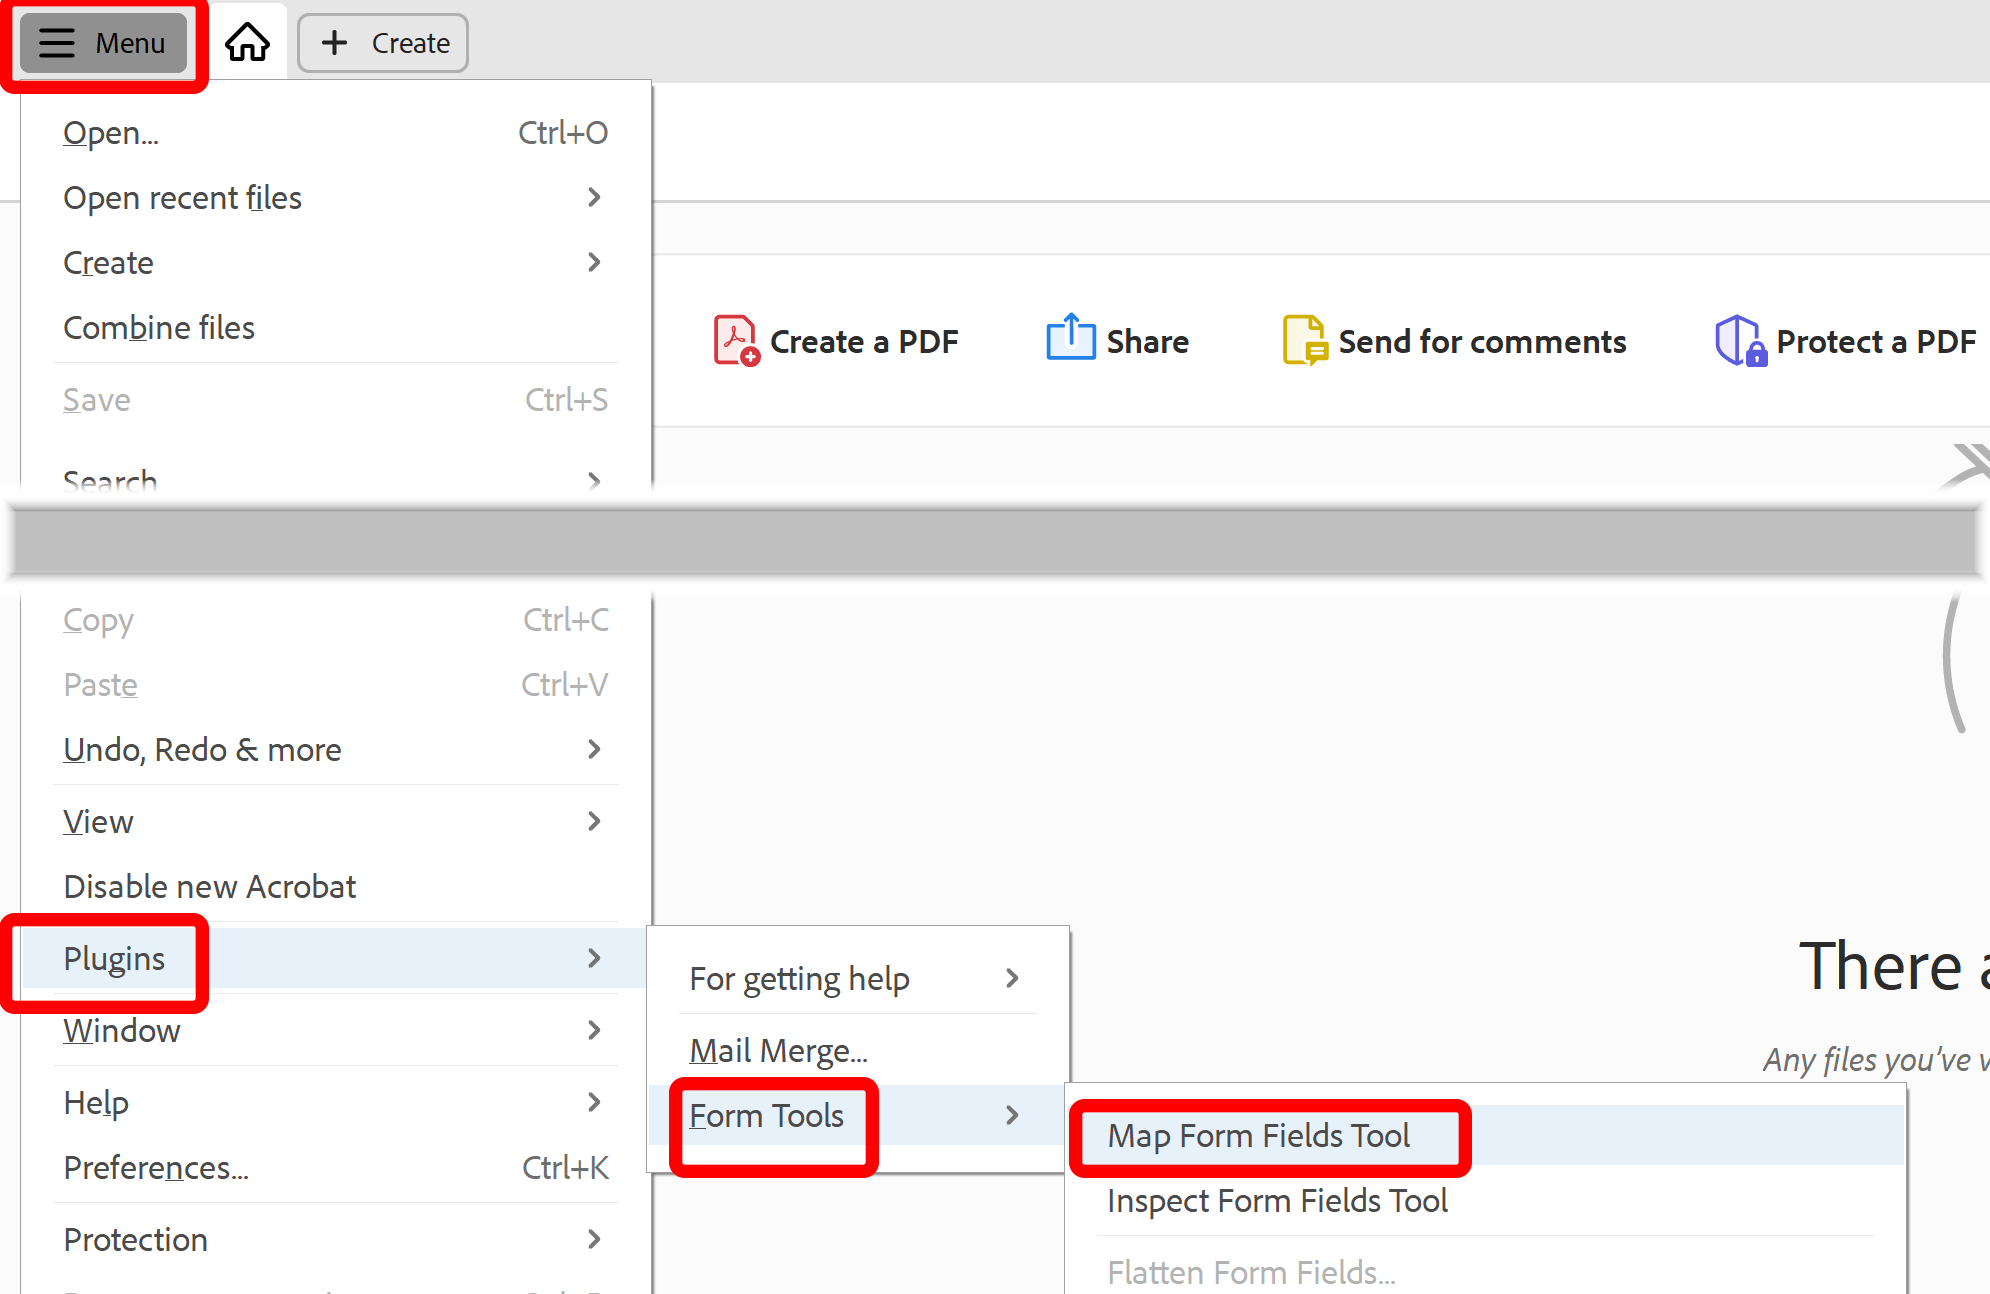
- Select "Plug-Ins > Form Tools > Map Form Fields Tool" to open the "Mail Merge Field Mappings" dialog.
- If you are using a new Adobe Acrobat interface, then you can find Map Form Fields tool here:
- If you are using a "classic" Adobe Acrobat interface, then use Plug-ins menu on the toolbar:
.PNG)
- Step 3 - Select a Data Source
- Click “Select Data Source…”.
.PNG)
- Select a data type to use from the list. Click "OK" once done.
.PNG)
- Choose a data file you are planning to use for the mail merge. Click "Open".
.PNG)
- Step 4 - Set Field Mapping
- Navigate to the page with the field(s) you need to add data mappings. The form fields are highlighted with the thick red border. Double-click on the form field to assign mapping to a data field(s).
.PNG)
- Select a corresponding data field in the "Select Mapping For..." dialog. Click "OK" to add selected mapping.
.PNG)
- Step 5 - Set More Field Mappings
- Once the form field has been mapped to the data field it will be highlighted with the green border. Repeat the step 4 for each form field that needs to be mapped.
.PNG)
- Step 6 - View Mappings (Optionally)
- You can review current set of mappings by clicking "View Mappings…" button.
.PNG)
- To delete an existing mapping, select it from the list and click “Delete Mapping” button. Click "OK" once done.
.PNG)
- Step 7 - Save Mappings
- Once all mappings are defined, press the "Save Mappings…" button.
.PNG)
- Specify a folder, a file name and save the mappings into the *.fmaps file. This file can be later used in the mail merge process.
.PNG)
- Step 8 - Close the "Mail Merge Field Mappings" Tool
- Press the “Close” button to exit the "Mail Merge Field Mapping" tool.
.PNG)
Stage 2 - Perform Mail Merge
- Step 9 - Open the "Mail Merge" Dialog
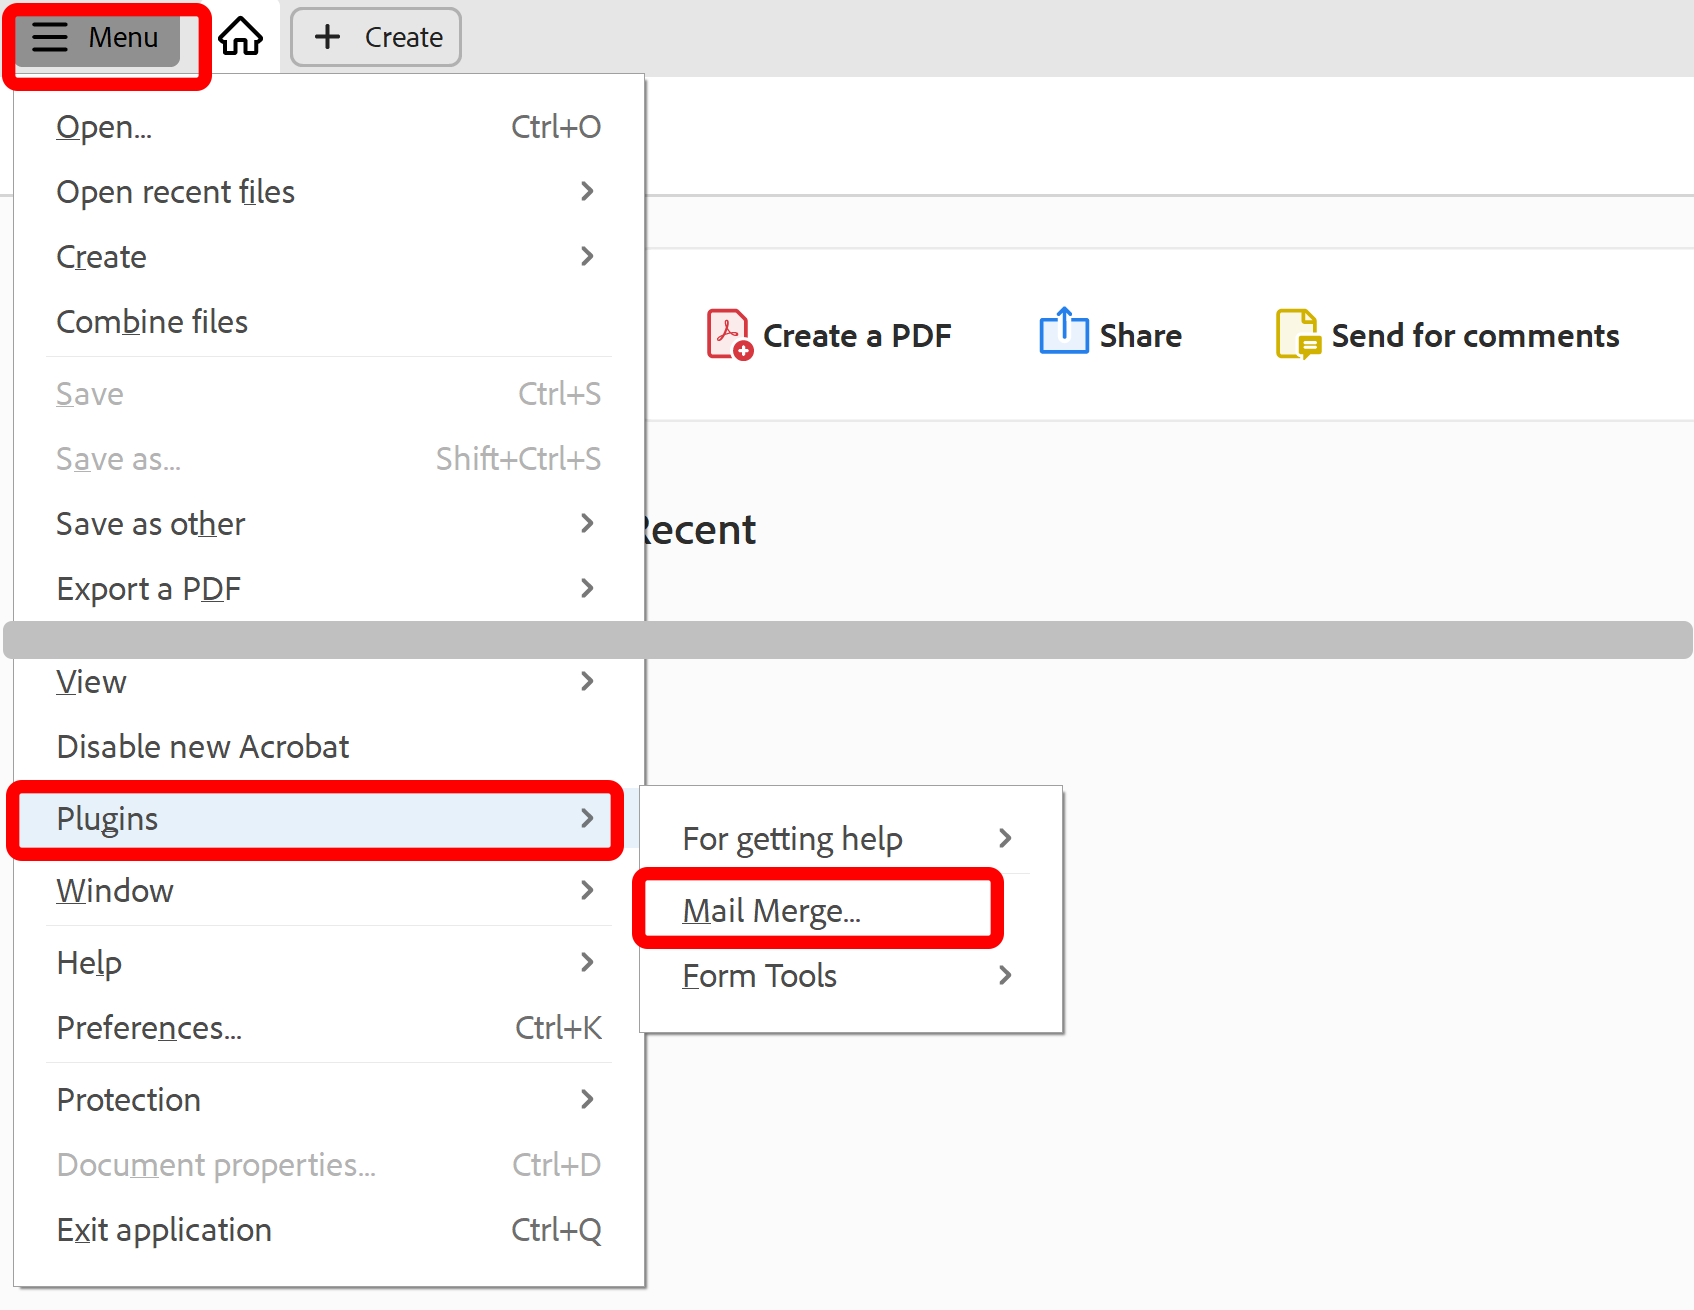
- Select Plugins > Mail Merge… to open the Mail Merge dialog.
- If you are using a new Adobe Acrobat interface, then you can locate Mail Merge menu here:
- Please see the following page for a short video tutorial on how to locate Plugins menu in the new Adobe® Acrobat® interface.
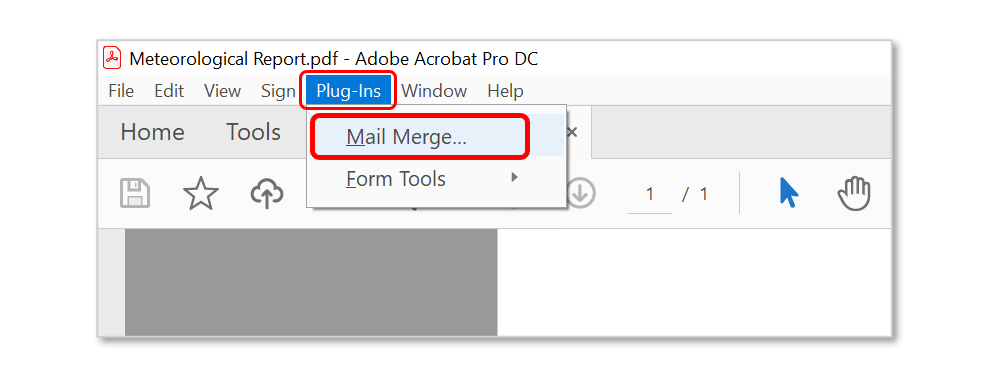
- If you are using a "classic" Adobe Acrobat interface (pre-2022), then you can locate Mail Merge menu here:
- Step 10 - Edit Mail Merge Settings
- Clear current settings if necessary. Press the "Edit Settings…" button.
.PNG)
- Step 11 - Select Data File
- Press the "Browse…" button in the "Data Source" dialog to select the input data file.
.PNG)
- Select a data type to use from the list. Click "OK" once done.
.PNG)
- Choose the same data file that was previously used for the data mapping at the step 3. Click "Open".
.PNG)
- Step 12 - Load Field Mappings
- Now load field mappings that have been previously created (using Visual Mapping tool) by clicking "Load Mappings..." button in the "Data Source" screen.
.PNG)
- Select the *.fmaps file that contains field mappings. Click “Open”.
.PNG)
- Click "OK" once the mappings are loaded.
.PNG)
- Step 13 - Examine the Data Source Selection
- If the mappings are matching the currently selected data file, then you should be able to see all previously defined mapings. Click "Next>" to advanced to the next step.
.PNG)
- Step 14 - Specify Field Options
- Check "Flatten output PDF documents" option (located on "Specify Field Options" screen) if you need to make form fields in the output PDF files non-editable. Click "Next>" to proceed.
.PNG)
- Step 15 - Specify Output Options
- Use "Select Output Options" screen to control where and how to save the output PDF documents. Click "Browse…" to specify an output folder. The software provies ability to insert text from the data fields anywhere in the file name. Optionally, specify other output and file naming options. Click "Next>" to proceed.
.PNG)
- Step 16 - Specify Watermarking Options
- Optionally, specify the watermarking options and click "Next>" to proceed.
.PNG)
- Step 17 - Specify Security Settings
- Optionally, specify the security and document access rights settings. Click "Next>" to proceed.
.PNG)
- Step 18 - Specify E-mail Options
- Optionally, specify e-mail options and click "Next>" to proceed.
.PNG)
- Step 19 - Specify JavaScript Actions
- Optionally, specify JavaScript actions and click "Finish".
.PNG)
- Step 20 - Finish Editing Mail Merge Settings
- Optionally, save the mail merge settings into an *.mms file for a later use by pressing the "Save Settings" button. Use the "Load Settings" button to load the settings from a previously saved file. Click "OK" to start the mail merge process.
.PNG)
- Step 21 - Selecting Data Records (Optionally)
- Optionally, click "View and Filter Data Records…" if it is necessary to run mail merge only on the subset of the data records. Otherwise, press "Run Mail Merge" button to start the actual mail merge process.
.PNG)
- Use the "View and Filter Data Records" dialog to inspect data records and specify what records should be used for the mail merge. Originally, all records from a selected data source are selected for processing. You can click on this checkbox to manually select or unselect records for processing. Each record that has a checkmark in the first column will be used in the mail merge process. All unselected records will be skipped. Use "Select Records..." button to select only a specific range of records.
.PNG)
- Step 22 - Start the Mail Merge Processing
- Press the "Run Mail Merge" button in the "Confirm Processing" dialog to start mail merge processing.
.PNG)
- Step 23 - Check the Mail Merge Results
- The "Mail Merge Results" dialog will appear once a mail merge is completed. The dialog will list any errors that occurred during the processing. Click "OK" to close this dialog and open an output folder where generated PDF files are stored.
.PNG)
- Step 24 - Examine Output Files
- Examine output files by opening them in the Adobe® Acrobat® and check if they satisfy project requirements.
.png)