Defining Data Fields for Information Extraction from PDF Documents
- Introduction
- The AutoExtract™ plug-in can be used to extract data from PDF documents, and create organized spreadsheet records. The easiest method is to use interactive PDF form fields as indicators of where to extract textual data from - but it is also possible to manually define page areas.
- In this tutorial, we will demonstrate how to manually define where to extract data from within various input documents. Data field definitions can be created via 4 different methods:
- Tutorial Overview:
-
- From a specific page location (good for fixed layouts where all input documents follow an identical format). See steps 1 - 5 below.
- By using a text pattern search (search for text following a unique pattern and extract it – e.g.: phone numbers, SSNs, EINs etc.). See step 6 below.
- Based on the relative position of a textual “clue”. For example - extract the text appearing beneath the located search text. See step 7 below.
- Using Acrobat JavaScript scripting (for extracting document's metadata).
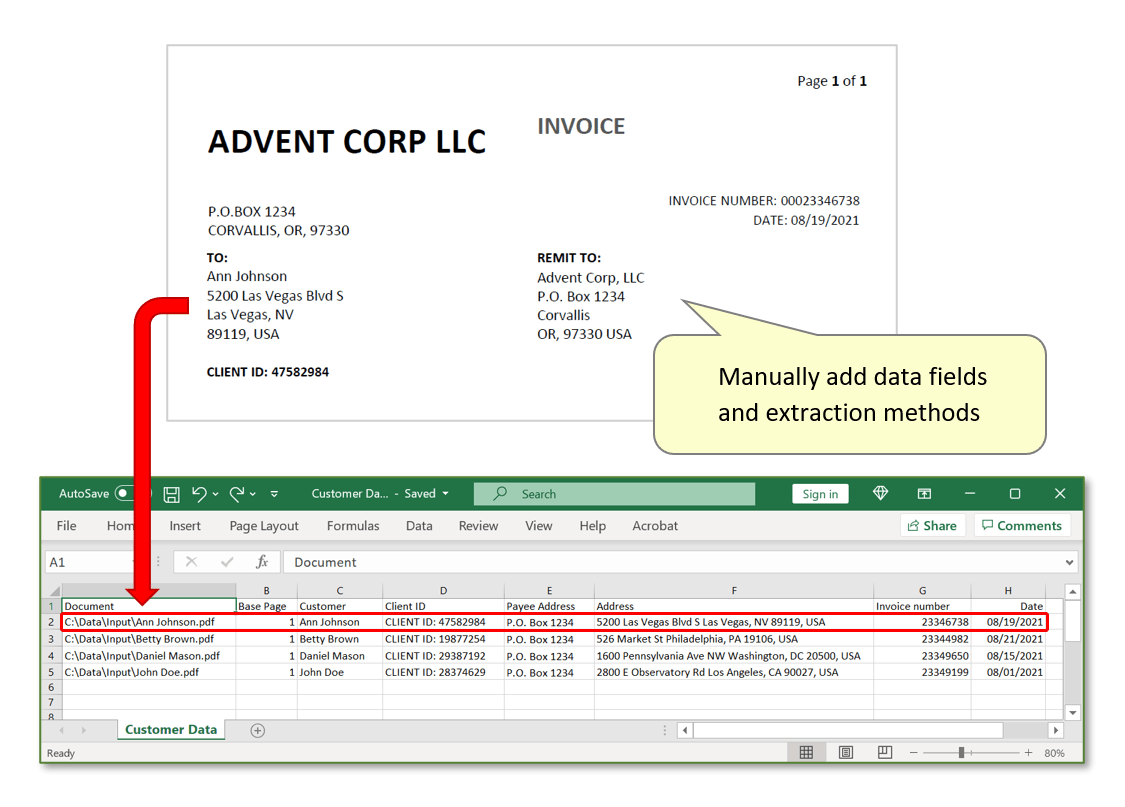
- The input documents used here are a collection of sample invoices. Each invoice features an identical format – we will use the three methods listed above to define how text should be extracted from them. The goal is to create data records for each invoice ‘customer’ in an output *.csv spreadsheet file.
- Prerequisites
- You need a copy of Adobe® Acrobat® along with the AutoExtract™ plug-in installed on your computer in order to use this tutorial. Both are available as trial versions.
- Step 1 - Open AutoExtract"
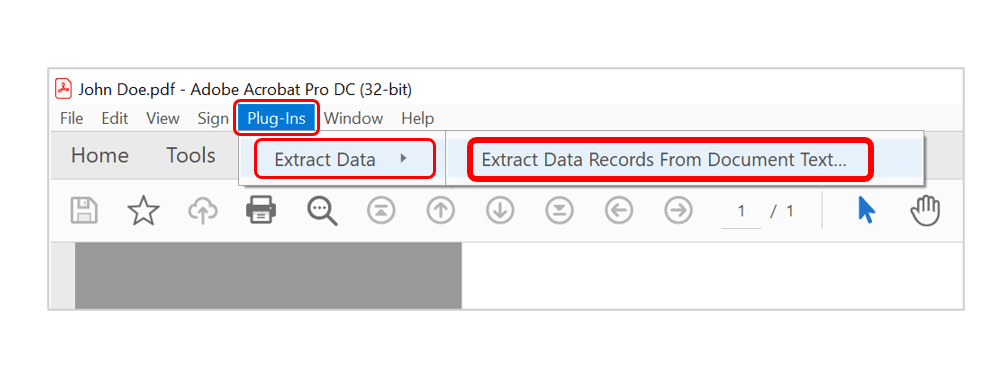
- Open a sample PDF document in Acrobat (i.e: an invoice) that has the same format as all of the files that you want to extract data from. Then select "Plug-Ins > Extract Data > Extract Data Records From Document Text…" to open the "AutoExtract Plug-in" dialog.
- Step 2 - Add a Data Field
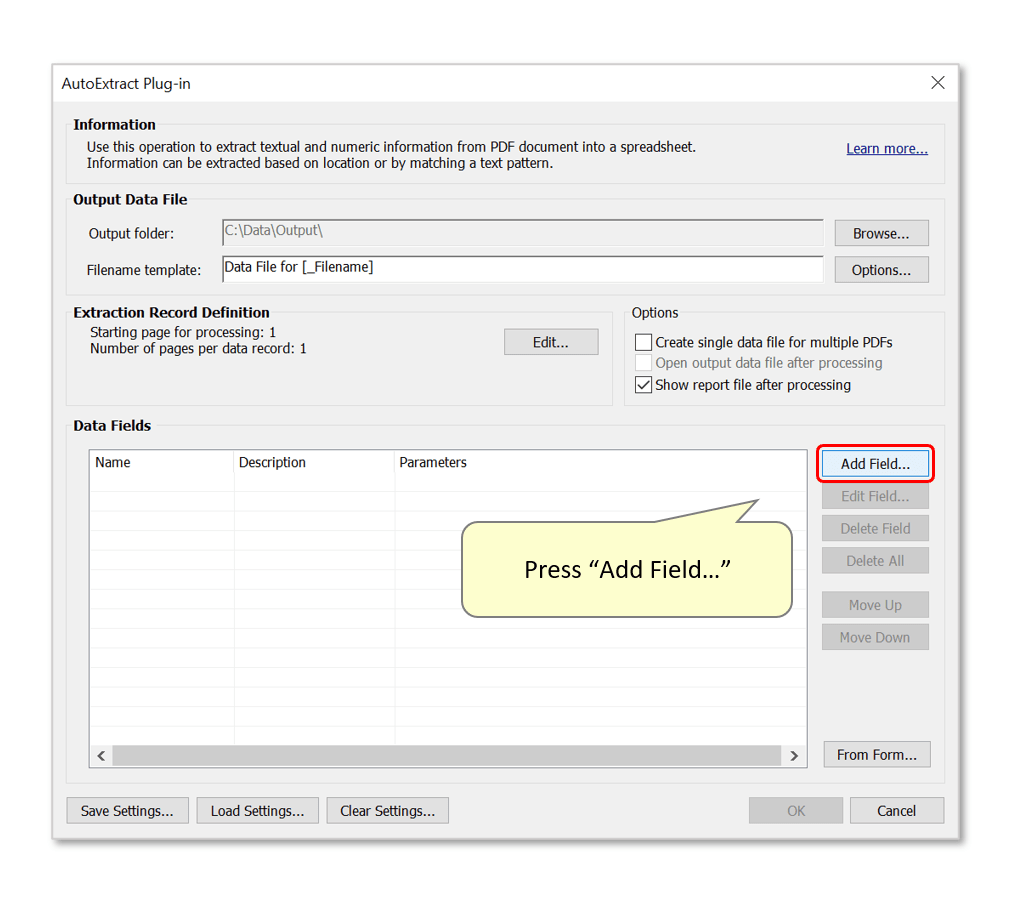
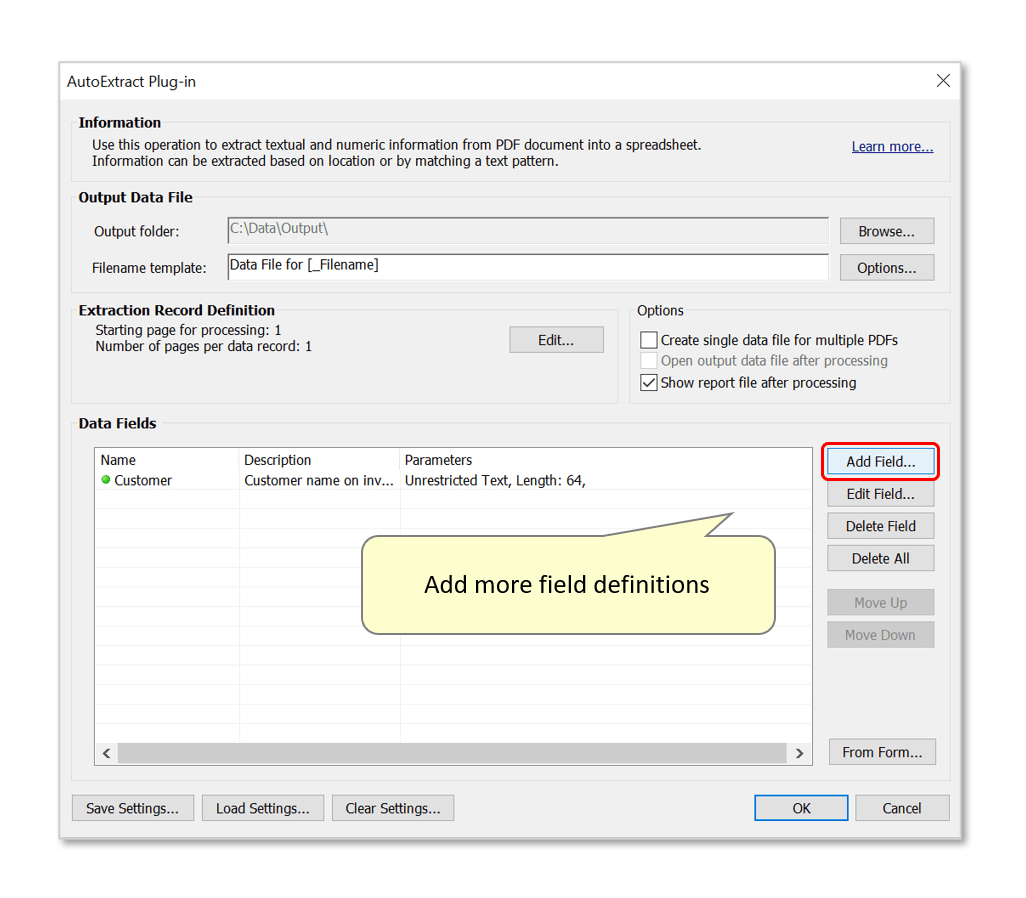
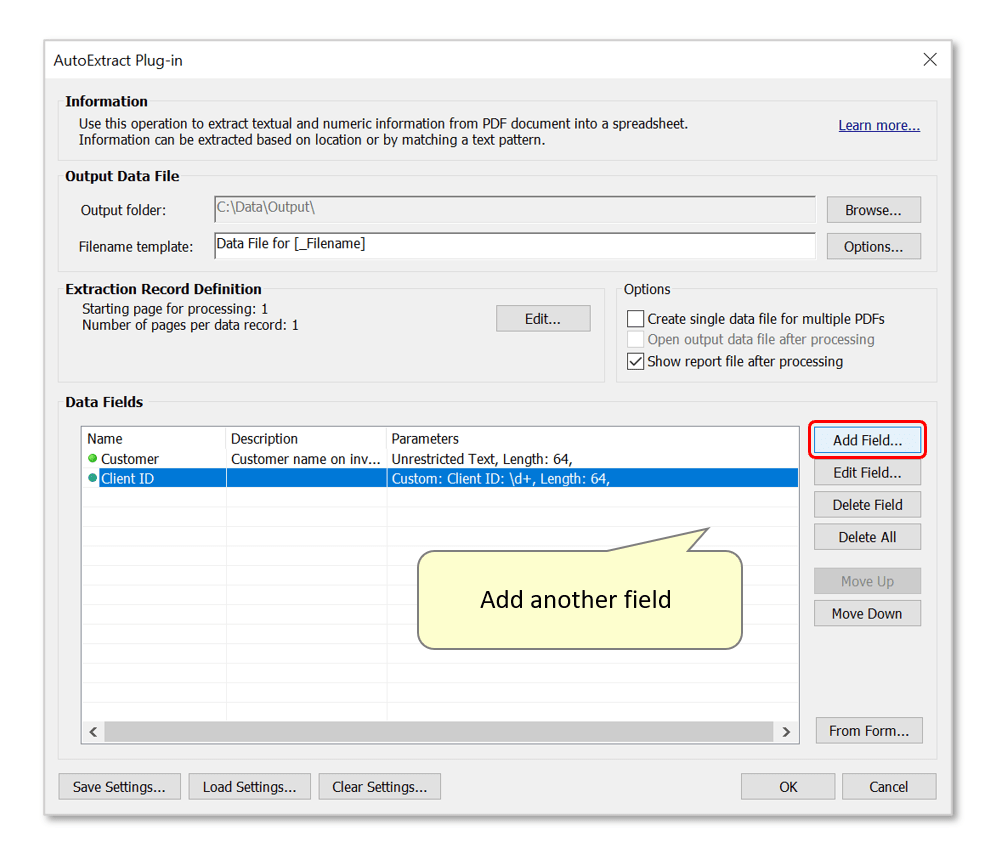
- Press the "Add Field..." button to add a field to the settings configuration.
- Step 3 - Name the Data Field
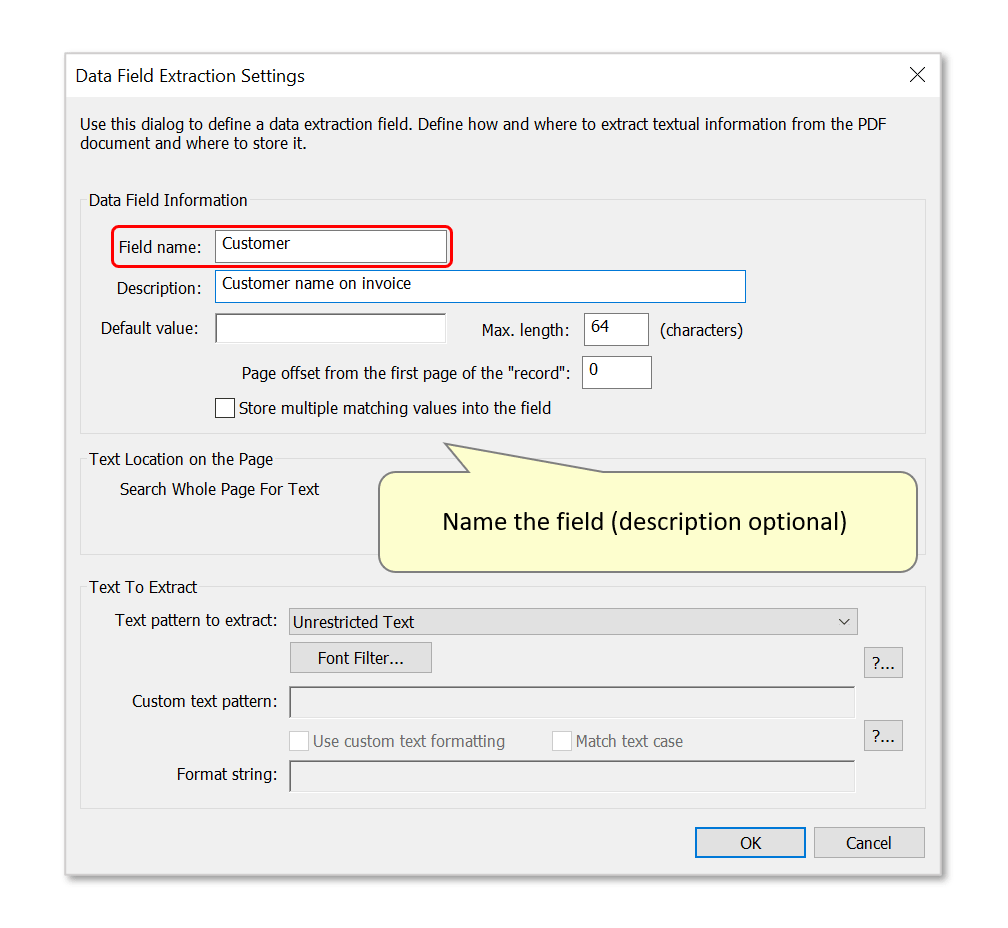
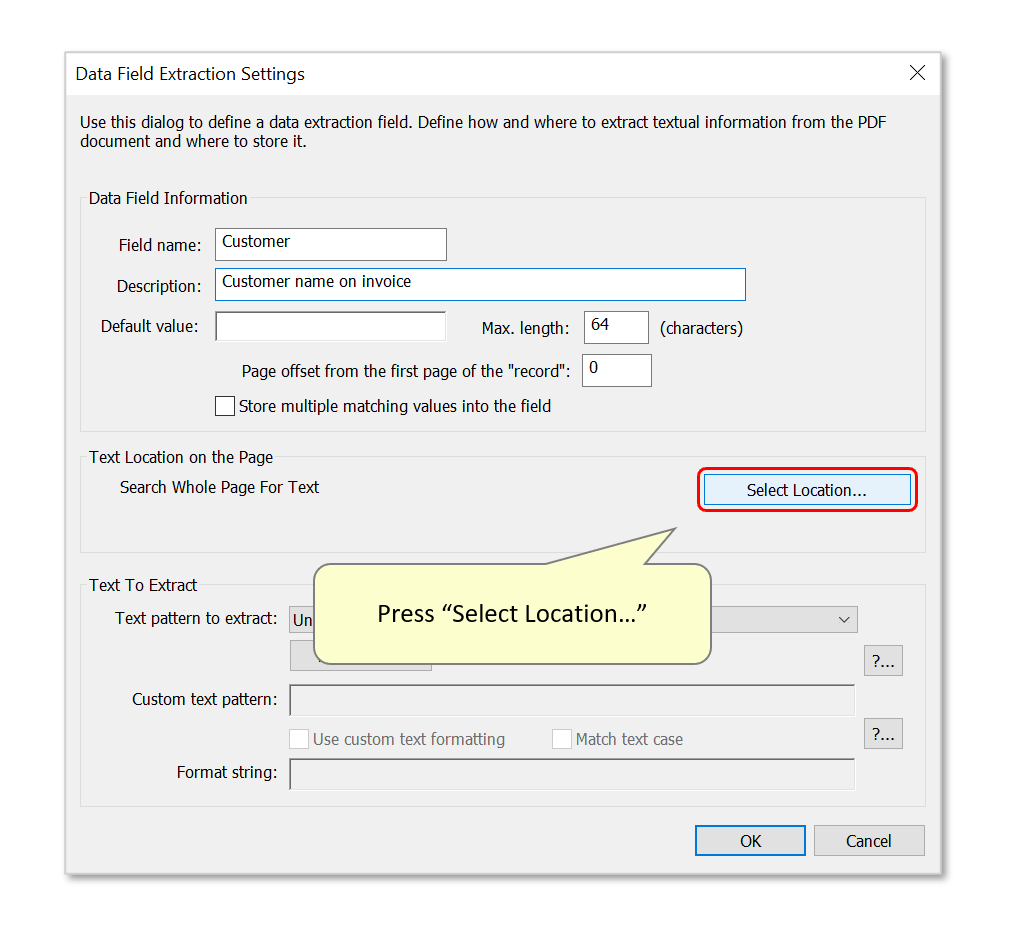
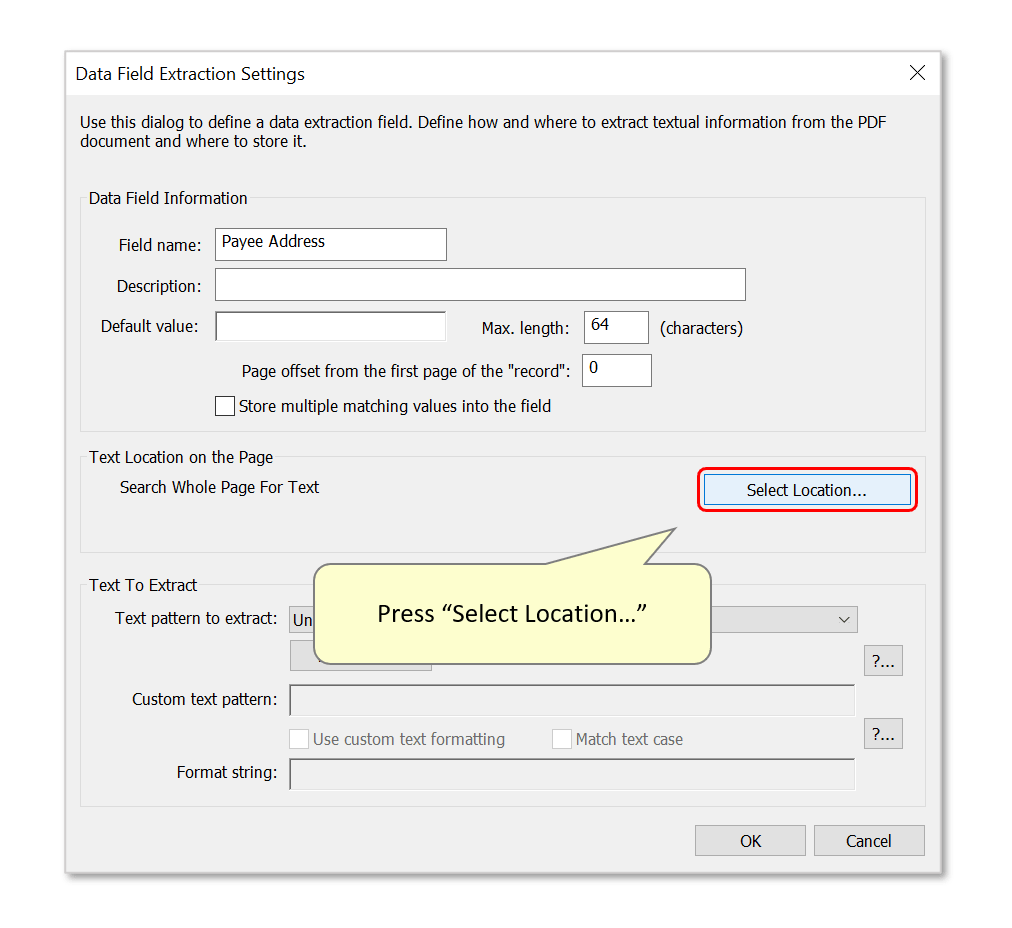
- Enter a name for the data field into the "Field name:" box. This will become the field header in the output spreadsheet(s) containing data extracted from the page area specified below.
- Optional: add a data field description. This may assist distinguishing similarly-titled data field names in a list.
- Step 4 - Define a Page Location to Search for Text
- Press "Select Location...".
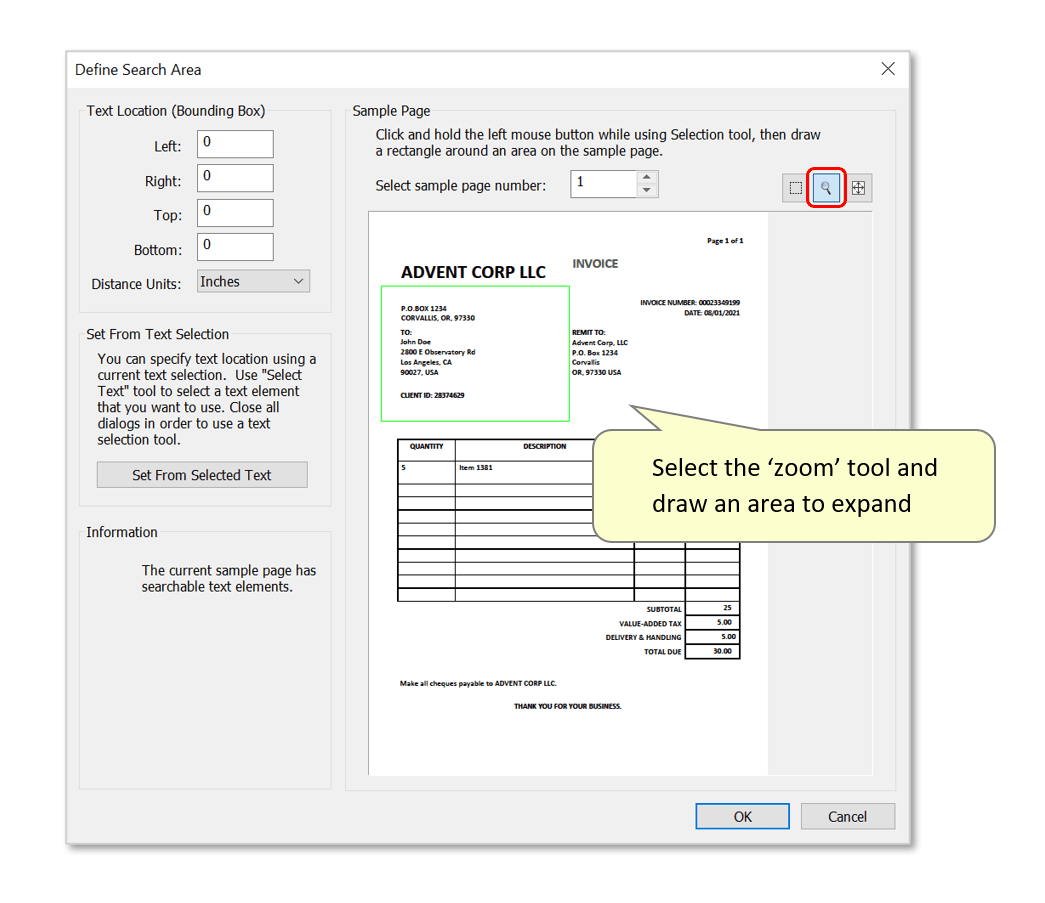
- Use the "Select a fixed area on the page" option and press "Next> >" to proceed.

- Optional: use the 'zoom' tool to expand an area of the sample page.
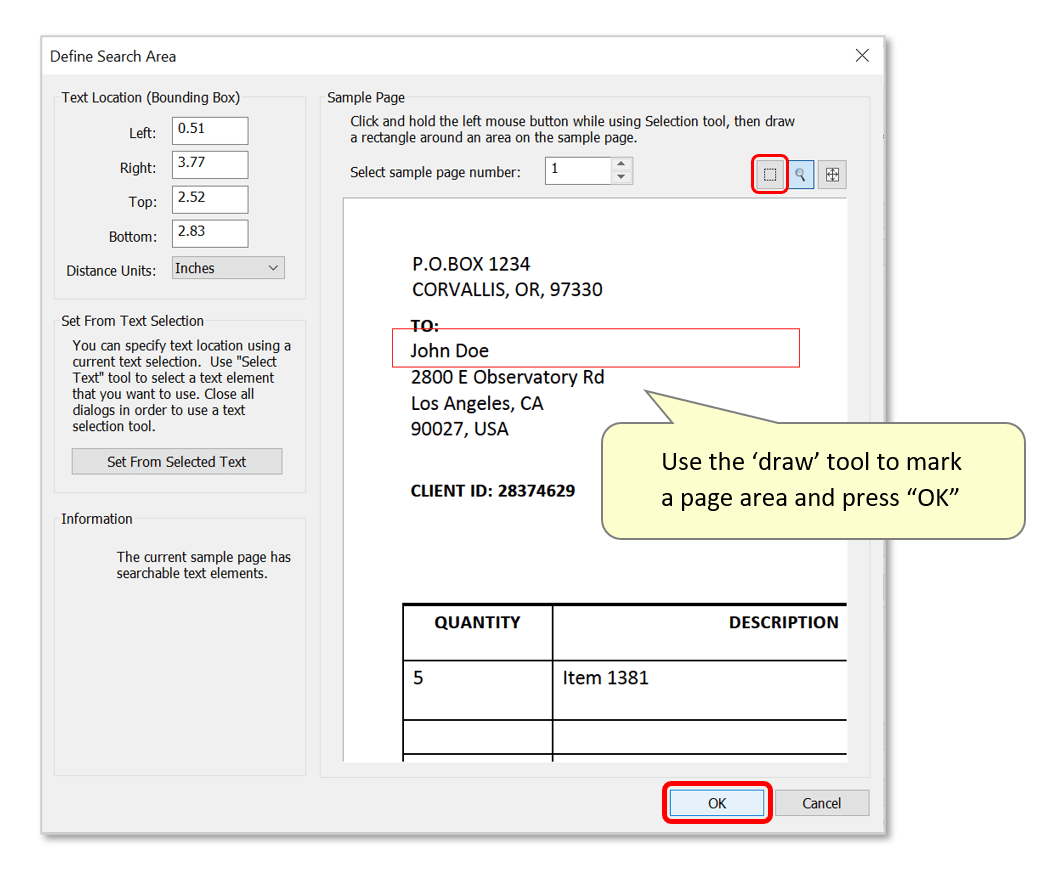
- Use the selection tool to draw a box marking the area of the page to search for text.
- IMPORTANT: PDF text elements have certain ‘dimensions’ (extents). This refers to the actual space that each character occupies on the page. The size of this box depends on the fonts’ characteristics and on the application that was used to create the PDF file. Be careful not to create extraction areas that are too small - they should fully encompass each character’s entire extents box in order to extract it. Make extraction areas (vertically) larger wherever possible – see below where the defined area includes extra space above/below the text to extract. It’s even possible to slightly overlap adjacent text items.
- Press "OK" to proceed.
- Step 5 - Confirm Data Field Settings
- The page location parameters will now be summarized here. Press "OK" to proceed.
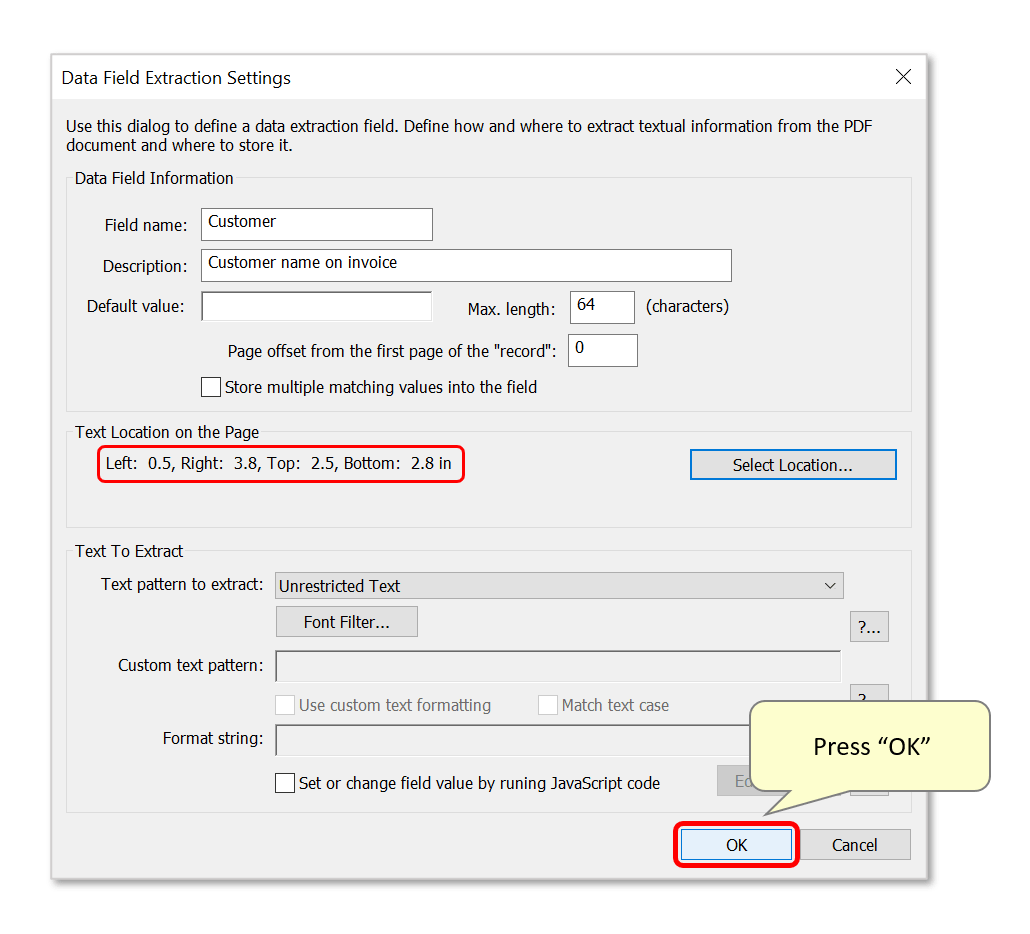
- The data field will now be listed in the AutoExtract Plug-in dialog. Press "Add Field..." to add another.
- Step 6 - Optional: Extract Text Using a Text Search
- It's possible to extract text from PDF files that matches a specific pattern. Using this method, no unique page area (i.e. PDF form text fields) is used for the extraction. The plug-in searches all pages of any input files, and any text matches are identified and extracted to the output spreadsheet.
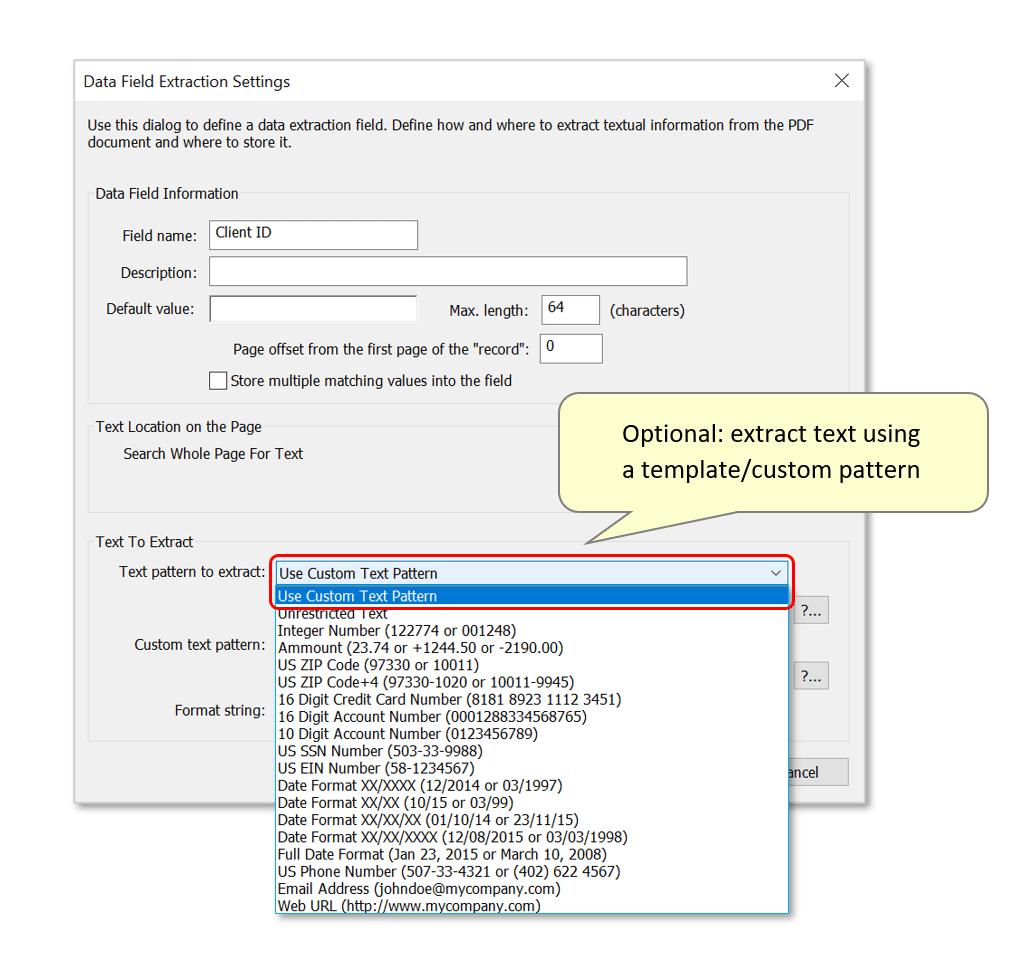
- To demonstrate, we will search for the presence of a unique "Client ID" number located on each input invoice. Name the data field, then use the drop-down list next to "Text pattern to Extract:" to select "Use Custom Text Pattern". It's also possible to use a template pattern from a list of typical options.
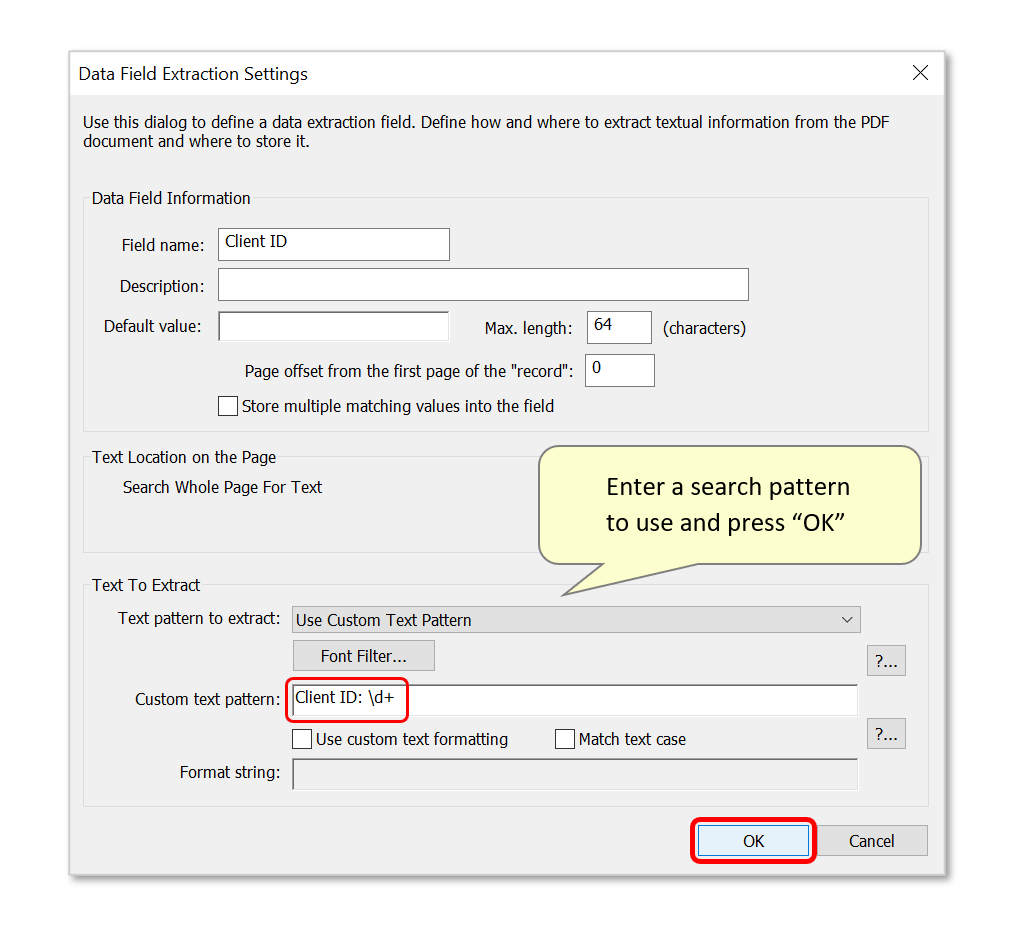
- Enter a text pattern to search for using regular expression syntax. By default, the entire pages of each file will be searched for occurrences of matching text unless a specific search area is selected (see step 4).
- Press "OK" to proceed.
- Step 7 - Optional: Extract Text via an Anchor Point
- It’s possible to extract text based on the relative position of a textual “clue”. For example - extract the text appearing beneath the words “BILL TO:”. This is a very powerful method, because it combines a text search and a positional offset to specify where text should be extracted from. It can be especially handy when working on some free-style documents.
-
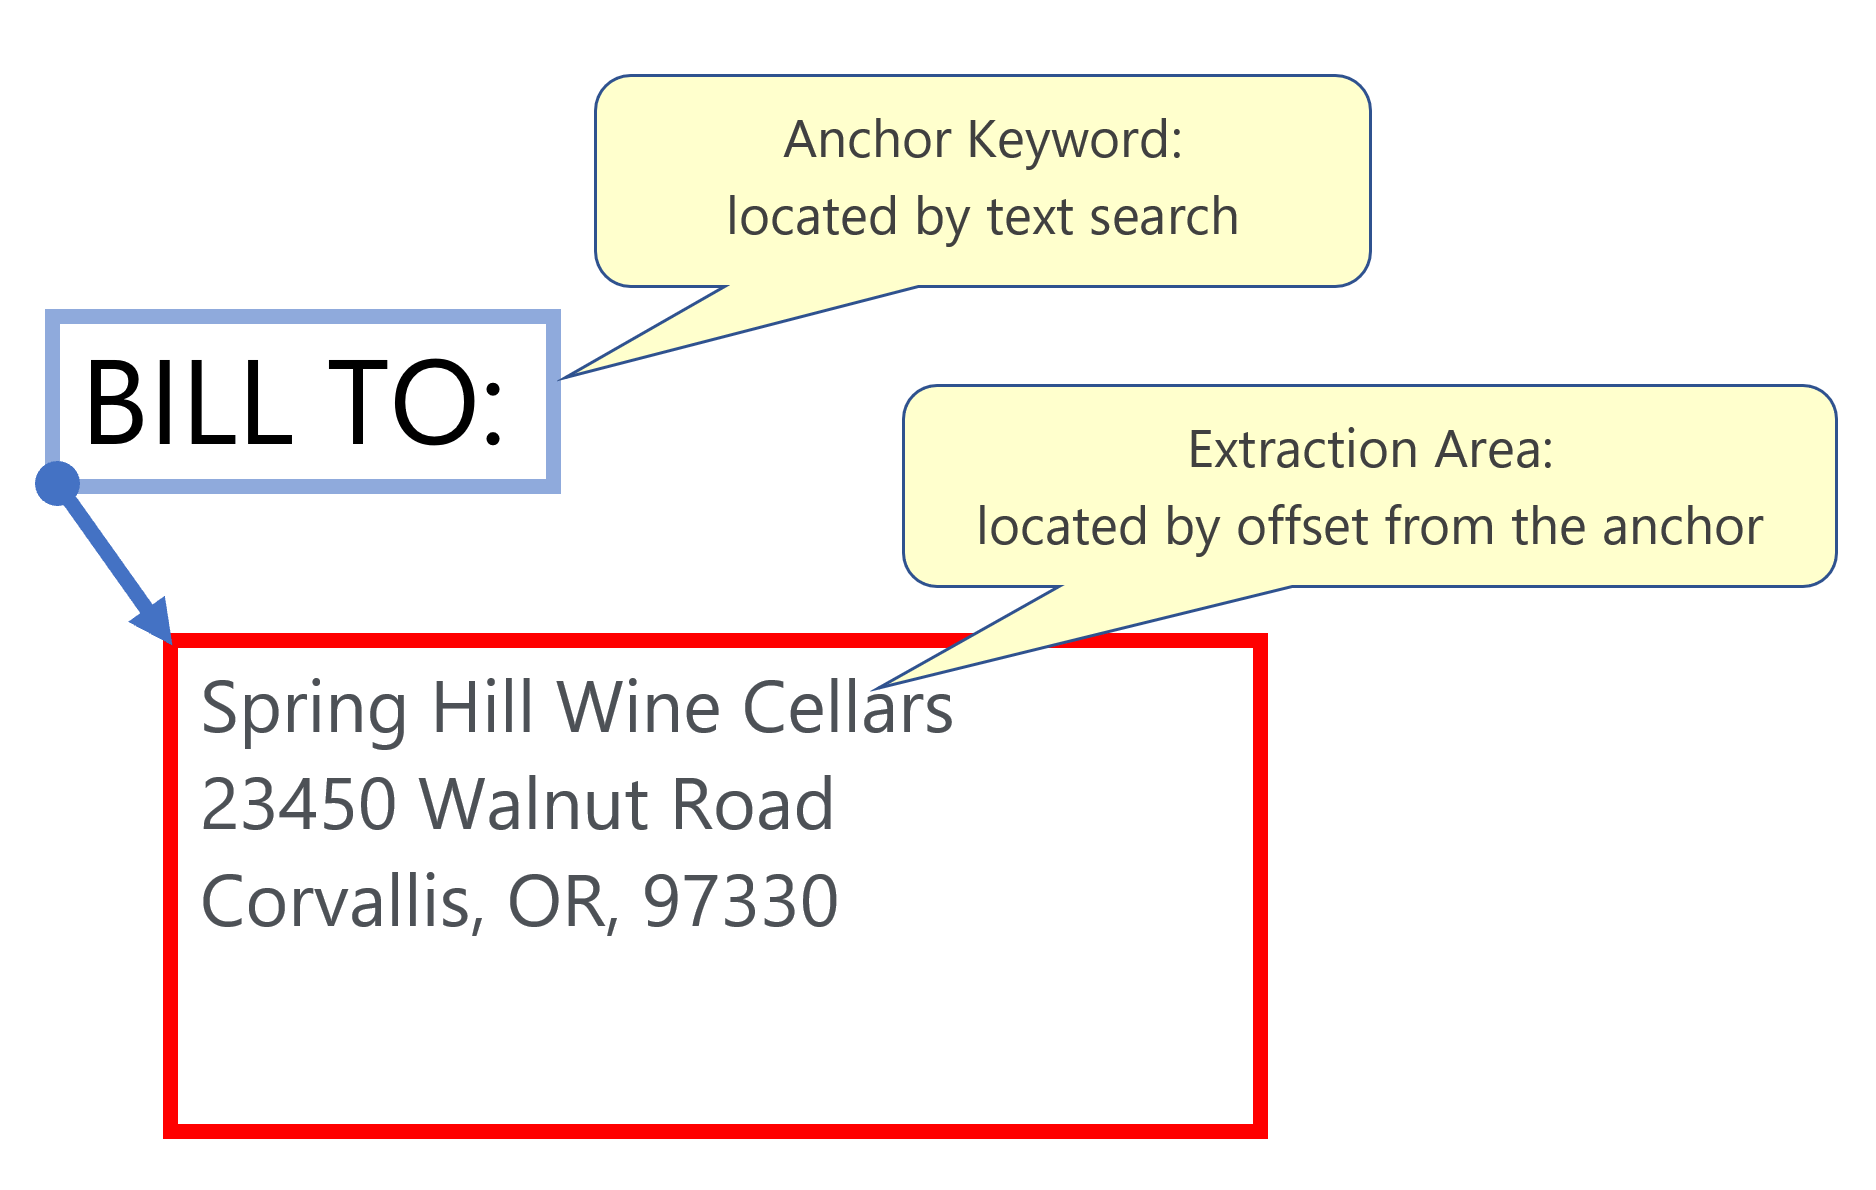
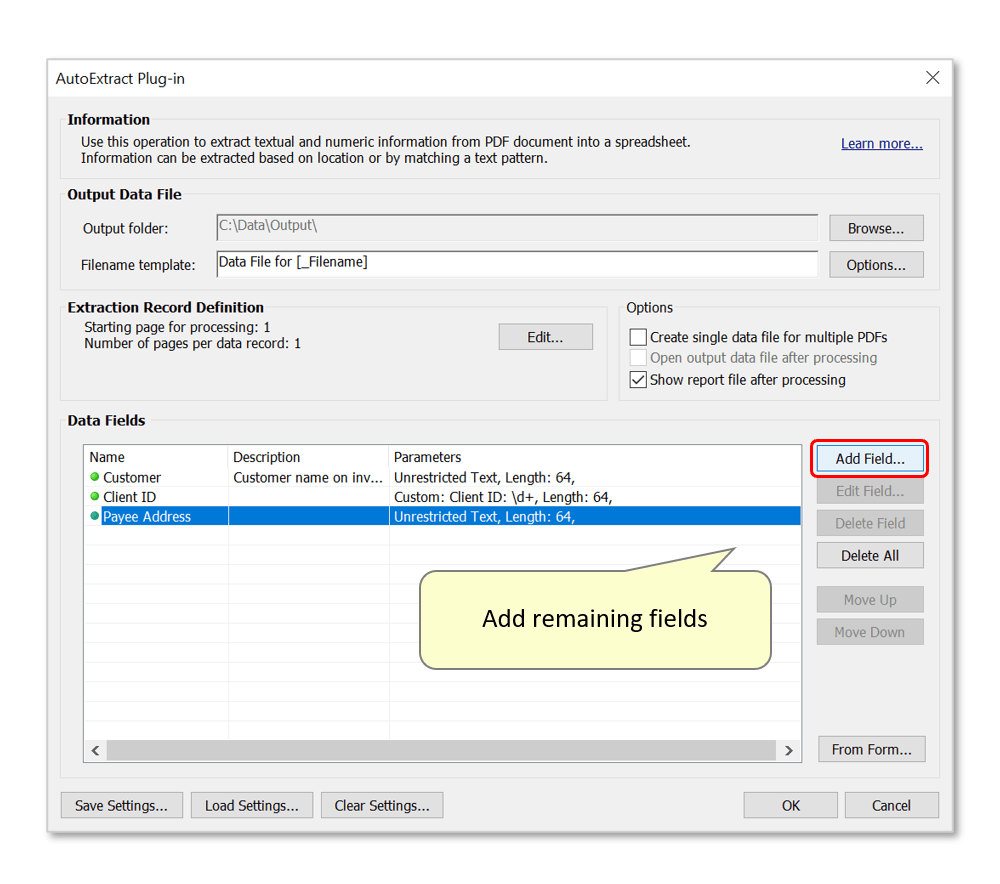
- Press "Add Field..." to define a field using this method.
- Name the data field, then press "Select Location...".
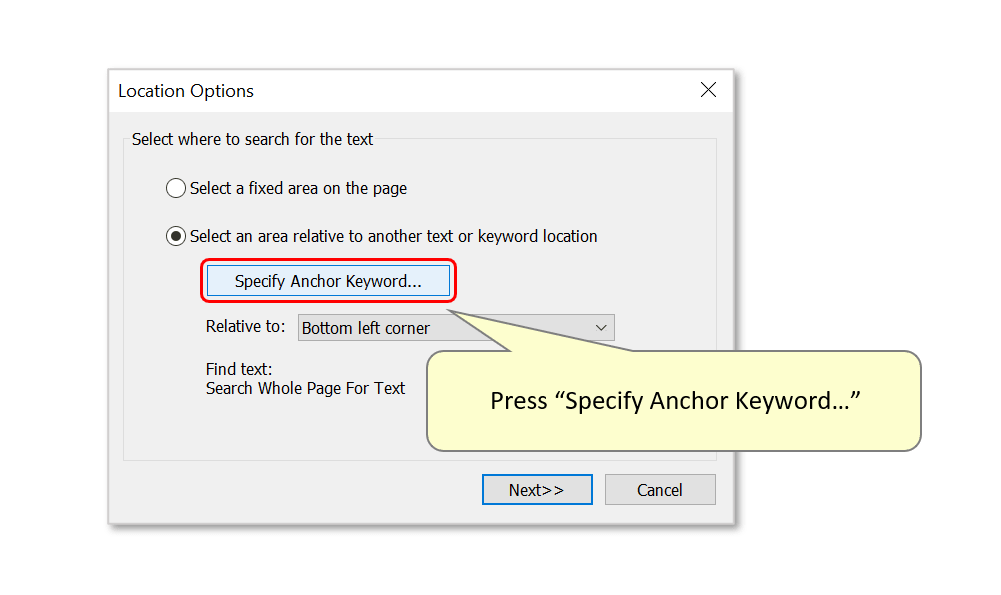
- Choose the "Select an area relative to another text or keyword location" option, then press "Specify Anchor Keyword...".
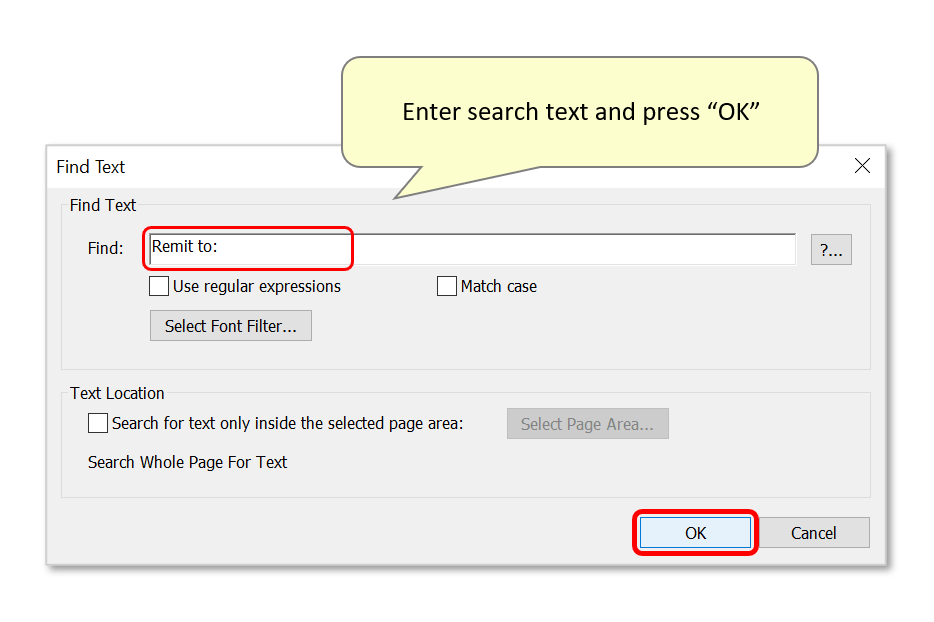
- Enter text to search for as an anchor point - here we will use "Remit to:" as a search keyword. Note that if you enter a search keyword that is not present on the sample page, you will get an error message and no offset will be calculated.
- Ensure that "Use regular expressions/Match text case" are left unchecked if necessary.
- Press "OK" to proceed.
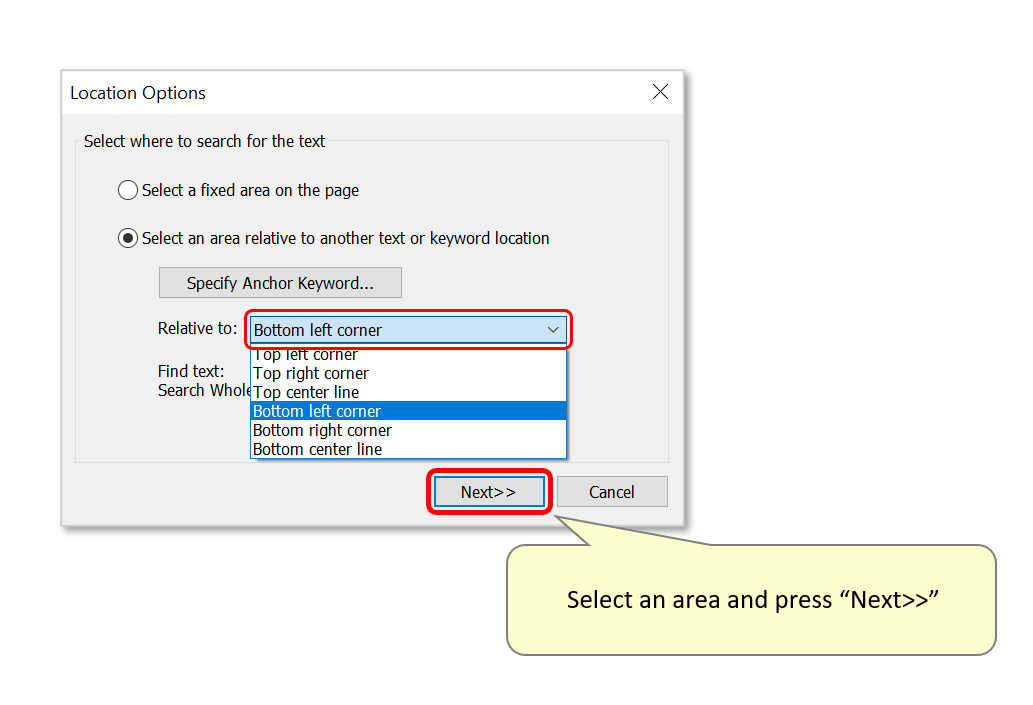
- Now select the area "Relative to:" the search text using the drop-down list. Here we will use "Bottom left corner". Press "Next>>" to proceed.
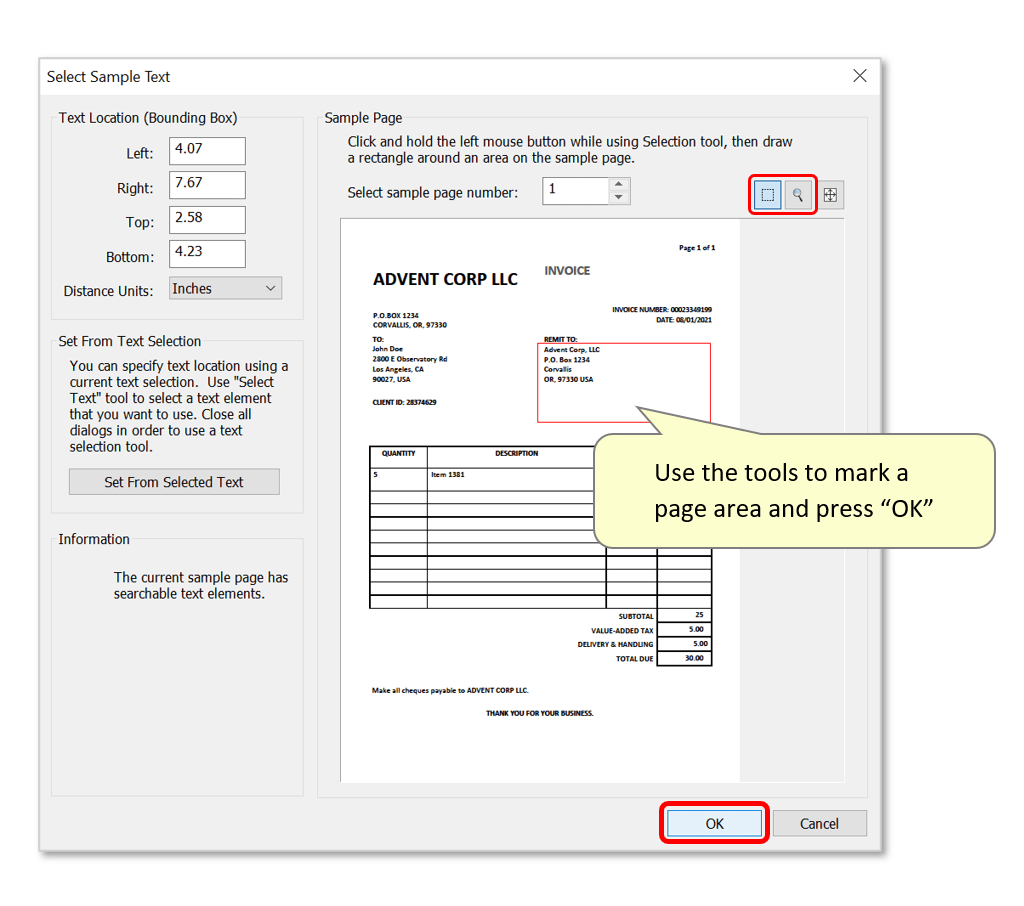
- Use the zoom/draw tools to mark an area on the sample page. Here we have drawn a large box around the “Remit to:” address lines - the software will find “Remit to:” on the sample page and compute a correct offset from the keyword to the area of interest. It will use this offset while processing input documents by searching for the “remit to:” keywords, then applying this pre-calculated offset to determine the text extraction area on the page.
- IMPORTANT: In PDF documents, there is not any ‘assumed’ text order. The order of page content depends on the way the PDF document was generated - words and sentences may appear in any order. This means it may not always be reliable/possible to use a plain text search to extract something like the “Remit to” address. For example in some PDF documents, the address may not actually “follow” the words 'Remit to:'.
- Press "OK" to proceed.
- Step 8 - Add More Fields
- Continue defining all the necessary fields for the extraction process.
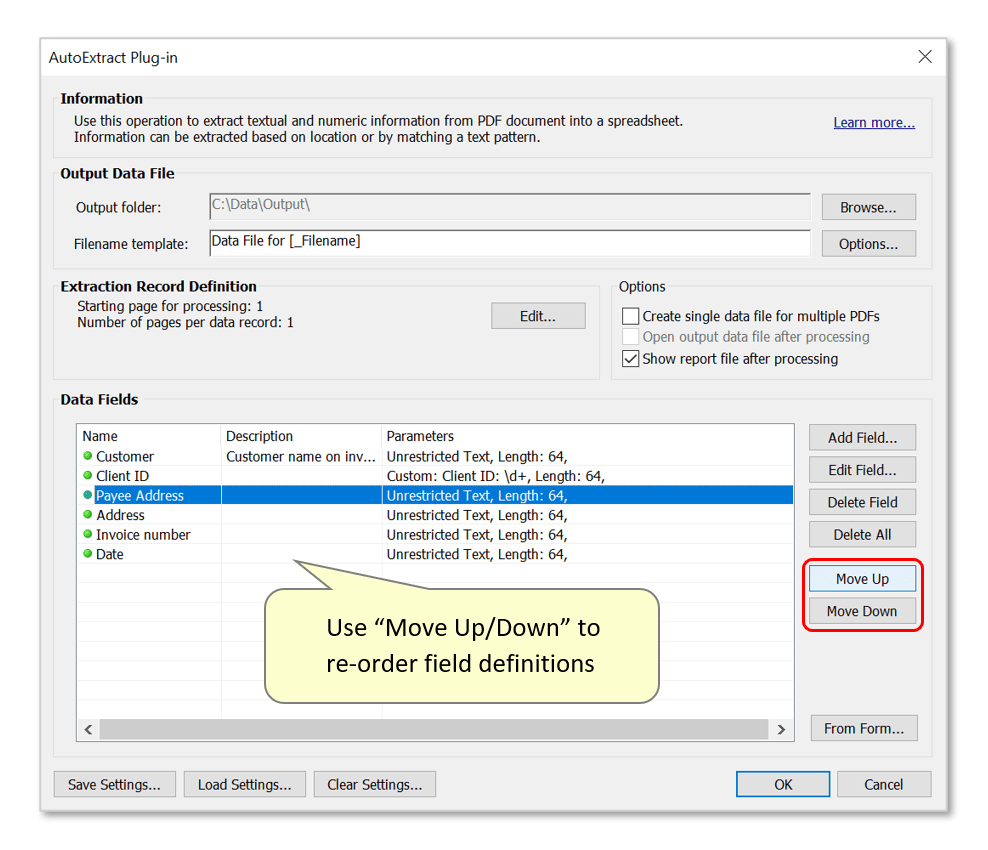
- Step 9 - Optional: Re-order Data Fields
- Once multiple data field definitions have been created, it's possible to adjust the order that they will be shown in in the output spreadsheet. Do this by selecting a data field in the list, and pressing the "Move Up/Down" buttons.
- Step 10 - Configure Output Options
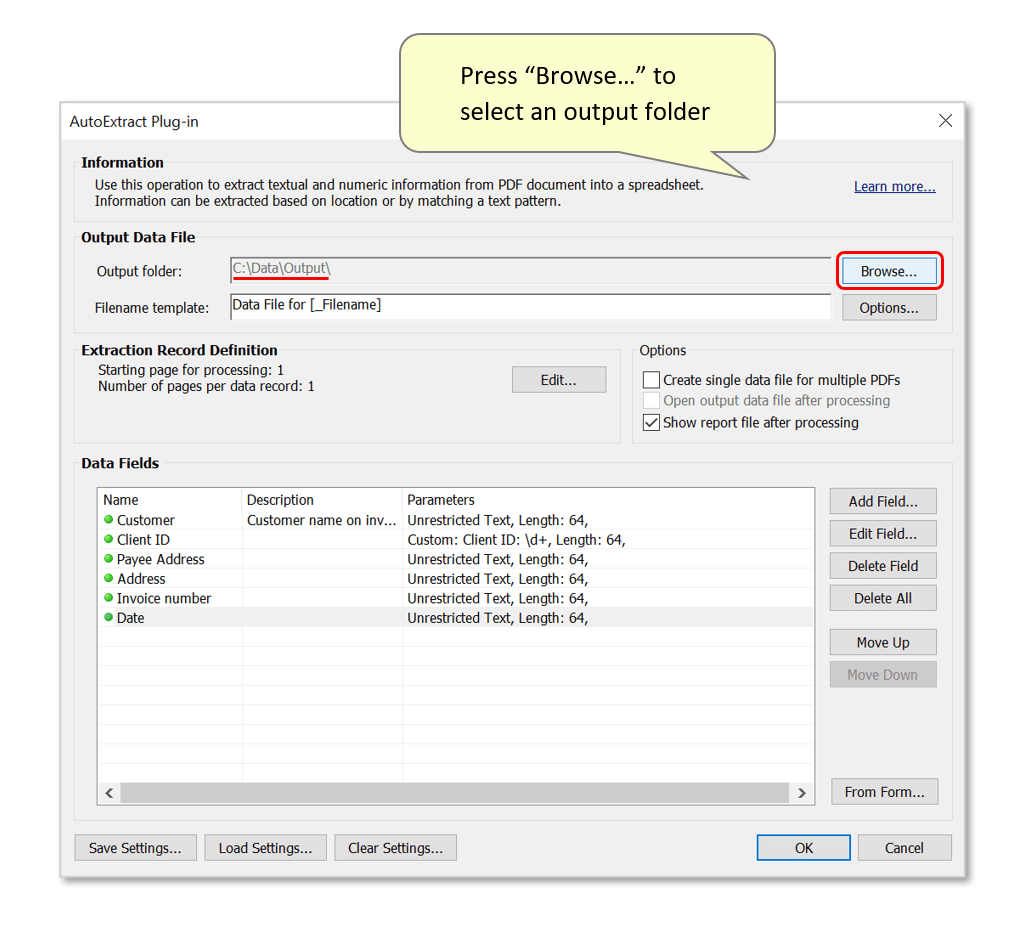
- Press "Browse..." to select a suitable output folder for spreadsheet data files to be saved in.
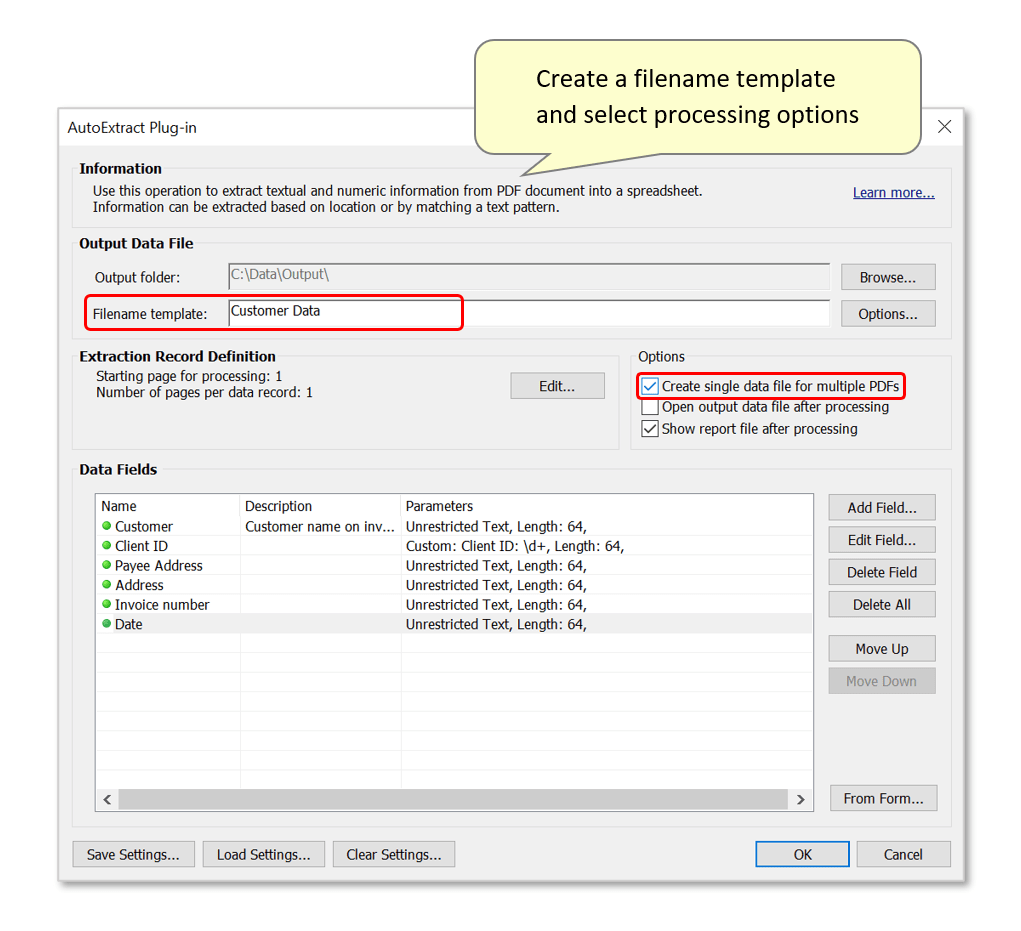
- Optionally customize the filenaming template for output files. Any text entered in the "Filename template:" box will be inserted into output filenames. Output data files can be named using extracted text by using [FieldName] syntax anywhere in the filename template. This refers to a corresponding data field added manually using the steps above - extracted text will be added to the filename.
- Alternatively, the "[_Filename]" keyword extracts the input filename and inserts it as a component of the output filename. The default template used here would create a "Data File for Ann M Johnson.csv" output filename format for each input PDF document used (see step 12 below).
- The plug-in can either create one output spreadsheet for each input PDF file, or extract the data from all input PDF files into a single spreadsheet. In this example, we will create one output spreadsheet by checking the "Create single data file for multiple PDFs" processing option. The spreadsheet will contain a series of records - one for each input invoice.
- Note that “[_Filename]” refers to the name of the input PDF file. If you are using the "Create single data file for multiple PDFs" option, the output file should be named appropriately to reflect its content. Change the filename template to something that suits the operation - this may include a relevant [Data Field] shared by all input documents, to produce an output filename that represents them collectively. Simple plain text may also be used - here the output file will be titled "Customer Data.csv"
- Step 11 - Confirm Extraction Settings
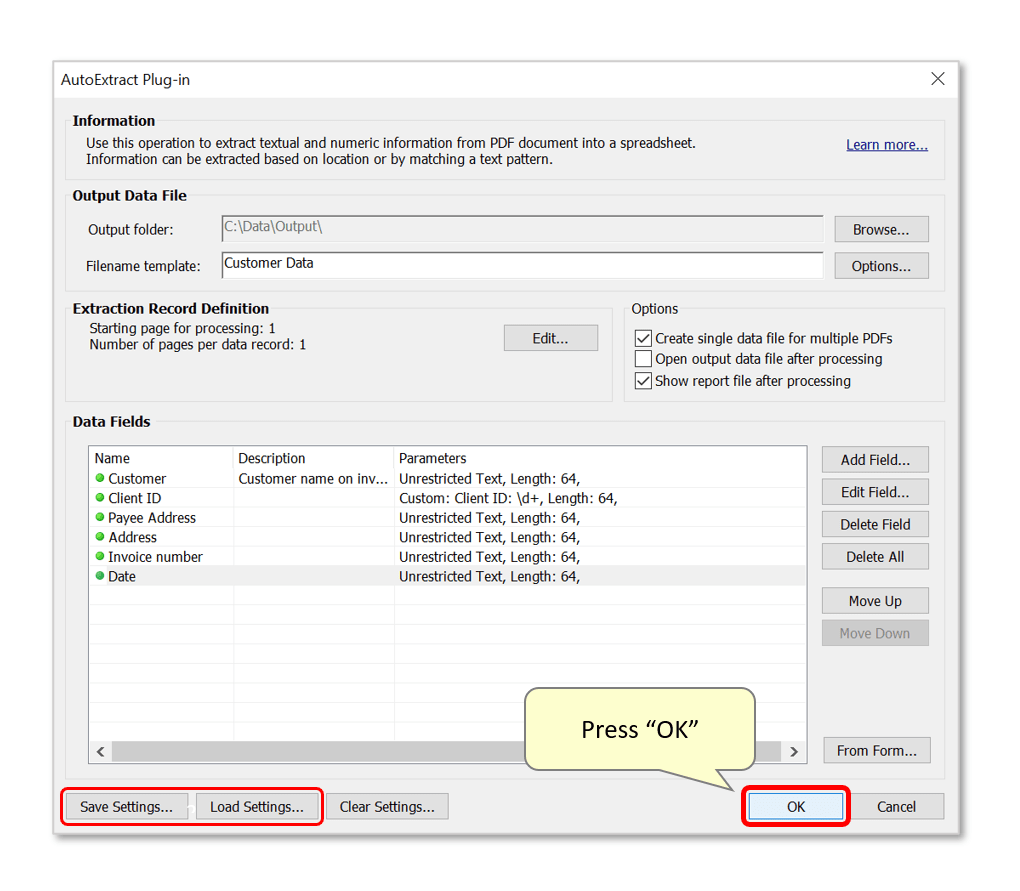
- Optionally use the "Save Settings..." button to save the current configuration as an AutoExtract Settings file. Settings will be saved with a *.zones file extension, and can be loaded by pressing "Load Settings...".
- Press "OK" to proceed.
- Step 12 - Add Files for Processing
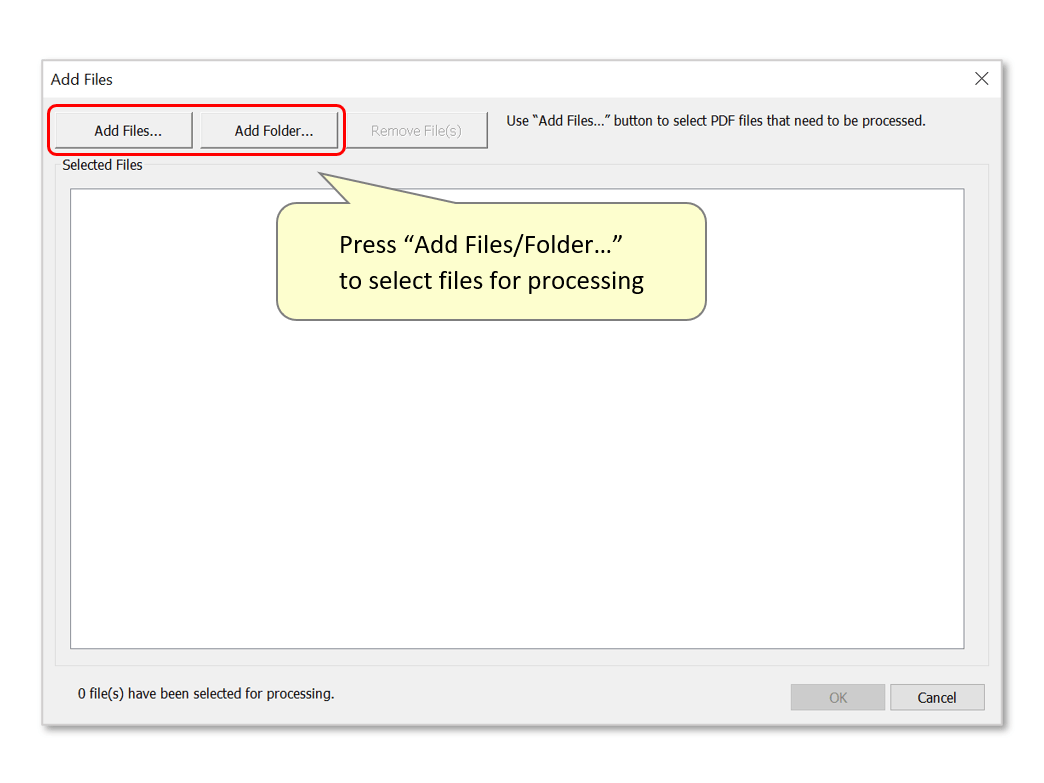
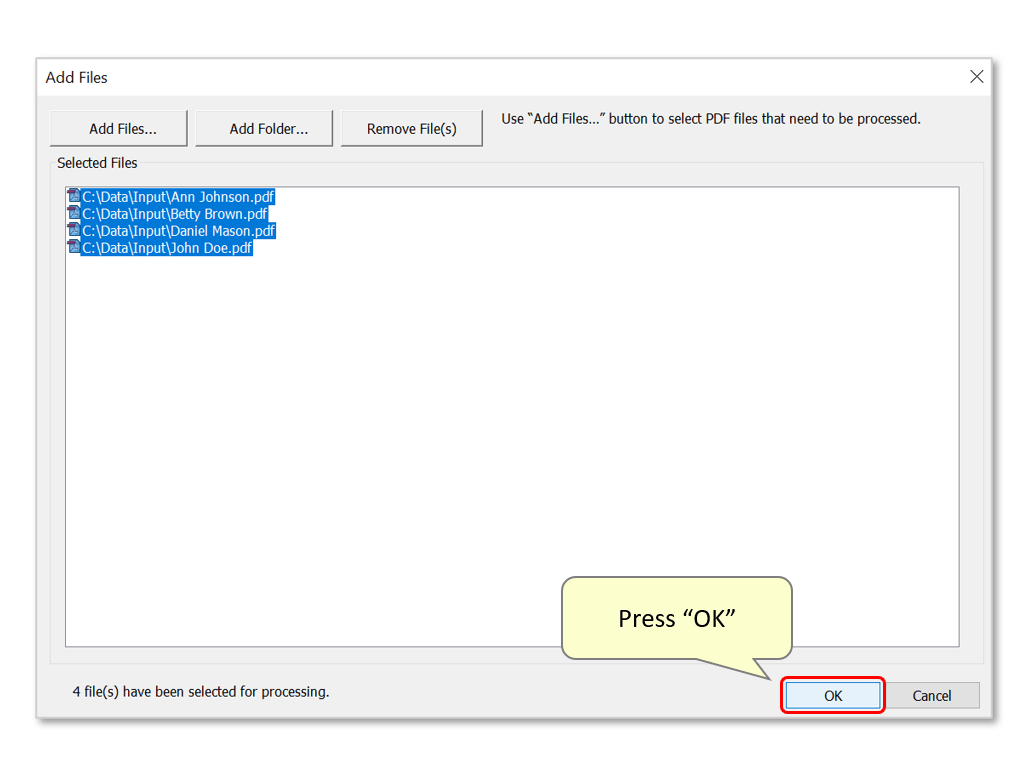
- Use the "Add Files..." button to choose files for processing. Alternatively, add an entire folder by pressing "Add Folder...".
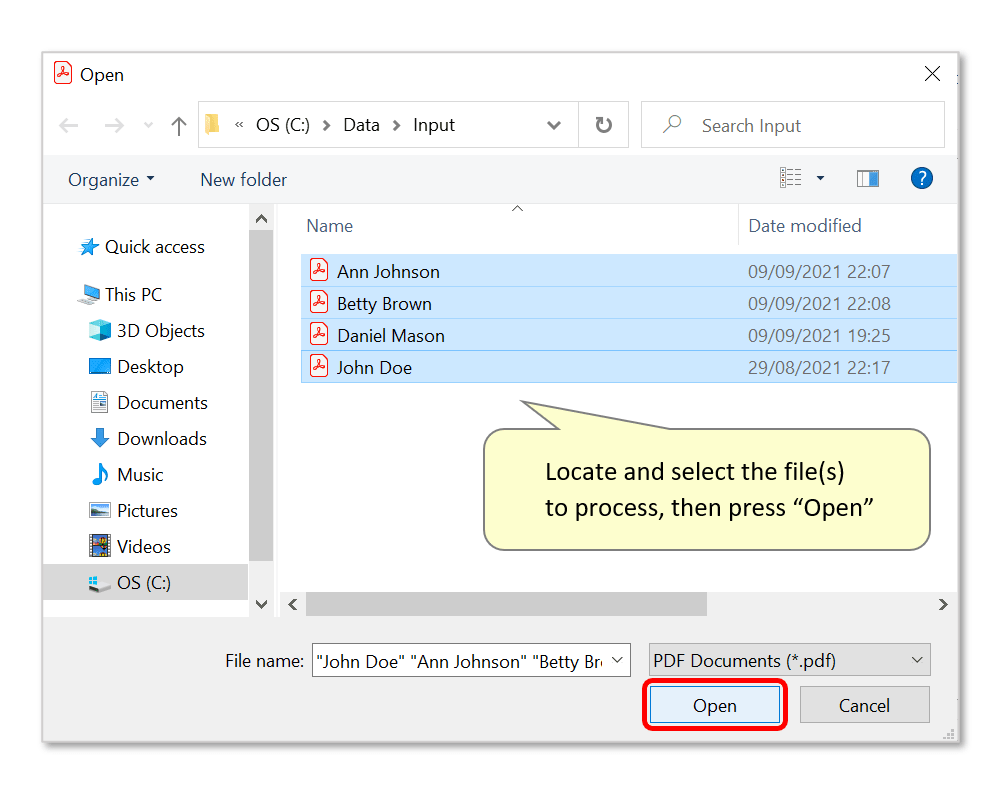
- Locate and select files for processing, then press "Open". In this example, we will extract data from multiple invoices. Note that it's possible to add files from various folders and process them at the same time by repeatedly using the "Add Files/Folder..." buttons.
- Press "OK" to extract the data records.
- Step 13 - Inspect the Results
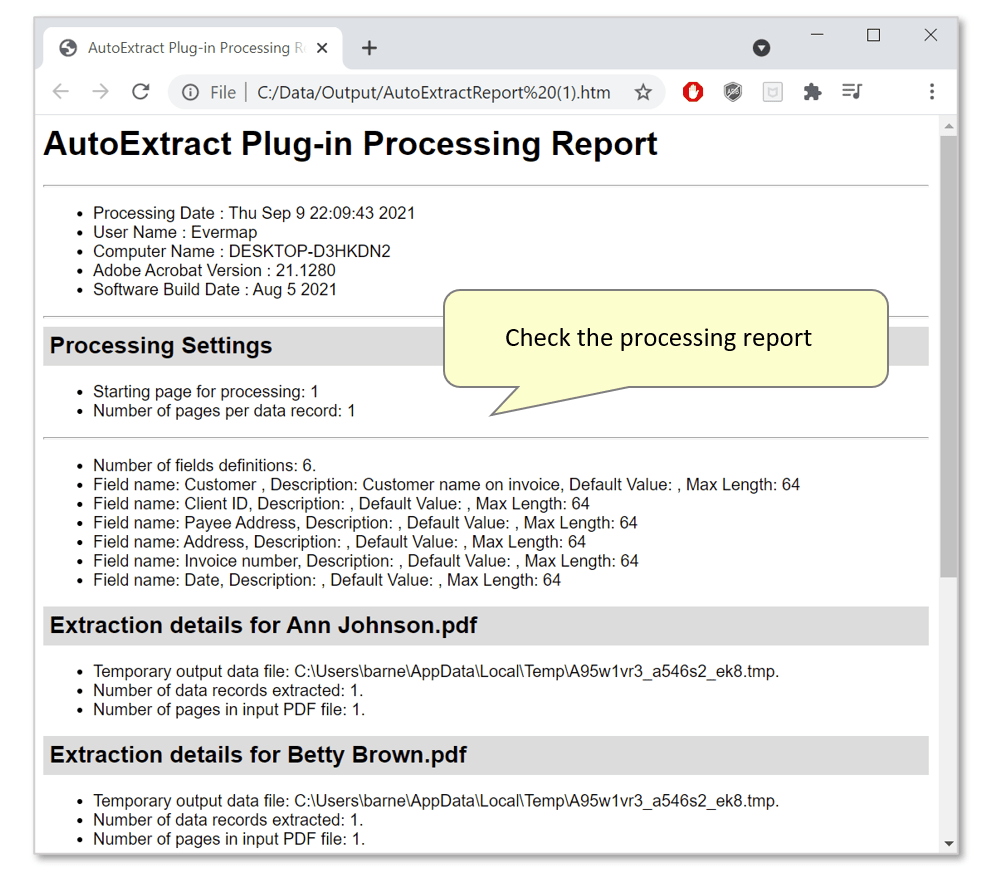
- A report box displays the number of spreadsheet records created. Press "OK" to close it, and open an auto-generated processing report in your default browser.

- Check the processing report.
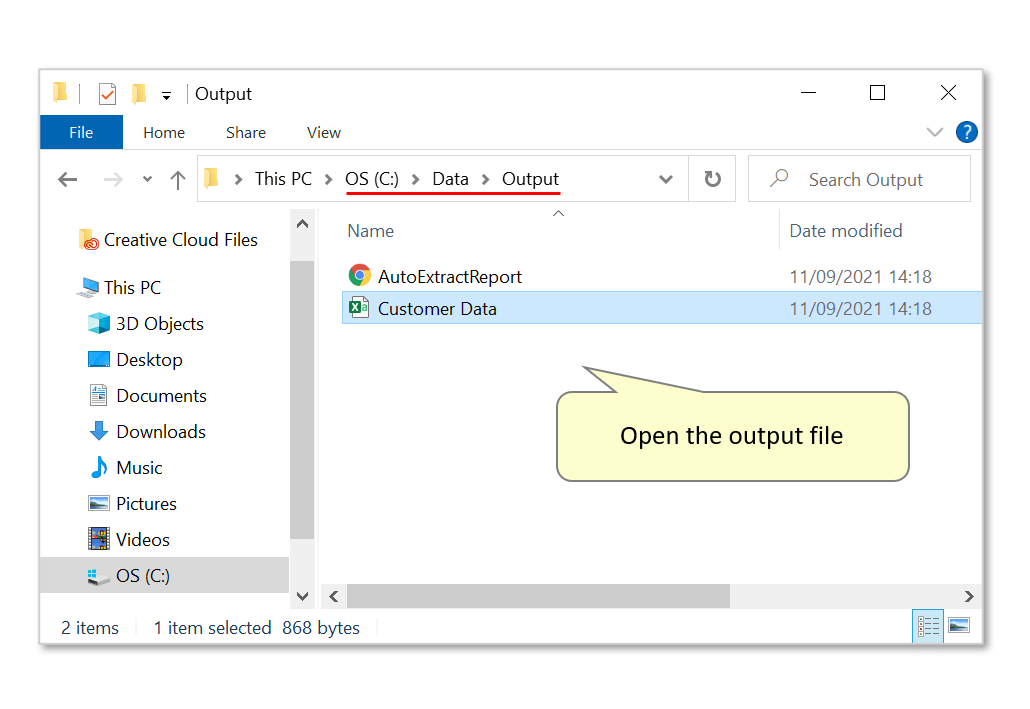
- Open the output folder chosen in step 4. The processing report will be saved here, as well as the output spreadsheet file. Open it to check its contents.
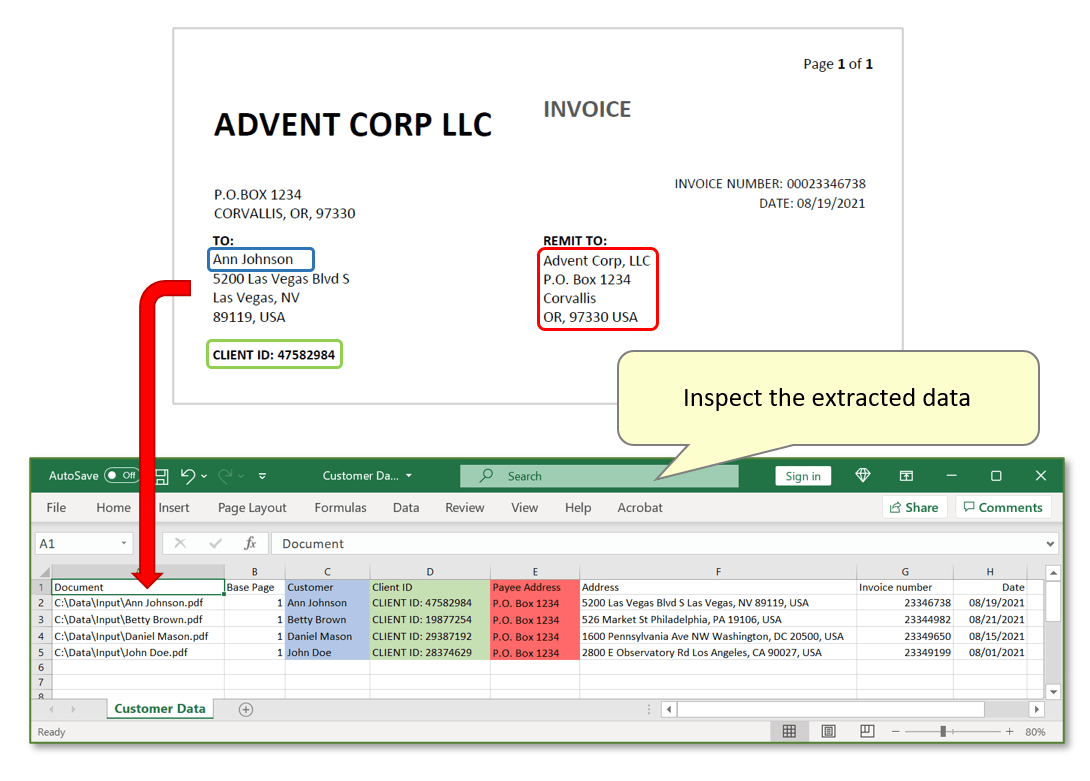
- Inspect the extracted data. Every row displays one record for each separate invoice, presented across various field headers corresponding to each manually added field (steps 1 - 5 highlighted in blue, step 6 in green, step 7 in red). Note that the data shown in the image below only shows single-line rows - expand each row's size as necessary to view all lines of extracted text.
- Click here for a list of all step-by-step tutorials available.